前端项目的开发过程中,开发者需要投入大量的时间、精力去进行基础代码的初始化; 在共建项目中,也会出现代码风格不统一的情况,维护成本提高; 前端为了实现UI效果统一,代码复用使用,我们将组件进行原子化、模块化封装,那么在自动化,智能化方向,我们还能做一些什么去实现前端提效呢? 基于简单的配置自动生成可用的业务逻辑代码呢? 在时间/统一性提效层面,总结了下面几种小方法,既能保证风格统一,又能避免“复制粘贴”,也能节省共建的小伙伴开发时间。
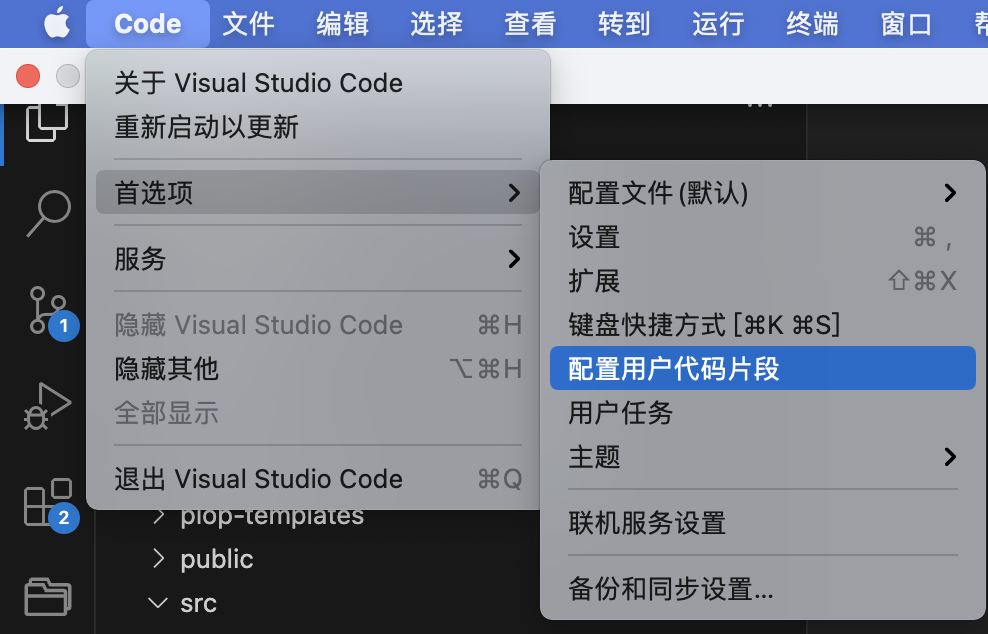
1、基于vsCode的自定义代码片段snippets,使用频率🌟🌟🌟🌟🌟, 几乎每天都会用到。
- 适用场景: 比较适合基础代码的构建,可以是页面,也可以是代码块;可以根据自己的个人使用习惯定义代码片段;
- vscode插件库也提供了vue2,vue3相关snippets插件,可以下载使用
{
    "Print to console": {
        "prefix": "list",
        "body": [
            "<template>",
            "  <div class='box-container'>\n",
            "  </div>",
            "</template>",
            "<script>",
            "export default {",
            "  components: {\n",
            "  },",
            "  mixins: [],",
            "  props: {\n",
            "  },",
            "  watch: {\n",
            "  },",
            "  data() {",
            "    return {\n",
            "    };",
            "  },",
            "  computed: {\n",
            "  },",
            "  created() {\n",
            "  },",
            "  mounted() {\n",
            "  },",
            "  methods: {\n",
            "  },",
            "};",
            "</script>\n",
            "<style scoped lang=\"${1:scss}\">\n",
            "</style>\n",
        ],
        "description": "Create vue list"
  }
}
根据Snippets语法 编写代码段:
- 辑器prefix: 代码片段名字,即输入此名字就可以调用代码片段
- body: 这个是代码段的主体.需要编写的代码放在这里
- $1: 生成代码后光标的初始位置, $2: 生成代码后光标的第二个位置,按 tab 键可进行快速切换,还可以有 $3,$4,$5..... ${1,字符}: 生成代码后光标的初始位置(其中 1 表示光标开始的序号,字符表示生成代码后光标会直接选中字符)
- description: 代码段描述,输入名字后编显示的提示信息
- tab键制表符:\t
- 换行: \r 或者\n2
2、基于plop插件,实现基础代码的批量生成,使用频率🌟🌟, 初始化新功能代码必用。
适用范围:功能性大模块创建,定义基础页面格式后,支持文件批量创建
plop插件使用
- 安装plop插件: npm install -–save-dev plop
- 根目录下新建文件plopfile.js
- 在项目根目录下创建plop-templates 文件夹,并在plop-templates/view 里新建一个index.hbs/index.vue等模版文件
- 最后一步: .gitignore中增加文件, 防止被提交到远程
hbs配置相关:
模板文件中所使用到的参数是由plopfiles.js内的actions数组对象的data传入的;可定义function进行处理后赋值给自定义参数并传入模板中。
- prompts 用户输入:
- input:输入
- list:选择,choices数组提供选项
- confirm:回答y/n
- actions 参数type,有4种:
- add:根据模板生成文件
- addMany: 可以看成add的多个版本
- modify :根据模板修改根据正则替换存在的文件或地方
- append:将模板或者字符串根据正则添加到符合正则的地方
plopfile.js的基础配置如下,其中plop-templates是自定义业务模版,下面会详细解释;
// eslint-disable-next-line func-names
module.exports = function (plop) {
  plop.setGenerator('generator', {
      description: '创建列表模板',      // 这里是对这个plop的功能描述
      prompts: [{
        type: 'input', // select
        message: '请输入模块名称如system(可省略)',
        name: 'modeName',
        default: '',
      }, {
        type: 'input',
        name: 'apiName',
        message: '接口和存储的名称',
      },
        {
          type: 'confirm',
          name: 'hasCreate',
          message: '是否需要创建页面',
          default: this.hasCreate,
      }],
      actions: (data) => {
        const { hasCreate } = data;
        const routePath = "{{modeName}}";
        console.log(hasCreate, 'dsdsdsdsd');
        const actions = [{
            type: 'add',
            path: 'src/pages/{{modeName}}/list.vue',
            templateFile: 'plop-templates/list/list.hbs', // 模板文件
        }, {
            type: 'add',
            path: 'src/pages/{{modeName}}/components/config.js', // 文件存放路径
            templateFile: 'plop-templates/list/components/config.js', // 模板文件
        }, {
            type: 'add',
            path: 'src/pages/{{modeName}}/components/mixins.vue', // 文件存放路径
            templateFile: 'plop-templates/list/components/mixins.js', // api
        }, {
          // 配置路由文件
          type: 'modify',
          path: 'src/router/index.js',
          pattern: /\/\/ generator import/,
          template: "import {{modeName}} from './modules/{{modeName}}';\n// generator import",  //增加标记,下次填充的时候匹配到这个关键字部分
        }, {
          // 配置路由文件
          type: 'modify',
          path: 'src/router/index.js',
          pattern: /\/\/ generator router/,
          template: `{\n...{{modeName}},\n},\n// generator router`,
      }, {
          type: 'add',
          path: 'src/router/modules/{{apiName}}.js', // 文件存放路径
          templateFile: 'plop-templates/list/route.js', // api
      }, {
            type: 'add',
            path: 'src/api/{{apiName}}.js', // 文件存放路径
            templateFile: 'plop-templates/api/demo.js', // 文件夹下的modules.ts
        }, {
          type: 'add',
          path: 'src/store/modules/{{apiName}}/index.js', // 文件存放路径
          templateFile: 'plop-templates/store/index.js', // 文件夹下的modules.ts
      }, {
        type: 'add',
        path: 'src/store/modules/{{apiName}}/db.json', // 文件存放路径
        templateFile: 'plop-templates/store/db.json', // 文件夹下的modules.ts
    }];
      if (hasCreate) {
        actions.push({
          type: 'add',
          path: 'src/pages/{{modeName}}/create.vue', // 文件存放路径
          templateFile: 'plop-templates/list/create.vue', // 模板文件
        });
      }
      return actions;
    },
  });
};
*******⌛️⌛️⌛️具体使用案例下面会演示哦😊*****
3、基于json-server,基于简单的字段配置,自动生成增删改查详情5个接口,使用频率🌟🌟🌟。
适用范围: 于前端开发节奏快于后端的情况,可实现接口mock, 减少前端对后端的依赖。当然集团内也有很多mock接口的工具可供使用,这里不做赘述😊;
网站地址:接口自动生成器
json-server插件使用
- 安装json-server插件: npm install -g json-server
- 创建db.json文件,在文件中写入想要构造的接口
- 运行json-server --watch db.json
- 注意是在同db.json目录下哦
- 支持修改port, json-server --watch db.json --port 8887
生成的接口简述:
- 获取全部数据: 【GET】http://localhost:3000/posts
- 用_gte,_lte来设置一个字段的取值范围。包含开头和结尾: http://localhost:3000/posts?id_gte=1&id_lte=12;
- 用_ne来设置不包含某个值:http://localhost:3000/articles?id_ne=1&id_ne=2
- _start来指定开始位置,_end来指定结束位置,或者是用_limit来指定从开始位置起往后取几个数据。不包含_start,包含_end: http://localhost:3000/articles?_start=2&_end=5
- 用_like来设置模糊匹配某个字段: http://localhost:3000/articles?id_like=3
- 用q来设置全文搜索: http://localhost:3000/articles?q=maxime
- 分页采用 _page 来设置页码, _limit 来控制每页显示条数。如果没有指定 _limit ,默认每页10条:http://localhost:3000/articles?_page=2&_limit=3
- _sort指定要排序的字段,_order指定正序还是逆序(asc | desc ,默认是asc): http://localhost:3000/articles?_sort=id&_order=desc
- 获取数据详情:【GET】http://localhost:3000/posts/${id} 或者http://localhost:3000/posts?id=${id}&name=${name}
- 添加数据:【POST】http://localhost:3000/posts
- 更新数据:【PUT】http://localhost:3000/posts
- 删除数据:【DELETE】http://localhost:3000/posts
{
  "posts": [
    { "id": 1, "title": "json-server", "author": "swj8" }
  ],
  "comments": [
    { "id": 1, "body": "some comment", "postId": 1 }
  ],
  "profile": { "name": "typicode" }
}
*******⌛️⌛️⌛️, 再等等,具体使用案例下面会演示哦😊*****
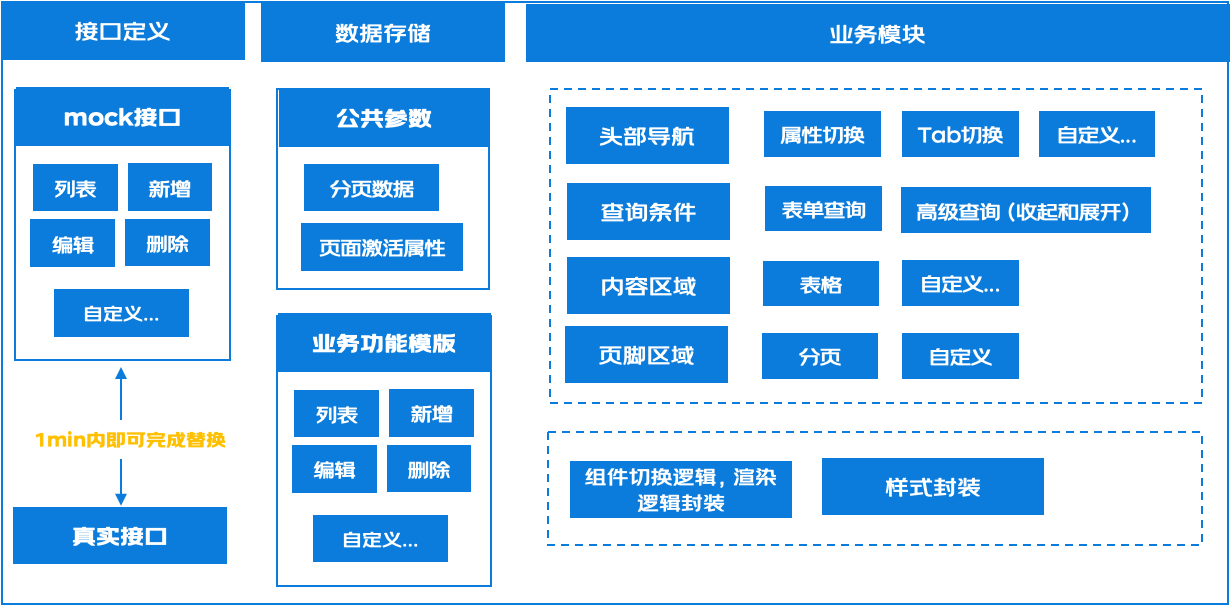
4、基于页面基础元素封装业务模版,使用频率🌟🌟🌟🌟🌟, 不是在新建,就是在维护的路上;
背景: 目前项目展示数据以表格居多,页面效果相似度较高,考虑将切换逻辑,查询逻辑,页面渲染,接口请求等进行封装。
优势:
- 开发只需要关注字段的定义和接口地址即可,剩下的部分均可实现一键生成。
- 跨团队共建中,由于该模型可低成本形成可用页面,开发接受度强,愿意去使用,这样实现了代码风格的统一;
- 实际使用结果: 穹体、行云测试管理(部分)、数测、物料等多个平台均采用该业务模型完成开发,最大限度上减少了冗余代码的产生;
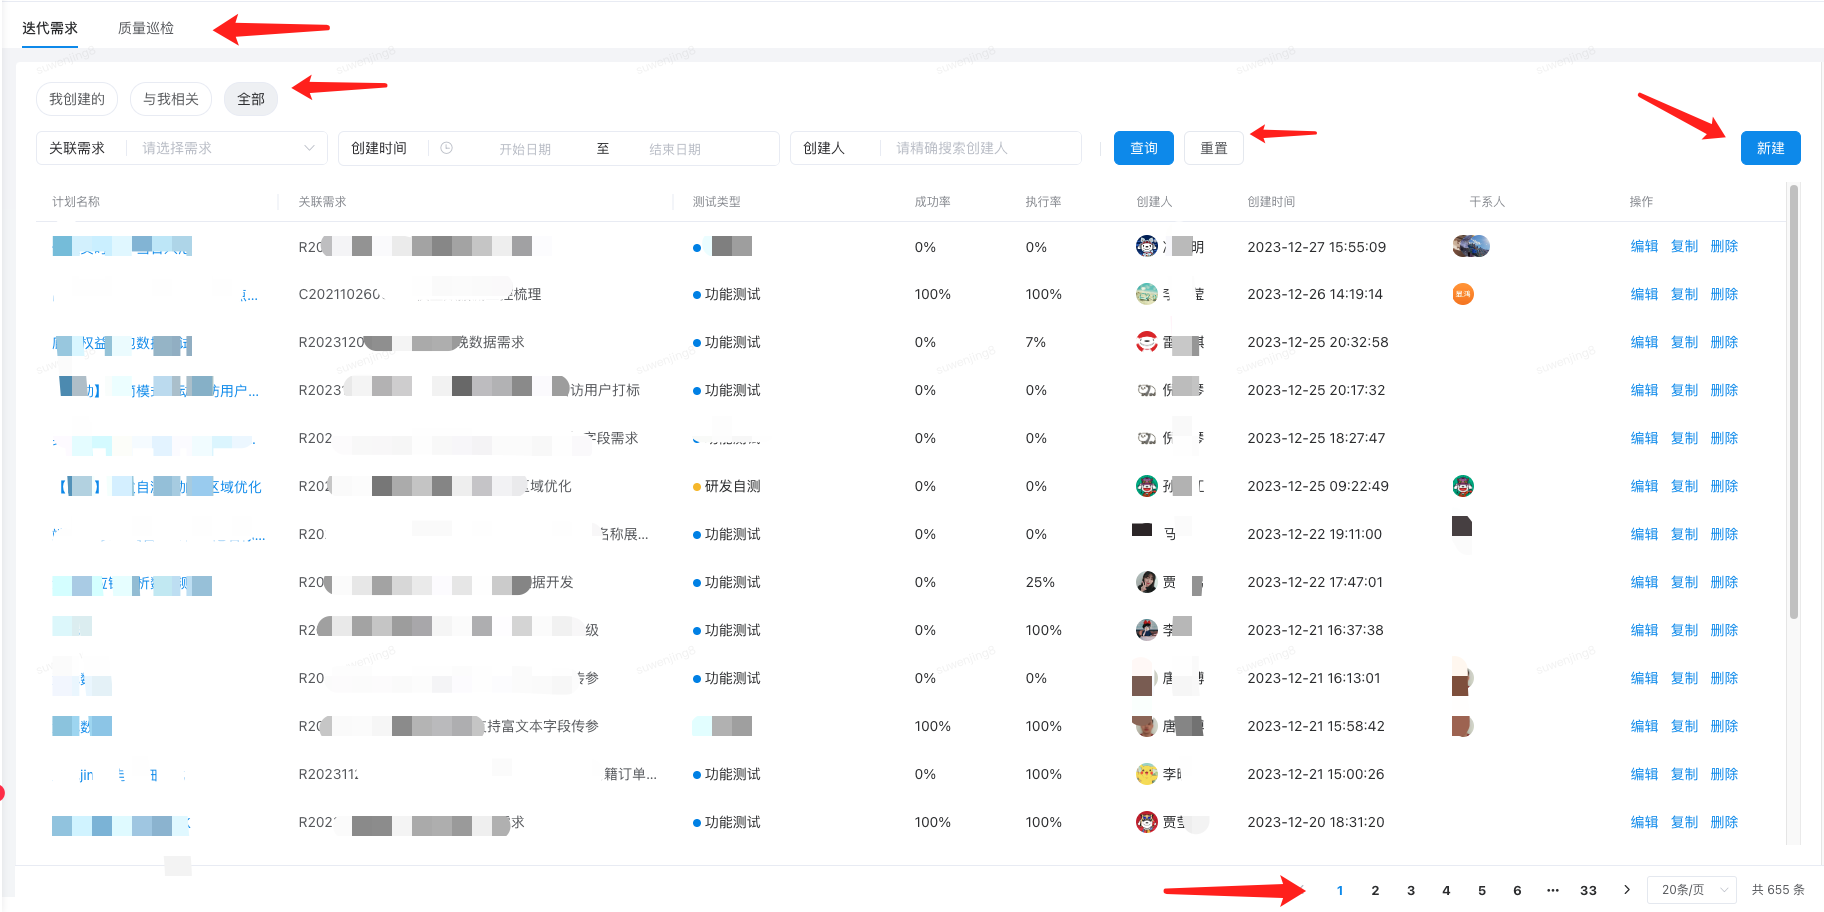
设计结构图如下, 比较粗糙,关于字段定义渲染页面的配置可以简单看下,业务逻辑相关代码就不做展示了。
import {formatArrayToObj} from '@/utils/index.js';

const permissionOptions =  [
  {label: '公有', value: 'PUBLIC', default: '', type: 'primary'},
  {label: '私有', value: 'PRIVATE', default: '', type: 'warning'},
];

const permissionOptionsObj = formatArrayToObj(permissionOptions, 'value');

const searchFormJson = {
  title: '列表的查询条件',
  tabs: [{label: '我创建的', value: 'creator'}, {label: '全部', value: 'all'}],
  elements: {
    name: {
      label: '数据名称',
      component: 'el-input',
      default: '',
      attrs: {
        style: {
          width: '200px',
        },
      },
    },
    auth: {
      label: '权限范围',
      component: 'pul-select',
      default: '',
      attrs: {
        options: permissionOptions,
        style: {
          width: '200px',
        },
      },
    },
    creator: {
      label: '创建人',
      component: 'pul-erp',
      default: {},
      hidden: true,
      attrs: {
        placeholder: '请精确搜索创建人',
        style: {
          width: '200px',
        },
      },
    },
  },
  formAttrs: {
    labelWidth: '90px',
    labelWidthBorder: false,
    inline: true,
    class: 'fold-form-item',
  },
  feature: {
    hasSearchBtn: true,
  },
};

const createDataForm = {
  title: '创建数据',
  elements: {
    name: {
      label: '数据名称',
      // required: true,
      component: 'el-input',
      default: '',
      rule: [
        { required: true, message: '请输入数据名称', trigger: 'change' }],
      attrs: {
        placeholder: '请输入英文、数字、下划线',
        maxlength: "30",
        'show-word-limit': true,
      },
    },
    desc: {
      label: '数据描述',
      component: 'el-input',
      default: '',
      attrs: {
        type: "textarea",
        autosize: { minRows: 2, maxRows: 4},
      },
    },
    auth: {
      label: '权限范围',
      labelDesc: '若生效范围为私有,则仅用户自己可以查看使用;若生效范围为公有,则其他用户也可查看和引用',
      component: 'pul-select',
      required: true,
      default: 'PUBLIC',
      attrs: {
        options: permissionOptions,
        style: {
          display: 'inline-block',
          width: '100%',
        },
      },
    },
  },
  formAttrs: {
    labelWidth: '120px',
    labelWidthBorder: false,
    inline: true,
    'label-position': 'right',
    class: 'fold-form-item',
  },
  feature: {
    hasSearchBtn: false,
  },
};

export {
  permissionOptionsObj,
  searchFormJson,
  createDataForm,
};
5、基于plop,json-server,业务模型,实现10s生成上述页面.

6、基于低代码设计模式,结合后端存储,0代码实现页面搭建;
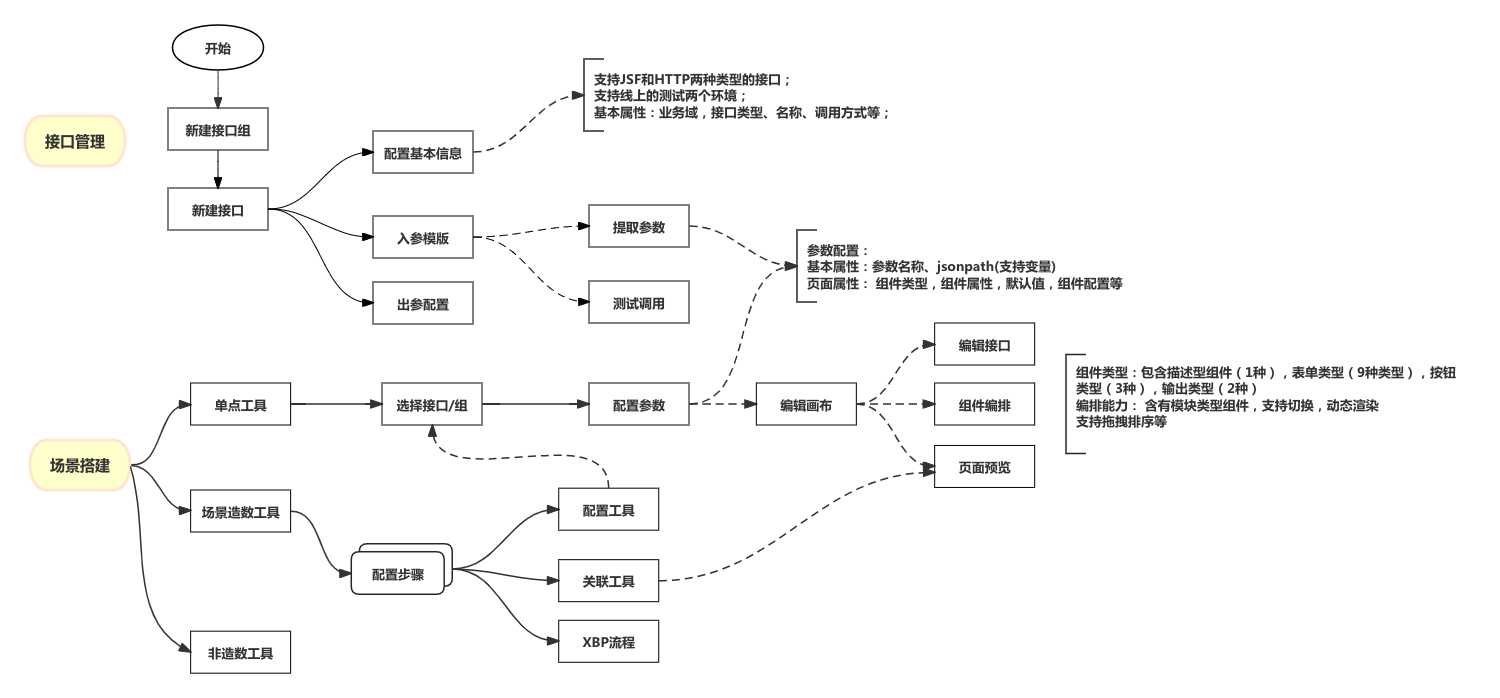
背景:融合4个物料平台的已有能力,为集团用户提供测试物料生产、查询、配置的统一入口; 对于物料提供方,提供配置化的场景工具构造能力,降低物料工具的维护成本,一直想尝试的低代码平台实现0代码搭建,终于有了机会~
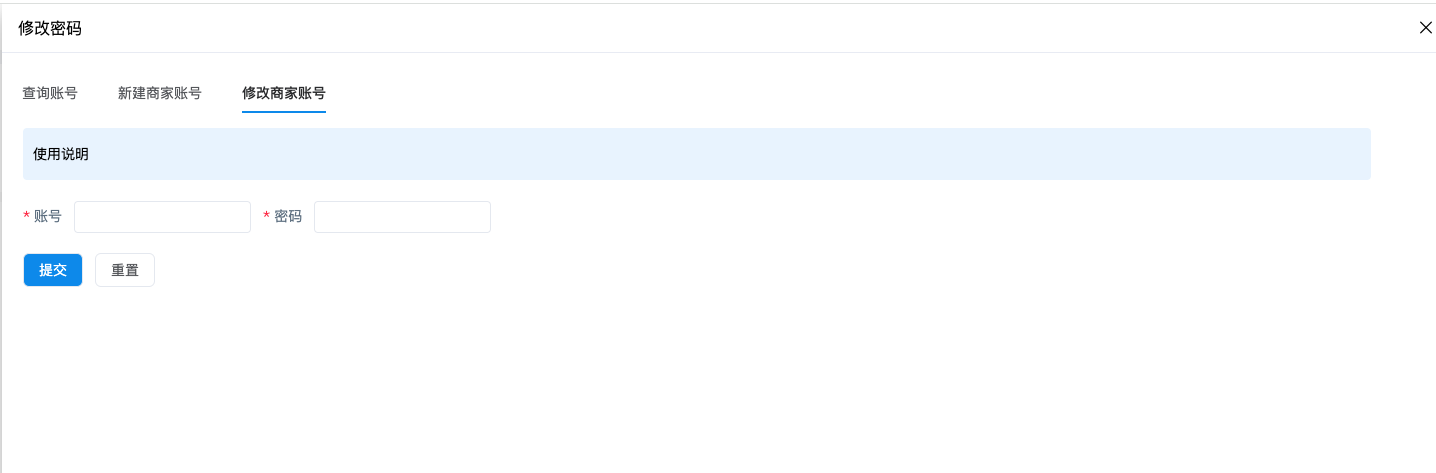
业务场景梳理: 接口配置后,经过参数配置,组件的关联,自动生成页面;
简单流程图可以看下,后期在编排能力上和UI视觉效果上会持续优化。
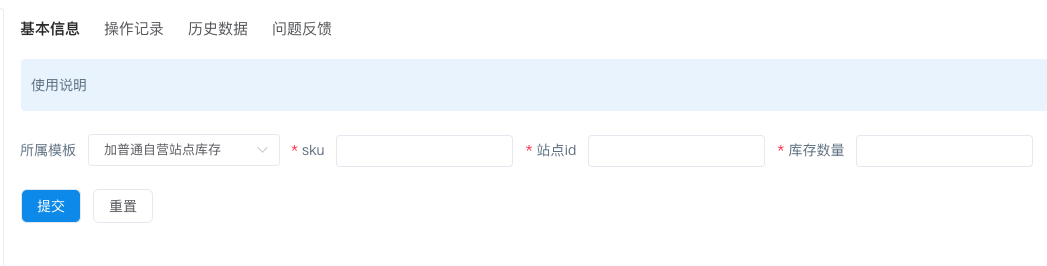
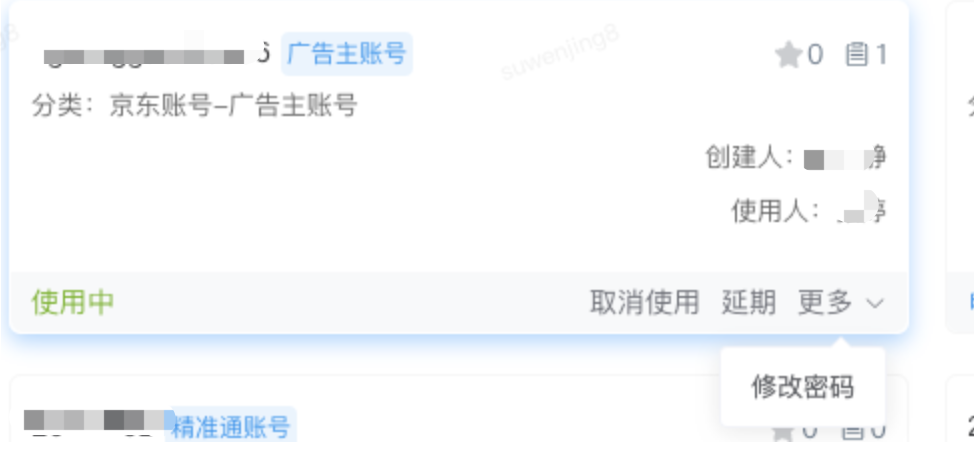
编排基础页面展示:
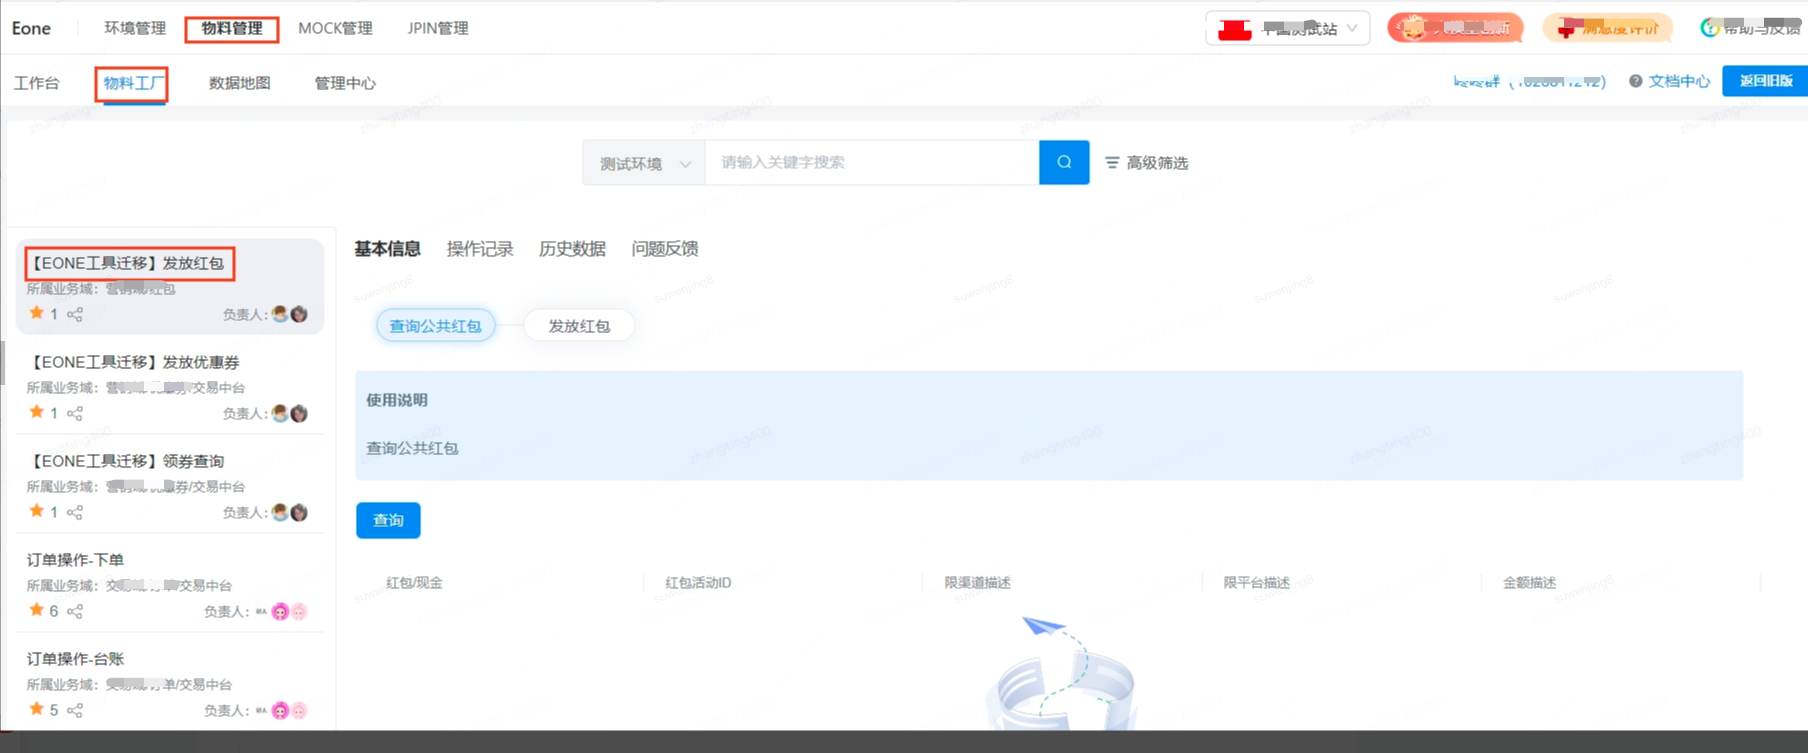
除了编排和执行,我们还提供了操作记录查询、工具生成的历史数据查询; 整个的数据结构也都是复用编排的数据结构。

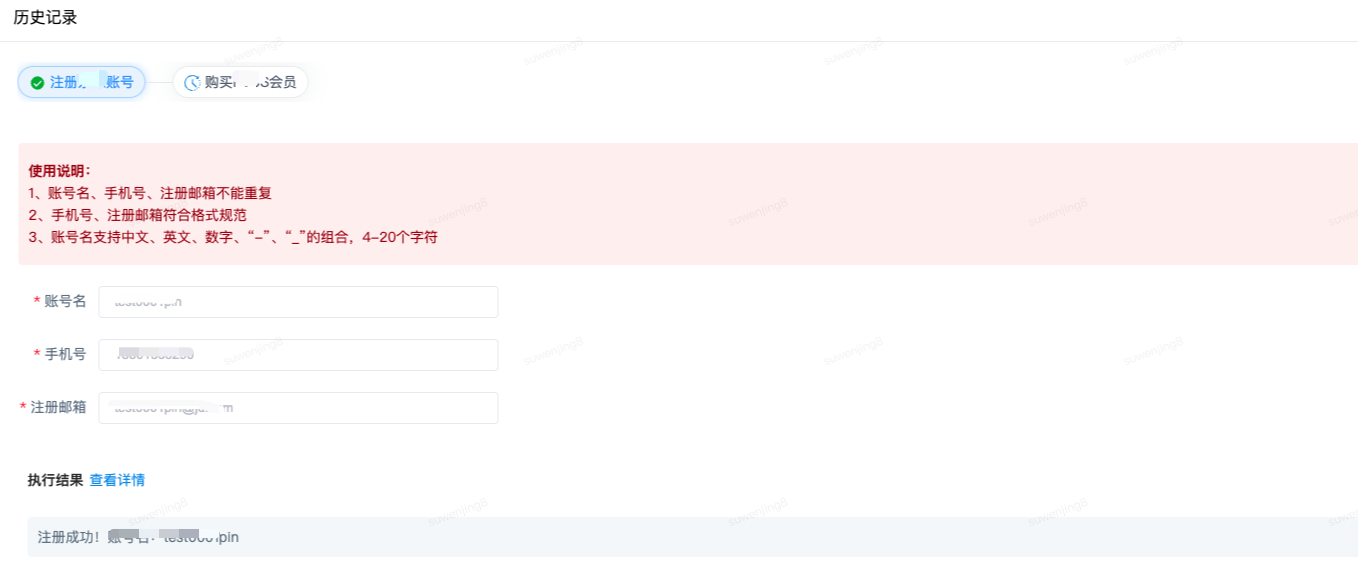
下面基础数据结构,隐藏掉部分关键点,如有兴趣可以去物料平台适用。
{
    "code": 200,
    "data": {
        "activeTabId": 0,  //展开即可定位到当前激活的tab
        "description": "注册京东账号",
        "environment": "test",
        "tabInfos": [
            {
                "allBlocks": [
                    {
                        "blockId": 1226,
                        "blockModules": [
                            {
                                "chosenTemplateId": 0,
                                "interfaceId": 0,
                                "modules": [
                                    {
                                        "approveConfig": null,
                                        "associateInfo": null,  //接口信息
                                        "paramConfig": {
                                            "max": 0,
                                            "min": 0,
                                            ...组件参数配置
                                        },
                                        "paramInfos": [],
                                        "required": false,
                                        "stepValue": "",
                                        "styleProperties": { //组件样式信息
                                            "background": "#fef0f0",
                                            "customRow": 4
                                        },
                                        "tabId": 115,
                                        "templateIds": [],
                                        "toolId": 11,
                                        "type": 7,
                                        "typeName": "使用说明",
                                        "updateTime": 1698924413000
                                    }
                                ],
                                "styleProperties": null,
                                "templateSelectId": 0,
                                "templateSelectName": "",
                                "templateSelects":  [  //支持模版绑定切换组件
                                    {
                                        "moduleIds": [
                                            {
                                                "defaultValue": "test0001pin",
                                                "id": 1230
                                            },
                                            {
                                                "defaultValue": "18801333290",
                                                "id": 1877
                                            },
                                            {
                                                "defaultValue": "test0001pin@jd.com",
                                                "id": 1232
                                            }
                                        ],
                                        "templateId": 44,
                                        "templateName": "普通账号"
                                    }
                                ]
                            }
                        ],
                        "category": "desc",
                        "styleProperties": {
                            "formLabelWidth": "auto",
                            "formCompWidth": "auto",
                            "formItemWidth": "100%"
                        }
                    },

                ],
                "createTime": 1698924413000,
                "description": "",
                "groupId": 16,
                "groupName": "xx",
                "id": 115,
                "modifier": null,
                "name": "xx",
                "sequence": 1,
                "status": 3,
                "statusName": "成功",
                "toolId": 11,
                "updateTime": 1698924413000
            }
        ],
        "toolId": 11,
        "toolName": "xx"
    },
    "message": "查询成功"
}
上述代码配置,只适用于测试物料生成吗? 并非如此,目前物料平台关于按钮级别的操作,后端直接下发工具,前端已经无需参与开发了;后期规划: 后期考虑将前端渲染逻辑进一步封装为插件,类似的功能就可以实现跨平台复用。
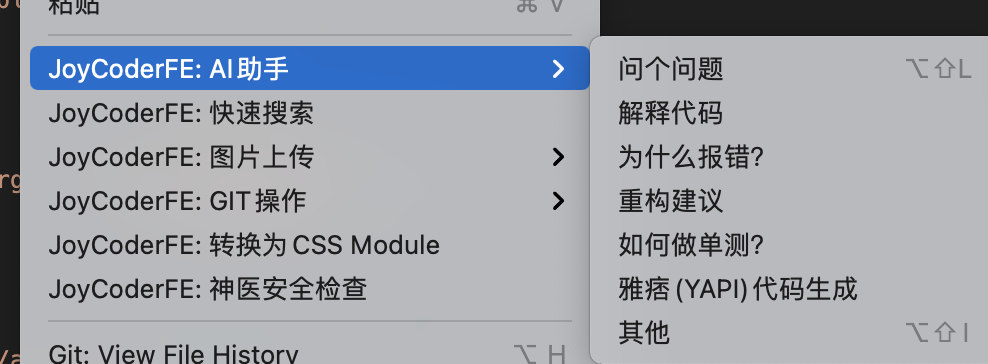
7、JoyCode插件使用,支持代码自动补全,图片转代码,需求和任务信息,代码评审等;
链接:JoyCoder插件、JoyCoder-AI助力,快乐编程
Q3发布了VScode版本,对图片上传,代码注释、知识问答、人机对话等功能进行了实践,整体还是非常惊喜,细节探索还在持续,希望工具越来越好~