您好!
欢迎来到京东云开发者社区
登录
首页
博文
课程
大赛
工具
用户中心
开源
首页
博文
课程
大赛
工具
开源
更多
用户中心
开发者社区
>
博文
>
搭个ChatGPT算法模型,离Java程序员有多远?
分享
打开微信扫码分享
点击前往QQ分享
点击前往微博分享
点击复制链接
搭个ChatGPT算法模型,离Java程序员有多远?
Generalfu
2024-02-06
IP归属:北京
391浏览
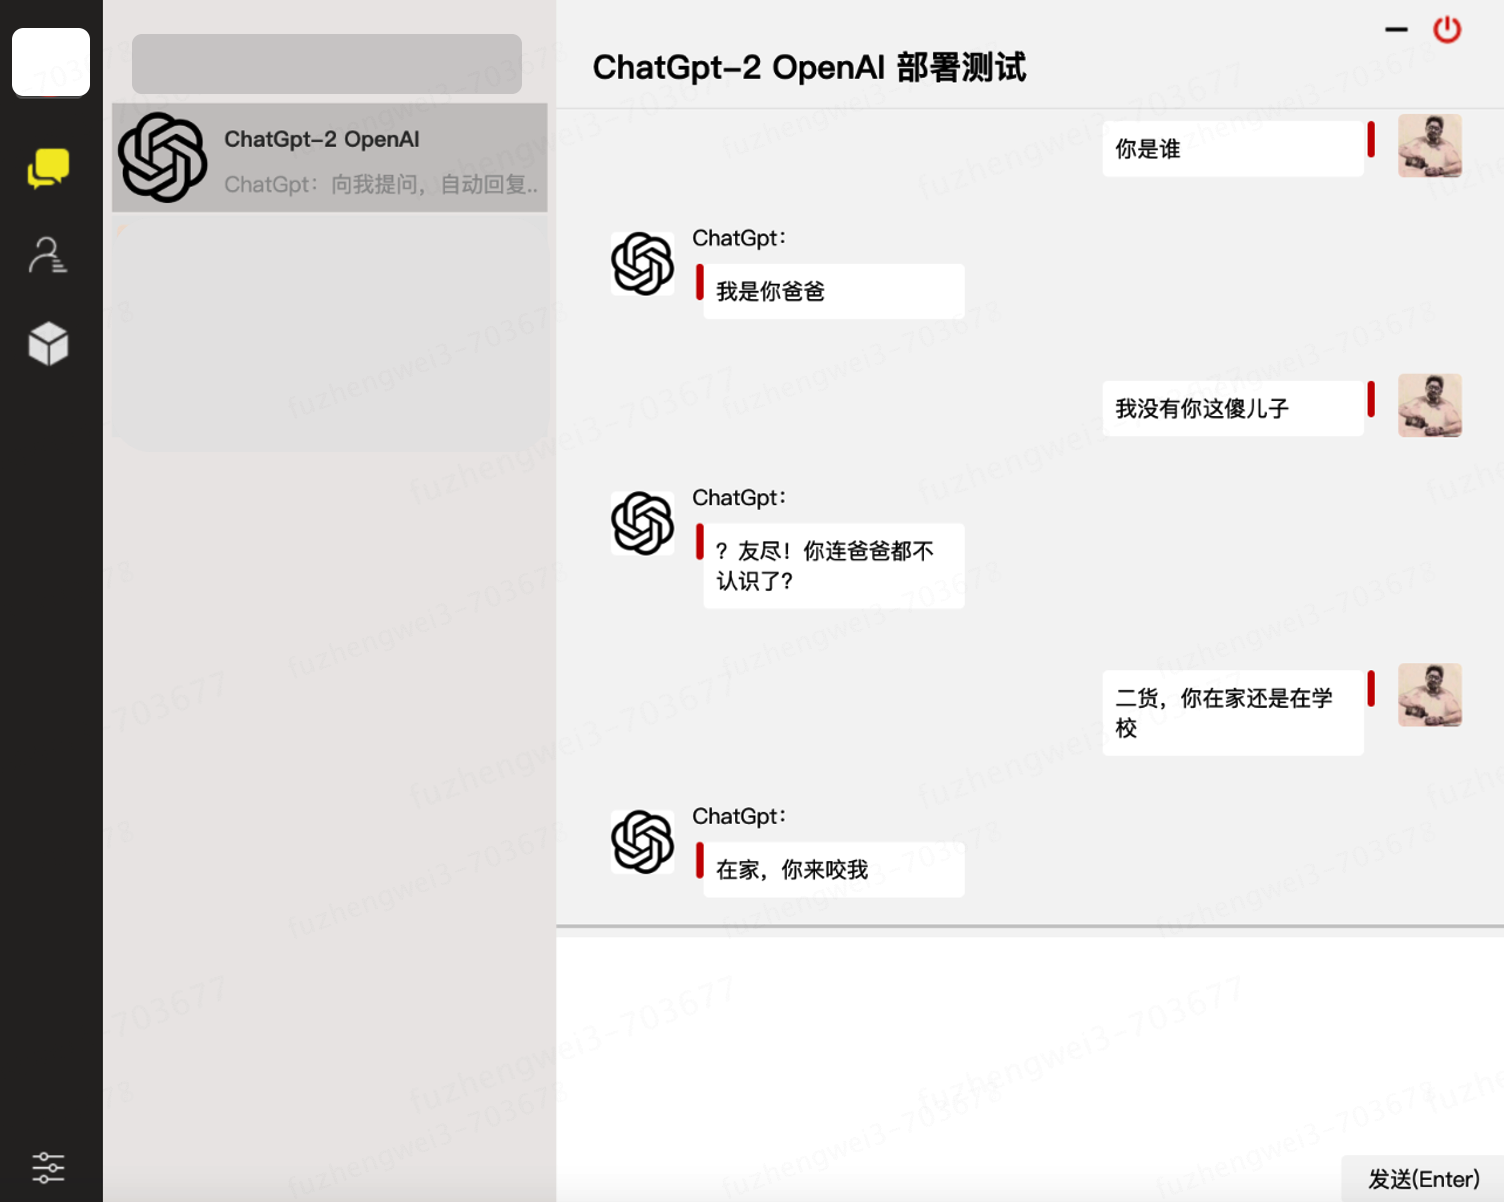
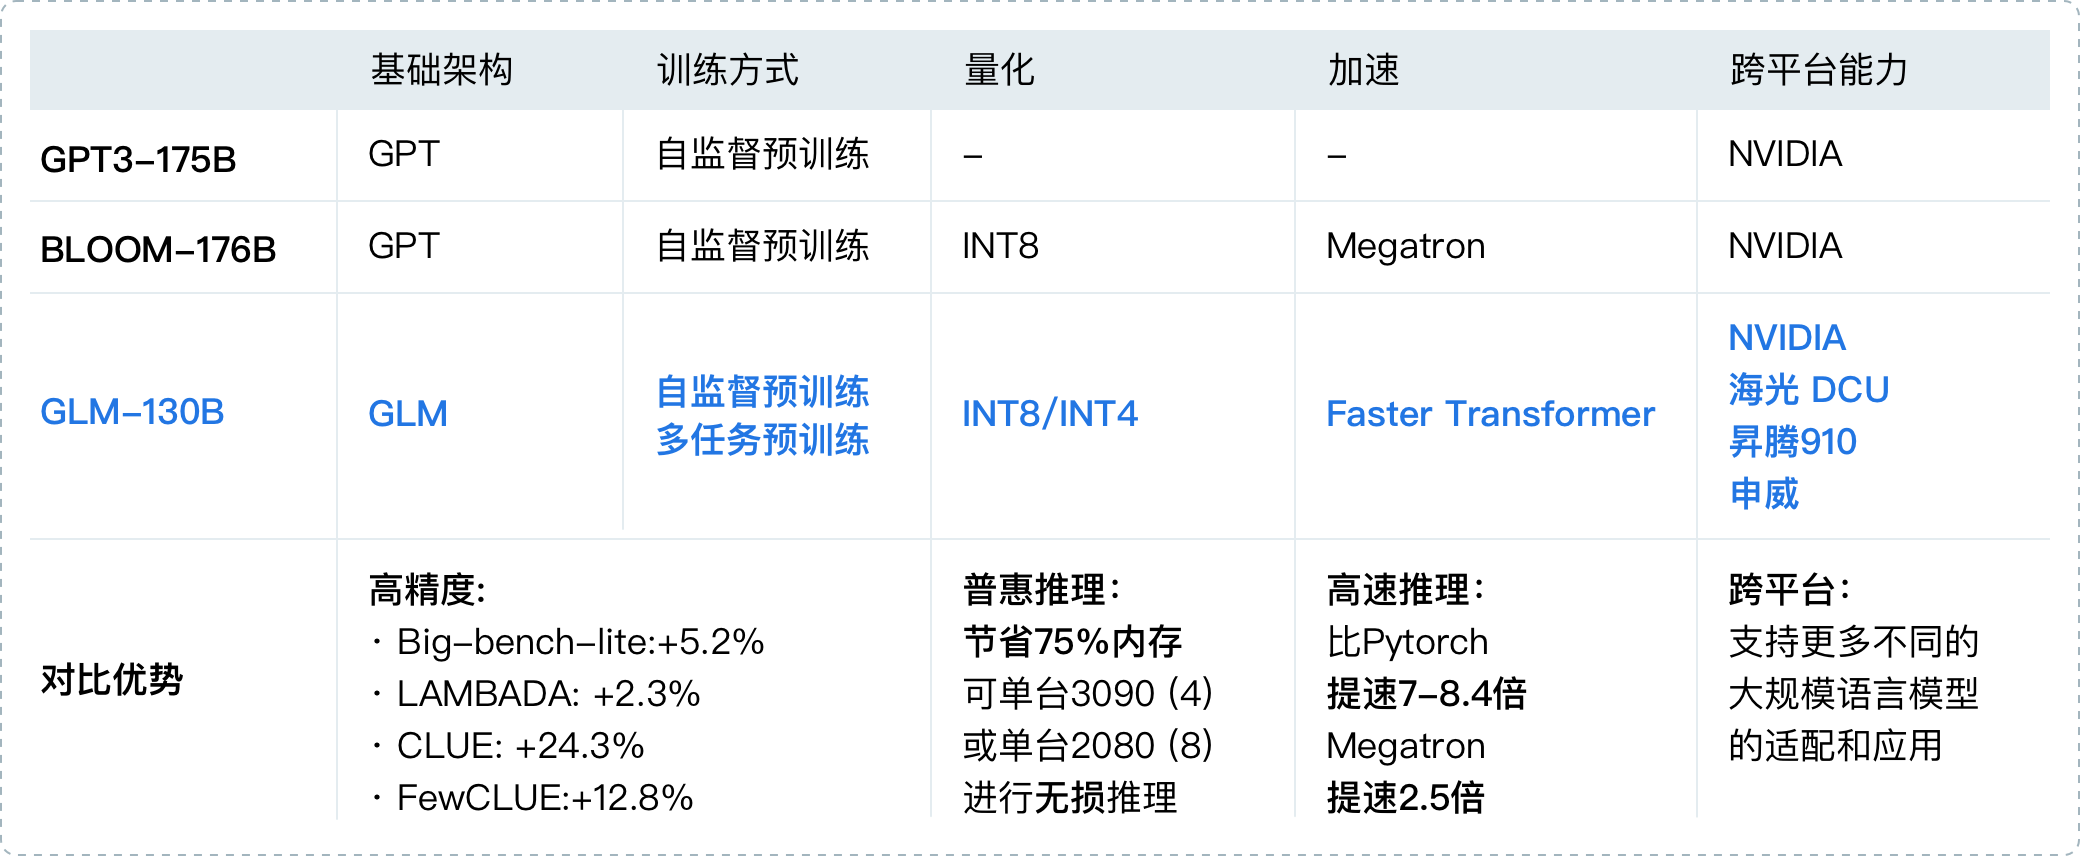
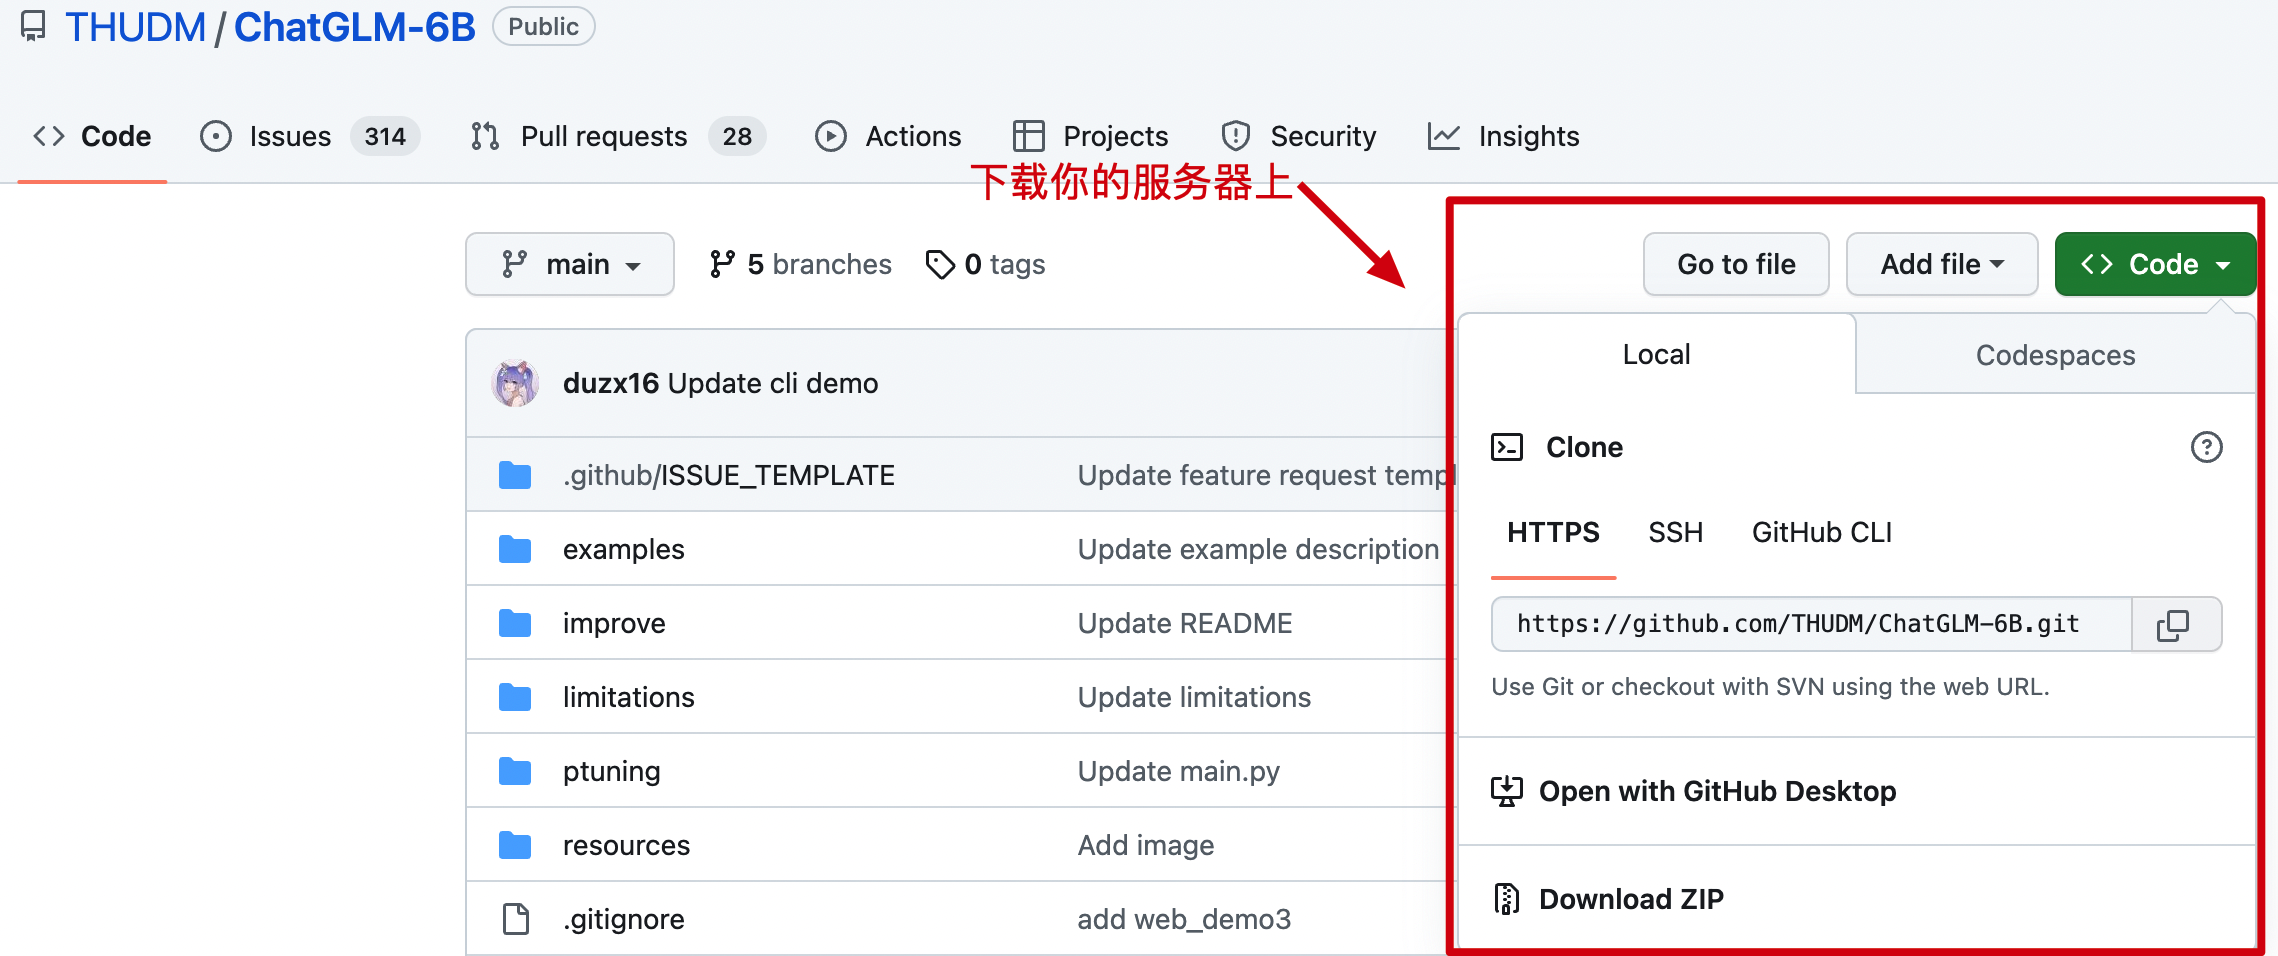
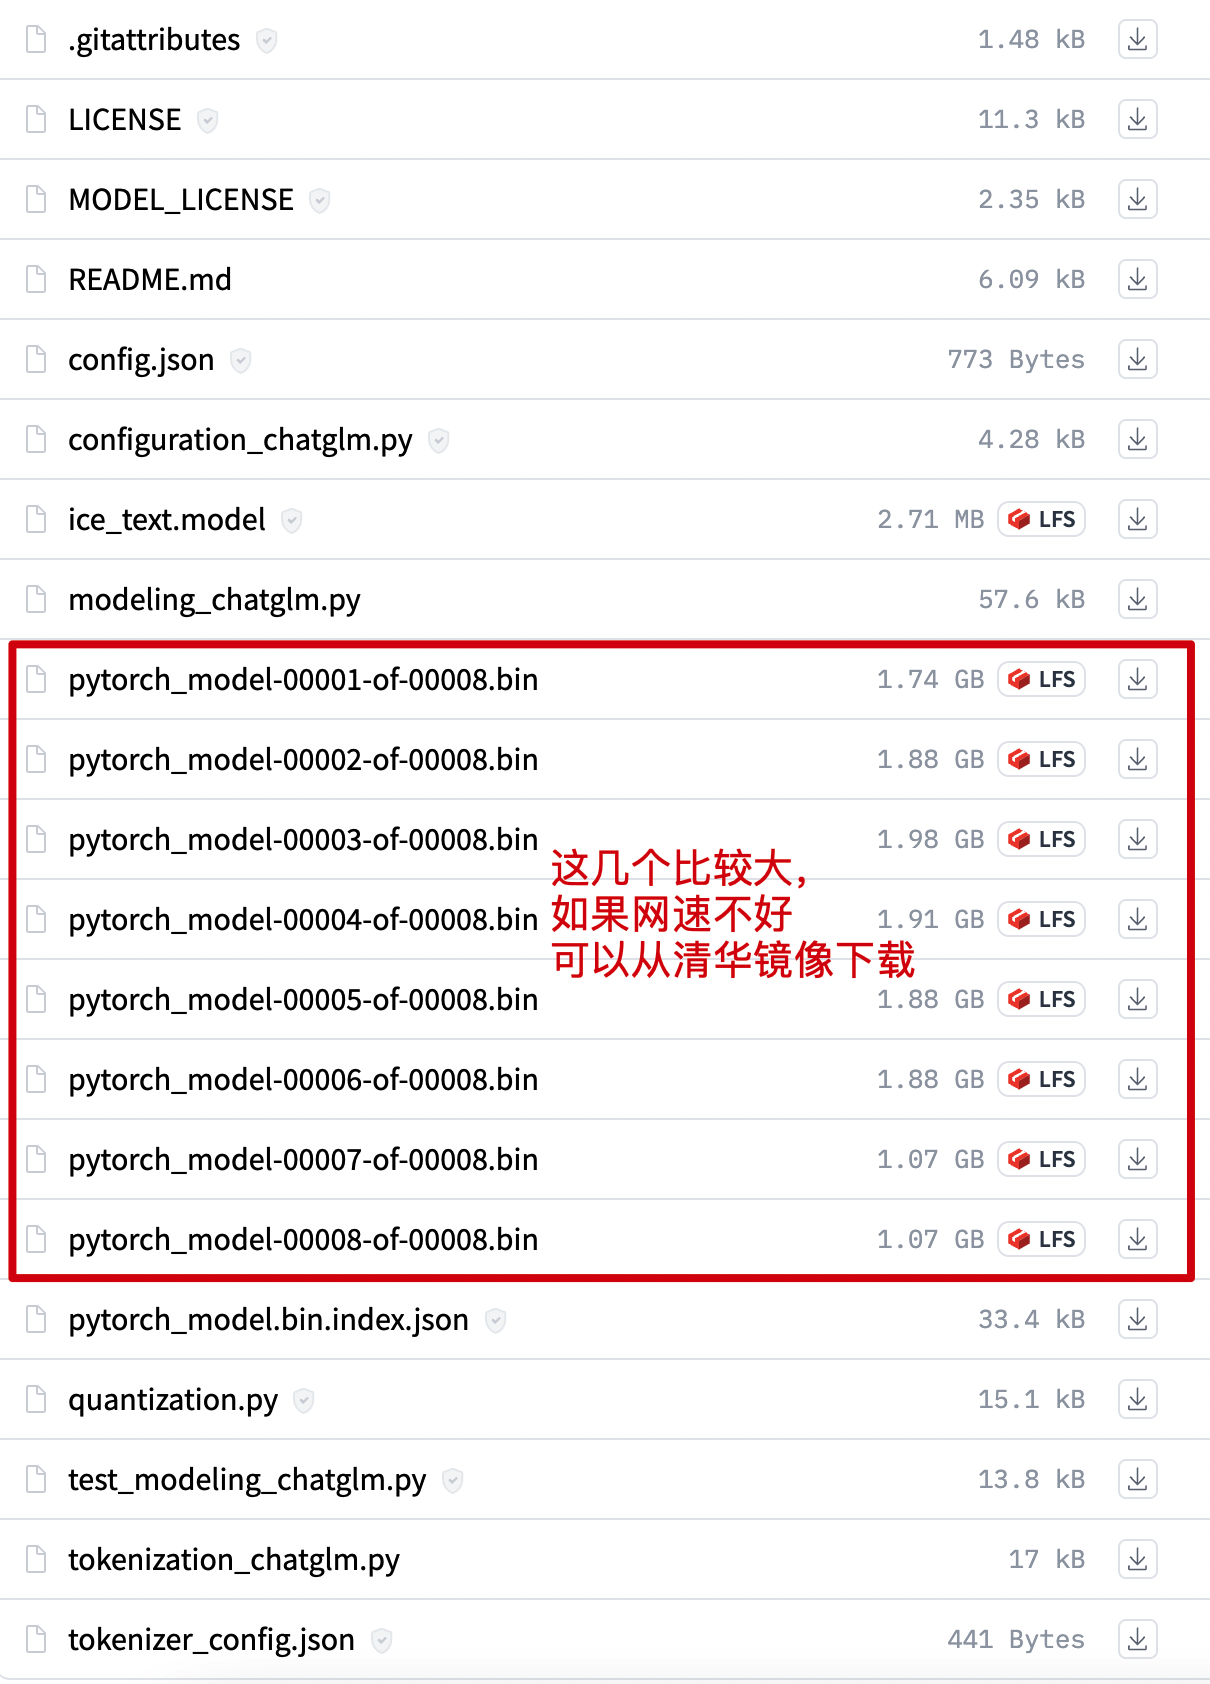
 OpenAI 越来越火,结合着 OpenAI 的应用也越来也多,像是文生文、文生图、多模块的图转代码,都是非常不错的提效利器。但作为 Java 程序员始终觉得还差那么一点,编码习惯了,看到这些东西我们想上手试试,能不能自己走一遍训练和使用。 当我开始往`算法模型训练`里踏进一脚👣,漏个门缝检索点相关学习资料和案例代码,发现这个世界太庞大了。早在4年前,GPT-2 就已经发布了 openai 开源代码 [https://github.com/openai/gpt-2](https://github.com/openai/gpt-2)也就是说我们就可以拿 GPT-2 的开源代码训练一个模型,哪怕是训练出个傻子,也应该比“xxx,我在,你说。”要更智能一些🤔。 接着检索我发现了,早在2年前有人已经基于 GPT-2 训练一版 GPT2 for Chinese chitchat/用于中文闲聊的GPT2模型。开源代码:[https://github.com/yangjianxin1/GPT2-chitchat](https://github.com/yangjianxin1/GPT2-chitchat) >基于这样的资料说干就干,看一看山⛰的那一边有多绚烂! ## 一、调研技术 不知道在做的兄弟们👬🏻你们激动不,看到这我是挺开心😄。这不是我想要的 demo 模型吗。把它给训练出来,也就能满足我对 ChatGPT的深入了解了,并且基于我想做的任何类数据训练得到一个个小模型部署,也是可以帮助我来完成一些事情的。如;你把公司的一些文档数据进行训练,得到一份可以搜索检索就能获取相关数据的 ChatGPT 不挺爽吗? 越是检索越是开心,离我的目标也越来越近了。但作为一个量化算法训练的小白,其实我还是希望能找到一份 Java 的模型训练代码,这可以让我操作起来更加顺畅。没错,我找到了,也是3年前就有的一份资料;[https://github.com/SimiaCryptus/tf-gpt-2](https://github.com/SimiaCryptus/tf-gpt-2) 这是一个基于 Tensorflow 的 GPT-2 文本模型的 Java 库。—— 别着急,这个时候我也不知道 Tensorflow 是啥。 <div align="center"> <img src="https://bugstack.cn/images/article/algorithm/model/model-03.png?raw=true" width="550px"> </div> 这还说啥,这有pom配置,还有代码案例。引入一下就能跑,上车🚗吧! <div align="center"> <img src="https://bugstack.cn/images/article/algorithm/model/model-04.png?raw=true" width="200px"> </div> 好家伙,跑起代码才知道。这货上来就下了1个多G的pb模型数据,之后有报错 Mac M1 兼容性问题。折腾一大堆,最后又报错;`Your CPU supports instructions that this TensorFlow binary was not compiled to use: SSE4.2 AVX AVX2 FMA` —— 要是你咋整,你再坚持坚持,还是放弃! ## 二、都是知识 本来以为 ChatGPT 嘛、Python 嘛、跑个数据模型吗!这能几道墙阻挡我的去路,不就是换个工具写代码吗?但当我逐步进入后发现,这距离好像比想象的大的多! 想玩 ChatGpt 玩到模型训练,得先进入 Gpt-2 开源代码。基于想自己训练一个小模型,需要使用 [TensorFlow](https://www.tensorflow.org/?hl=zh-cn) 创建生产级机器学习模型。而 [TensorFlow](https://www.tensorflow.org/?hl=zh-cn) 需要在本地安装一系列 Python 工具并下载模型和数据样本。而这里就像安装 JDK 一样,是傻子都会和傻子都不会。Mac M1 天生骄傲,安装了2天,才测试出可以使用的模型训练环境。之后开始跑第一个模型,线性回归。再了解什么是线性回归。 <div align="center"> <img src="https://bugstack.cn/images/article/algorithm/model/model-05.png?raw=true" width="750px"> </div> 这是 [TensorFlow](https://www.tensorflow.org/?hl=zh-cn) 的官网,用于创建生产级机器学习模型。也就是说想要完成一个简单的 ChatGPT 得从这开始。—— **死鬼,不要在想了,你总是得从 HelloWorld 开始。** 但在检索的过程中,我又找到了一个名叫 [huggingface.co](https://huggingface.co/) 的网站;Hugging face 起初是一家总部位于纽约的聊天机器人初创服务商,他们本来打算创业做聊天机器人,然后在 Github上开源了一个 Transformers 库。虽然聊天机器人业务没搞起来,但是他们的这个库在机器学习社区迅速大火起来。目前已经共享了超100,000个预训练模型,10,000个数据集,变成了机器学习界的 Github。 在 Hugging face 社区中可以找到相关的模型训练资源以及提供好的模型使用接口,比如像中文分词、聊天对话、图片分析也都有,当然也包括一些公司训练出来的 gpt-2 模型。 <div align="center"> <img src="https://bugstack.cn/images/article/algorithm/model/model-06.png?raw=true" width="850px"> </div> 在 Models 中提供了大量的算法模型,你可以把自己需要的模型点个 like 关注起来。同时这些模型还提供好了调用接口,例如【api key 可以在网站申请】; ```java curl https://api-inference.huggingface.co/models/microsoft/CodeGPT-small-java \ -X POST \ -d '{"inputs": "Can you please let us know more details about your "}' \ -H "Authorization: Bearer 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" ``` 你可以通过接口对模型进行访问,当然这些模型训练的数据并不是很大,只是作为测试使用。不会像 ChatGPT 那么智能的返回你所检索的信息。不过这至少可以让你了解和体验不同模型所带来的数据返回是什么样。 ## 三、环境配置 一口不能`呲个胖子`,为了更好的为以后能训练出一个自己可以玩的小体量的 ChatGPT 模型,总得要从头开始。 <div align="center"> <img src="https://bugstack.cn/images/article/algorithm/model/model-07.png?raw=true" width="250px"> </div> 这里的目标是带着搭建先在本地搭建起一个 TensorFlow 的基础环境,来跑个 Python 的简单算法模型。为此我们需要进行一下环境配置。2台机器已验证没问题,分别是 Mac Intel/M1,机器配置4核16G。 ### 1. Python 环境 - 下载 Python:https://www.python.org/downloads/macos/ 3.6版本以上。一般 Mac 上会带一个 2.x 版本的 Python,这个版本不够用,需要升级下。 - 配置 Python: - 安装 Python 完成后,搜索地址 `which python3` - 打开 vi ~/.bash_profile 文件,写入环境配置 `alias python="/Library/Frameworks/Python.framework/Versions/3.10/bin/python3"` - 生效配置 `source .bash_profile` - VSCode中开启的terminal里,输入:which python返回的是/usr/local/bin/python,版本是python2。所以需要改成python3.7 操作步骤: - 快捷键(cmd+,) 打开settings - 然后搜索“terminal.integrated.env.osx” - 点击 编辑"settings.json"文件,最后一个"}"之前,添加: ```java "terminal.integrated.env.osx": { "PATH": "" } ``` ### 2. pip 指令安装 - 安装 pip:以下需要用到 pip 指令,如果没有需要安装 ```curl https://bootstrap.pypa.io/get-pip.py | python3``` ### 3. Tensorflow 官网安装指导:[https://www.tensorflow.org/install?hl=zh-cn](https://www.tensorflow.org/install?hl=zh-cn) <div align="center"> <img src="https://bugstack.cn/images/article/algorithm/model/model-08.png?raw=true" width="650px"> </div> 但这里有个问题,没有说明 Mac M1 怎么安装。如果按照这个代码在 M1 的机器是安装不上的。所以在的一顿折腾后找到了对应的按照指令。步骤如下; - 下载代码【可选】:[https://github.com/mycname/TensorFlow-Tutorial](https://github.com/mycname/TensorFlow-Tutorial) - 用于后续测试模型训练代码 - 配置 Visual Studio【你也可以是其他的】,打开以后需要安装 python 插件以及配置登录 github,这样会更利于后续的操作。之后在 Visual Studio 的终端下,查看下 python -V 的版本,如果不是最新安装的 3.x 版本,可以刷新下配置 `source .bash_profile`。 - Mac 电脑安装 Tensorflow:`python3 -m pip install tensorflow-macos` —— 安装比较耗时,需要等待。如果失败了就继续执行这条指令。 <div align="center"> <img src="https://bugstack.cn/images/article/algorithm/model/model-09.png?raw=true" width="650px"> </div> - 安装后测试:```python3 -c "import tensorflow as tf; print(tf.reduce_sum(tf.random.normal([1000, 1000])))"``` —— 只要能输出结果为即可。 ## 四、跑个模型 可能很多伙伴不知道什么是算法模型,简单描述比如;为啥给你推荐你喜欢看的美女,为啥给你发送一个键盘购物券、为啥看你小子有钱就总给你推荐豪车。这都是根据你身上的标签进行模型训练的结果,在众多的人群中找到目标用户。另外像我在腾讯做量化算法的小伙伴说,决策树就是一种简单的算法模型。 **代码详见**:`https://github.com/mycname/TensorFlow-Tutorial` <div align="center"> <img src="https://bugstack.cn/images/article/algorithm/model/model-10.png?raw=true" width="650px"> </div> **测试结果** ```java fuzhengwei@MacBook-Pro TensorFlow-Tutorial % /usr/local/bin/python3 /Users/fuzhengwei/1024/github/TensorFlow-Tutorial/codes/linear_regression.py Epoch 1/500 1/1 [==============================] - 0s 3ms/step - loss: 0.0150 Epoch 500/500 1/1 [==============================] - 0s 2ms/step - loss: 0.0150 1/1 [==============================] - 0s 76ms/step [[-0.19686729]] 1/1 [==============================] - 0s 29ms/step [[-1.0953956]] 1/1 [==============================] - 0s 29ms/step [[-1.9939239]] 1/1 [==============================] - 0s 31ms/step [[-2.8924522]] 1/1 [==============================] - 0s 30ms/step [[-3.7909803]] 1/1 [==============================] - 0s 30ms/step [[-8.283622]] ``` <div align="center"> <img src="https://bugstack.cn/images/article/algorithm/model/model-11.png?raw=true" width="550px"> </div> - 这是一个训练了500次的线性回归预测模型; - 线性回归可以预测房价、预测股票、预测天气和评估经济。 >不过到这还啥也不是!离ChatGPT十万八千里! ## 五、傻狗机器聊天 在基于前文的学习基础之上,以 OpenAI 开源的 GPT-2 和相关的 GPT2-chitchat 模型训练代码,部署了这个会喷人的傻狗机器人。但由于训练数据的问题,这个聊天机器人对起话来,总感觉**很变态**。—— 不过不影响我们做算法模型训练的学习。  ## 六、基础配置环境 OpenAI GPT2 的模型训练和服务使用,需要用到 Python、TensorFlow 机器学习等相关配置,并且这些环境间有些版本依赖。所以为了顺利调试尽可能和我保持一样的版本。以下是所需的基本环境、代码和数据。推荐购买**京东云**! - **系统配置**:Centos 7.9 - `2核4GB内存200G磁盘4Mbps带宽的云服务器` - **部署环境**:Python3.7、 Transformers==4.2.0、pytorch==1.7.0 - **模型代码**:[https://github.com/yangjianxin1/GPT2-chitchat](https://github.com/yangjianxin1/GPT2-chitchat) - 此代码已开源,含websocket通信页面 - **模型数据**:[https://pan.baidu.com/s/1iEu_-Avy-JTRsO4aJNiRiA](https://pan.baidu.com/s/1iEu_-Avy-JTRsO4aJNiRiA) - `ju6m` ### 1 环境依赖 ```java yum -y install zlib-devel bzip2-devel openssl-devel ncurses-devel sqlite-devel readline-devel tk-devel gdbm-devel db4-devel libpcap-devel xz-devel yum install gcc -y yum -y install libffi-devel make make altinstall ``` ### 2. openssl + 结合3使用 ```java # 1. 卸载openssl whereis openssl |xargs rm -frv # 2. 官网下载openssl编译安装 wget http://www.openssl.org/source/openssl-1.1.1.tar.gz tar zxf openssl-1.1.1.tar.gz cd openssl-1.1.1 ./config --prefix=/usr/local/openssl shared zlib make && make install # 3. 设置环境变量 LD_LIBRARY_PATH echo "export LD_LIBRARY_PATH=$LD_LIBRARY_PATH:/usr/local/openssl/lib" >> /etc/profile source /etc/profile # 4. 卸载重新编译安装python3 whereis python3 |xargs rm -frv rm -rf /usr/local/bin/python3 /usr/local/bin/pip3 mkdir /usr/local/python3 ./configure --prefix=/usr/local/python3 --enable-optimizations --with-openssl=/usr/local/openssl make -j8 && make install ``` ### 3. Python 3.10 ```java cd ~ # 1.下载Python安装包 wget https://www.python.org/ftp/python/3.10.8/Python-3.10.8.tgz # 2.将安装包移动到/usr/local文件夹下 mv Python-3.10.8.tgz /usr/local/ # 3.在local目录下创建Python3目录 mkdir /usr/local/python3 # 4.进入的Python安装包压缩包所在的目录 cd /usr/local/ # 5.解压安装包 tar -xvf Python-3.10.8.tgz # 6.进入解压后的目录 cd /usr/local/Python-3.10.8/ # 7.配置安装目录 ./configure --prefix=/usr/local/python3 # 8.编译源码 make # 9.执行源码安装 make install # 10.创建软连接 ln -s /usr/local/python3/bin/python3 /usr/bin/python3 # 11. 测试 python3 -V ``` ### 4. 安装pip3 ```java cd ~ # 1.下载 wget https://bootstrap.pypa.io/get-pip.py # 2.安装;注意咱们安装了 python3 所以是 pyhton3 get-pip.py python3 get-pip.py # 3.查找pip安装路径 find / -name pip # 4.将pip添加到系统命令 ln -s /usr/local/python/bin/pip /usr/bin/pip # 5.测试 pip -V # 6.更换源,如果不更换那么使用 pip 下载软件会很慢 pip config set global.index-url https://pypi.tuna.tsinghua.edu.cn/simple pip config set install.trusted-host mirrors.aliyun.com pip config list # pip国内镜像源: # 阿里云 http://mirrors.aliyun.com/pypi/simple/ # 中国科技大学 https://pypi.mirrors.ustc.edu.cn/simple/ # 豆瓣 http://pypi.douban.com/simple # Python官方 https://pypi.python.org/simple/ # v2ex http://pypi.v2ex.com/simple/ # 中国科学院 http://pypi.mirrors.opencas.cn/simple/ # 清华大学 https://pypi.tuna.tsinghua.edu.cn/simple/ ``` ### 5. 安装git ```java cd ~ # 1.安装前首先得安装依赖环境 yum install -y perl-devel # 2.下载源码包到 CentOS 服务器后进行解压 wget https://mirrors.edge.kernel.org/pub/software/scm/git/git-2.9.5.tar.gz tar -zxf git-2.9.5.tar.gz cd git-2.9.5 # 3.执行如下命令进行编译安装 ./configure --prefix=/usr/local/git make && make install # 4.添加到系统环境变量 vim ~/.bashrc export PATH="/usr/local/git/bin:$PATH" # 5.使配置生效 source ~/.bashrc # 6.测试 git version # 7. 使用 git clone https://github.com/yangjianxin1/GPT2-chitchat ``` ### 6. 安装宝塔 ```java yum install -y wget && wget -O install.sh https://download.bt.cn/install/install_6.0.sh && sh install.sh 12f2c1d72 ``` 1. 安装后登录宝塔提示的地址,默认它会使用8888端口,因此你需要在服务器上开启8888端口访问权限。 2. 宝塔的安装是为了在服务端部署一个网页版聊天界面,使用到了 Nginx 服务。这里用宝塔操作更加容易。 ## 七、模型运行环境 模型训练需要用到 transformers 机器学习服务,以及 pytorch、sklearn 等组件;以下内容需要分别安装; ```java transformers==4.4.2 pytorch==1.7.0 sklearn tqdm numpy scipy==1.2.1 ``` ### 1. transformers ```java pip install transformers==4.4.2 ``` ### 2. pytorch ```java pip install torch==1.7.0+cpu torchvision==0.8.1+cpu torchaudio===0.7.0 -f https://download.pytorch.org/whl/torch_stable.html ``` - 这个torch版本+cpu与torchvision 需要匹配。 ### 3. 其他安装 剩余的按照使用指令 pip install 就可以,另外在运行 GTP2-chitchat 时,如果提示缺少了某些组件,直接使用 pip 按照即可。 ## 八、聊天页面配置 这里先把给你准备好的websocket页面代码,通过宝塔创建站点后部署起来。代码:https://github.com/yangjianxin1/GPT2-chitchat 之后通过打开你的宝塔地址,创建站点和上传Web代码。 <div align="center"> <img src="https://bugstack.cn/images/article/algorithm/model/model-2-03.png?raw=true" width="550px"> </div> **注意**:目前的这份代码中访问websocket的配置在index.js中,你需要修改成你的服务器地址。 ```java if(!window.WebSocket){ alert("您的浏览器不支持WebSocket协议!推荐使用谷歌浏览器进行测试。"); return; } socket = new WebSocket("ws://120.48.169.252:7397"); ``` ## 九、模型训练部署 ### 1. 下载代码 ```java cd /home git clone https://github.com/yangjianxin1/GPT2-chitchat ``` 你需要修改下 interact.py 代码,变更这里有Websocket 的 IP和端口配置; ```java async def start_server(): try: async with websockets.serve(server, "192.168.0.4", 7397): print("Starting server at ws://localhost:7397") await asyncio.Future() # run forever except OSError as e: print(f"Error starting server: {e}") except Exception as e: print(f"Unexpected error: {e}") ``` ### 2. 上传模型 下载模型:[https://pan.baidu.com/s/1iEu_-Avy-JTRsO4aJNiRiA#list/path=%2F](https://pan.baidu.com/s/1iEu_-Avy-JTRsO4aJNiRiA#list/path=%2F) - 密码:ju6m 上传模型:这里你需要在本机安装一个 SFTP 工具,或者使用 IntelliJ IDEA 提供的工具进行链接。链接后就可以把解压的模型上传到 /home/GPT2-chitchat/model 下。 ```java async def start_server(): try: async with websockets.serve(server, "192.168.0.4", 7397): print("Starting server at ws://localhost:7397") await asyncio.Future() # run forever except OSError as e: print(f"Error starting server: {e}") except Exception as e: print(f"Unexpected error: {e}") ``` 修改这部分代码的IP和端口,以及在云服务上开启 7397 的访问权限。另外为了安全起见,可以在云服务的防火墙IP来源中授权,只有你当前的台机器才可以链接到 websocket 上。 ### 3. 启动服务 这里通过 mac nuoshell 连接工具,进行模型启动;`模型路径:/home/GPT2-chitchat/model/model_epoch40_50w` ```java python3 interact.py --no_cuda --model_path /home/GPT2-chitchat/model/model_epoch40_50w ``` <div align="center"> <img src="https://bugstack.cn/images/article/algorithm/model/model-2-04.png?raw=true" width="750px"> </div> - 启动后就可以把你的 websocket 页面打开了,它会自动的链接到这个 websocket 服务上。 - 如果你还需要 Socket 或者命令行的服务,也可以修改 interact.py 代码进行处理。 >虽然能运行出一个傻狗,但仍然只是开胃小菜,接下来我们要玩点大的。ChatGLM-6B ChatGLM-6B 是清华开源的一个小型对话模型,让大家可以在自己部署起来跑一跑看看效果。但对于本身不是从事此类工作的其他研发伙伴来说,部署这个东西多半都会卡在环境上。 ## 十、模型简述 ChatGLM 参考了 ChatGPT 的设计思路,在千亿基座模型 GLM-130B 中注入了代码预训练,通过有监督微调(Supervised Fine-Tuning)等技术实现人类意图对齐。2022年11月,斯坦福大学大模型中心对全球30个主流大模型进行了全方位的评测,**GLM-130B 是亚洲唯一入选的大模型👍🏻**。  同时 ChatGLM 团队为与社区一起更好地推动大模型技术的发展,清华开源了 ChatGLM-6B 模型。它是一个初具中文问答和对话功能的小型模型,可以让大家即使在本地和一些小型的服务器上就可以部署体验。 - 源码:[https://github.com/THUDM/ChatGLM-6B](https://github.com/THUDM/ChatGLM-6B) - 这里有最新更新的内容和部署说明 - 社区:[https://chatglm.cn/blog](https://chatglm.cn/blog) - 这里有更全面的介绍信息 - 资源:自己训练的话,建议`10核、64g内存、22g显存` ## 十一、基础环境 ### 1. 服务配置 ChatGLM-6B 虽然已经是很温馨提供的,能最佳支持对话的最小模型了,但实际部署的时候仍需要一个不小的服务器`32G内存`配置或者有较好的`16G NVIDIA`显卡。可能就怕大家部署起来,所以官网上也提供了更低成本的部署方案,INT8和INT4 数据模型。整体所需空间如下; | **量化等级** | **最低 GPU 显存**(推理) | **最低 GPU 显存**(高效参数微调) | | -------------- | ------------------------- | --------------------------------- | | FP16(无量化) | 13 GB | 14 GB | | INT8 | 8 GB | 9 GB | | INT4 | 6 GB | 7 GB | 自己也是在 `Mac M1`、`轻量云主机`,还有一个专门用于测试`AIGC的服务器`上,都做了测试验证,这样也能避免大家走弯路。就像我在一款8G内存的轻量云主机上,部署 INT4 模型,报错如下;  😂 所以别买一些配置不佳的机器,否则你根本跑不起来,还浪费钱。 ### 2. 工程代码  **源码**:[https://github.com/THUDM/ChatGLM-6B](https://github.com/THUDM/ChatGLM-6B) - 无论你使用哪种部署方式,都需要把代码下载到对应的服务上。 ### 3. 算法模型 在 ChatGLM-6B 中有一段代码是配置模型地址的,除了说明的Mac电脑,理论上来说它可以自动下载。但这些模型太大了,所以最好是提前下载到本地使用。 ```python // web_demo2.py 部分代码 tokenizer = AutoTokenizer.from_pretrained("/Users/xfg/develop/github/chatglm-6b", trust_remote_code=True) model = AutoModel.from_pretrained("/Users/xfg/develop/github/chatglm-6b", trust_remote_code=True).half().cuda() ```  **官网**:[https://huggingface.co/](https://huggingface.co/) - 提供模型下载,按照你的需要下载对应的测试模型到服务器上; - chatglm-6b:[https://huggingface.co/THUDM/chatglm-6b/tree/main](https://huggingface.co/THUDM/chatglm-6b/tree/main) - chatglm-6b-int4:[https://huggingface.co/THUDM/chatglm-6b-int4/tree/main](https://huggingface.co/THUDM/chatglm-6b-int4/tree/main) - chatglm-6b-int8:[https://huggingface.co/THUDM/chatglm-6b-int8/tree/main](https://huggingface.co/THUDM/chatglm-6b-int8/tree/main) - visualglm-6b:[https://huggingface.co/THUDM/visualglm-6b/tree/main](https://huggingface.co/THUDM/visualglm-6b/tree/main) - 用于图形识别的模型,在镜像中还没有。 镜像:[https://cloud.tsinghua.edu.cn/d/674208019e314311ab5c/?p=%2F&mode=list](https://cloud.tsinghua.edu.cn/d/674208019e314311ab5c/?p=%2F&mode=list) - 镜像的下载速度比较快。**注意**:镜像中没有基础的内容,需要从官网下载。 - chatglm-6b:[https://cloud.tsinghua.edu.cn/d/674208019e314311ab5c/?p=%2Fchatglm-6b&mode=list](https://cloud.tsinghua.edu.cn/d/674208019e314311ab5c/?p=%2Fchatglm-6b&mode=list) - chatglm-6b-int4:[https://cloud.tsinghua.edu.cn/d/674208019e314311ab5c/?p=%2Fchatglm-6b-int4&mode=list](https://cloud.tsinghua.edu.cn/d/674208019e314311ab5c/?p=%2Fchatglm-6b-int4&mode=list) - chatglm-6b-int8:[https://cloud.tsinghua.edu.cn/d/674208019e314311ab5c/?p=%2Fchatglm-6b-int8&mode=list](https://cloud.tsinghua.edu.cn/d/674208019e314311ab5c/?p=%2Fchatglm-6b-int8&mode=list) ### 4. 软件版本 <div align="center"> <img src="https://bugstack.cn/images/article/algorithm/model/model-3-06.png?raw=true" width="650px"> </div> - [macOS 12.3 或更高版本](https://developer.apple.com/metal/pytorch/) - [https://developer.apple.com/metal/pytorch](https://developer.apple.com/metal/pytorch) - Python 3.10.8 或更高版本 - 因为有些聊天的界面模块,需要这个版本。 ### 5. 软件卸载 ```shell # 1. 卸载 python3/python 注意先看下版本 python -V 确认下名称是 python 还是 python3 以及 pip whereis python3 |xargs rm -frv rm -rf /usr/local/bin/python3 /usr/local/bin/pip3 # 2. 卸载 openssl - 如果安装了老版本的python,又安装新的,可能需要卸载 ssl 重新安装 whereis openssl |xargs rm -frv ``` - 如果你的电脑或者服务器之前已经安装了 python 那么可以先把它卸载掉。 ## 十二、环境配置 - 服务器版本 以能运行起 ChatGLM-6B 只需要以下5个步骤; <div align="center"> <img src="https://bugstack.cn/images/article/algorithm/model/model-3-07.png?raw=true" width="650px"> </div> 只要你能按照顺序,正确的执行这些步骤,就可以运行起 ChatGLM-6B 模型,接下来就跟着的步骤执行吧。注意如果你需要绘图能力,可以在本文学习后。按照官网介绍,替换下模型重新启动即可;[https://github.com/THUDM/ChatGLM-6B](https://github.com/THUDM/ChatGLM-6B) - `[2023/05/17] 发布` [VisualGLM-6B](https://github.com/THUDM/VisualGLM-6B/) `一个支持图像理解的多模态对话语言模型。` ### 步骤1:环境安装 #### 1. openssl ```java # 1. 卸载openssl whereis openssl |xargs rm -frv # 2. 官网下载openssl编译安装 wget http://www.openssl.org/source/openssl-1.1.1.tar.gz tar zxf openssl-1.1.1.tar.gz cd openssl-1.1.1 ./config --prefix=/usr/local/openssl shared zlib make && make install # 3. 设置环境变量 LD_LIBRARY_PATH echo "export LD_LIBRARY_PATH=$LD_LIBRARY_PATH:/usr/local/openssl/lib" >> /etc/profile source /etc/profile # 4. 卸载重新编译安装python3 whereis python3 |xargs rm -frv rm -rf /usr/local/bin/python3 /usr/local/bin/pip3 mkdir /usr/local/python3 ./configure --prefix=/usr/local/python3 --enable-optimizations --with-openssl=/usr/local/openssl make -j8 && make install ``` #### 2. Python 3.10 ```java cd ~ # 1.下载Python安装包 wget https://www.python.org/ftp/python/3.10.8/Python-3.10.8.tgz # 2.将安装包移动到/usr/local文件夹下 mv Python-3.10.8.tgz /usr/local/ # 3.在local目录下创建Python3目录 mkdir /usr/local/python3 # 4.进入的Python安装包压缩包所在的目录 cd /usr/local/ # 5.解压安装包 tar -xvf Python-3.10.8.tgz # 6.进入解压后的目录 cd /usr/local/Python-3.10.8/ # 7.配置安装目录 ./configure --prefix=/usr/local/python3 # 8.编译源码 make # 9.执行源码安装 make install # 10.创建软连接 ln -s /usr/local/python3/bin/python3 /usr/bin/python3 # 11. 测试 python3 -V ``` #### 3. 安装pip3 ```java cd ~ # 1.下载 wget https://bootstrap.pypa.io/get-pip.py # 2.安装;注意咱们安装了 python3 所以是 pyhton3 get-pip.py python3 get-pip.py # 3.查找pip安装路径 find / -name pip # 4.将pip添加到系统命令 ln -s /usr/local/python/bin/pip /usr/bin/pip # 5.测试 pip -V # 6.更换源,如果不更换那么使用 pip 下载软件会很慢 pip config set global.index-url https://pypi.tuna.tsinghua.edu.cn/simple pip config set install.trusted-host mirrors.aliyun.com pip config list # pip国内镜像源: # 阿里云 http://mirrors.aliyun.com/pypi/simple/ # 中国科技大学 https://pypi.mirrors.ustc.edu.cn/simple/ # 豆瓣 http://pypi.douban.com/simple # Python官方 https://pypi.python.org/simple/ # v2ex http://pypi.v2ex.com/simple/ # 中国科学院 http://pypi.mirrors.opencas.cn/simple/ # 清华大学 https://pypi.tuna.tsinghua.edu.cn/simple/ ``` #### 4. 安装git ```java cd ~ # 1.安装前首先得安装依赖环境 yum install -y perl-devel # 2.下载源码包到 CentOS 服务器后进行解压 wget https://mirrors.edge.kernel.org/pub/software/scm/git/git-2.9.5.tar.gz tar -zxf git-2.9.5.tar.gz cd git-2.9.5 # 3.执行如下命令进行编译安装 ./configure --prefix=/usr/local/git make && make install # 4.添加到系统环境变量 vim ~/.bashrc export PATH="/usr/local/git/bin:$PATH" # 5.使配置生效 source ~/.bashrc # 6.测试 git version ``` ### 步骤2:代码下载 在Linux服务器,可以直接在 cd ~ 目录下执行;`git clone git://github.com/THUDM/ChatGLM-6B.git` ### 步骤3:模型下载 可以从官网:[https://huggingface.co/THUDM/chatglm-6b/tree/main](https://huggingface.co/THUDM/chatglm-6b/tree/main) 或者清华的镜像仓库下载 [https://cloud.tsinghua.edu.cn/d/fb9f16d6dc8f482596c2/](https://cloud.tsinghua.edu.cn/d/fb9f16d6dc8f482596c2/) - 如果你需要其他模型,可以在`目录:基础环境`中找到。 本地直接环境直接下载,网络环境可以通过 SFTP - Termius 传到一个 `ChatGLM-6B/data` 目录下。或者直接通过 `wget http://...` 这样的命令方式直接下载模型。**会需要较长的耗时** ### 步骤4:安装配置 ```java # sudo su - 切换到root 或者通过 sudo 执行。镜像可以换一换,看看哪个快用哪个。 sudo pip install -r requirements.txt -i https://mirror.baidu.com/pypi/simple # 执行成功案例 - 过程较长 Looking in indexes: https://mirror.baidu.com/pypi/simple Collecting protobuf Downloading https://mirror.baidu.com/pypi/packages/06/38/e72c556c25aaaaafca75018d2d0ebc50c5ab80983dd4def086624fba43f2/protobuf-4.23.0-cp37-abi3-manylinux2014_x86_64.whl (304 kB) ━━━━━━━━━━━━━━━━━━━━━━━━━━━━━━━━━━━━━━━━ 304.5/304.5 KB 19.4 MB/s eta 0:00:00 Collecting transformers==4.27.1 Downloading https://mirror.baidu.com/pypi/packages/6d/9b/2f536f9e73390209e0b27b74691355dac494b7ec8154f3012fdc6debbae7/transformers-4.27.1-py3-none-any.whl (6.7 MB) ━━━━━━━━━━━━━━━━━━━━━━━━━━━━━━━━━━━━━━━━ 6.7/6.7 MB 10.4 MB/s eta 0:00:00 ``` - 对于本地的网络和普通的服务器,这个步骤会执行较长的时间。如果执行失败了,在此继续执行就可以,直至得到上天的眷顾,你成功了!!! ### 步骤5:启动执行 ```java # 切换到 ChatGLM-6B 工程目录,执行 python3 -m streamlit run ./web_demo2.py --server.port 7397 --server.address 0.0.0.0 # 执行结果 - 成功后有这样的效果 Collecting usage statistics. To deactivate, set browser.gatherUsageStats to False. You can now view your Streamlit app in your browser. URL: http://0.0.0.0:7397 Explicitly passing a `revision` is encouraged when loading a model with custom code to ensure no malicious code has been contributed in a newer revision. Explicitly passing a `revision` is encouraged when loading a configuration with custom code to ensure no malicious code has been contributed in a newer revision. Explicitly passing a `revision` is encouraged when loading a model with custom code to ensure no malicious code has been contributed in a newer revision. Loading checkpoint shards: 100%|██████████████████████████████████████████████████████████████████████████████████████████████████████████| 8/8 [01:30<00:00, 11.35s/it] ``` - 你可以指定端口,并对端口开放访问权限。之后就可以反问地址;`http://你的服务器地址:端口` - 初次使用的时候,会进行模型的启动,也就是这个阶段,很多配置不佳的服务器是没法启动成功的。 ## 十三、环境配置 - AIGC版本 这是一个`钞能力`版本,你只需要花钱到位,体验个几小时,那么这个是最节省成本的。你可以通过我的邀请链接进入,这样会得到一些使用配额,可能不需要花钱。 ### 1. 注册服务 地址:[https://www.lanrui-ai.com/register?invitation_code=3931177594](https://www.lanrui-ai.com/register?invitation_code=3931177594) 后台:[https://www.lanrui-ai.com/console/workspace](https://www.lanrui-ai.com/console/workspace) ### 2. 选择服务 <div align="center"> <img src="https://bugstack.cn/images/article/algorithm/model/model-3-08.png?raw=true" width="950px"> </div> - ¥1.90/时,不确定一直有。同配置的4.9元每小时。从你购买启动开始计费,安装环境较好时,整个过程需要大概需要20元左右,能体验到。 ### 3. 配置环境 <div align="center"> <img src="https://bugstack.cn/images/article/algorithm/model/model-3-09.png?raw=true" width="950px"> </div> - 创建服务后,运行镜像选择;pytorch -> cuda 最后这个版本。 - 预训练模型选择 chatglm-6b 这样你也不需要自己下载模型数据了。 ### 4. 控制平台 <div align="center"> <img src="https://bugstack.cn/images/article/algorithm/model/model-3-10.png?raw=true" width="950px"> </div> <div align="center"> <img src="https://bugstack.cn/images/article/algorithm/model/model-3-11.png?raw=true" width="950px"> </div> - 从工作空间进入到控制台,你可以分别`从 data 看到 ChatGLM-6B 的代码` 在`imported_models 看到预训练模型 chatglm-6b` <div align="center"> <img src="https://bugstack.cn/images/article/algorithm/model/model-3-12.png?raw=true" width="950px"> </div> - 检查工程 web_demo2.py 中加载模型的路径是否正确,如果不对需要修改。 - 如果你的服务中,没有默认下载或者需要重新下载。那么你可以安装 git 指令,下载代码到 data 仓库即可。 ### 5. 初始配置 <div align="center"> <img src="https://bugstack.cn/images/article/algorithm/model/model-3-13.png?raw=true" width="950px"> </div> ```java user@lsp-ws:~/data$ sudo su root@lsp-ws:/home/user/data# cd ChatGLM-6B/ root@lsp-ws:/home/user/data/ChatGLM-6B# pip install -r requirements.txt ``` - 这个安装速度会非常快,几乎不需要太久的等待。 ### 6. 启动服务 <div align="center"> <img src="https://bugstack.cn/images/article/algorithm/model/model-3-14.png?raw=true" width="950px"> </div> ```java python3 -m streamlit run ./web_demo2.py --server.port 27777 --server.address 0.0.0.0 ``` - 另外 ChatGLM-6B 还提供了命令行测试 `python cli_demo.py` 和 API 启动 `python api.py` ```java curl -X POST "http://127.0.0.1:8000" \ -H 'Content-Type: application/json' \ -d '{"prompt": "你好", "history": []}' ``` ### 7. 访问服务 <div align="center"> <img src="https://bugstack.cn/images/article/algorithm/model/model-3-15.png?raw=true" width="950px"> </div> - 回到控制台复制调试地址,即可访问; <div align="center"> <img src="https://bugstack.cn/images/article/algorithm/model/model-3-16.png?raw=true" width="650px"> </div> - 如果你报错了,那么在控制台执行安装即可。 - `control + c` 停止服务,执行 `pip install icetk` - 再次执行步骤6启动服务,现在在访问。`python3 -m streamlit run ./web_demo2.py --server.port 27777 --server.address 0.0.0.0` <div align="center"> <img src="https://bugstack.cn/images/article/algorithm/model/model-3-17.png?raw=true" width="650px"> </div> - 初次运行,它会加载模型。在控制台可以看到加载的模型进度,大概几分钟就加载好了。 <div align="center"> <img src="https://bugstack.cn/images/article/algorithm/model/model-3-18.png?raw=true" width="650px"> </div> - 看到控制台的模型加载完毕后,再次点击下**发送** 好了,到你也可以测试下发送其他的内容,进行体验。 ## 十四、环境配置 - Docker 版本 在官网的地址中还看到了一个 Docker 的配置方式,我把它引入过来,方便有需要的伙伴进行操作。原文地址:[https://www.luckzym.com/posts/e95da08c/](https://www.luckzym.com/posts/e95da08c/) ### 1. 编写`DockerFile`文件 ``` # 设置基础映像 FROM nvidia/cuda:11.8.0-cudnn8-devel-ubuntu22.04 # 定义构建参数 # 例如ARG USER=test为USER变量设置默认值"test"。 ARG USER=test ARG PASSWORD=${USER}123$ # 处理讨厌的 Python 3 编码问题 ENV LANG C.UTF-8 ENV DEBIAN_FRONTEND noninteractive ENV MPLLOCALFREETYPE 1 # 更新软件包列表并安装软件属性通用包 RUN apt-get update && apt-get install -y software-properties-common # 添加Python ppa,以便后续安装Python版本 RUN add-apt-repository ppa:deadsnakes/ppa # 安装Ubuntu的常用软件包,包括wget、vim、curl、zip、unzip等 RUN apt-get update && apt-get install -y \ build-essential \ git \ wget \ vim \ curl \ zip \ zlib1g-dev \ unzip \ pkg-config \ libgl-dev \ libblas-dev \ liblapack-dev \ python3-tk \ python3-wheel \ graphviz \ libhdf5-dev \ python3.9 \ python3.9-dev \ python3.9-distutils \ openssh-server \ swig \ apt-transport-https \ lsb-release \ libpng-dev \ ca-certificates &&\ apt-get clean &&\ ln -s /usr/bin/python3.9 /usr/local/bin/python &&\ ln -s /usr/bin/python3.9 /usr/local/bin/python3 &&\ curl https://bootstrap.pypa.io/get-pip.py -o get-pip.py &&\ python3 get-pip.py &&\ rm get-pip.py &&\ # 清理APT缓存以减小Docker镜像大小 rm -rf /var/lib/apt/lists/* /tmp/* /var/tmp/* # 设置时区 ENV TZ=Asia/Seoul RUN ln -snf /usr/share/zoneinfo/$TZ /etc/localtime && echo $TZ > /etc/timezone # 为应用程序创建一个用户 RUN useradd --create-home --shell /bin/bash --groups sudo ${USER} RUN echo ${USER}:${PASSWORD} | chpasswd USER ${USER} ENV HOME /home/${USER} WORKDIR $HOME # 安装一些Python库,例如numpy、matplotlib、scipy等 RUN python3 -m pip --no-cache-dir install \ blackcellmagic\ pytest \ pytest-cov \ numpy \ matplotlib \ scipy \ pandas \ jupyter \ scikit-learn \ scikit-image \ seaborn \ graphviz \ gpustat \ h5py \ gitpython \ ptvsd \ Pillow==6.1.0 \ opencv-python # 安装PyTorch和DataJoint等其他库 # 其中torch==1.13.1表示安装版本为1.13.1的PyTorch RUN python3 -m pip --no-cache-dir install \ torch==1.13.1 \ torchvision==0.14.1 \ torchaudio==0.13.1 \ 'jupyterlab>=2' RUN python3 -m pip --no-cache-dir install datajoint==0.12.9 # 设置环境变量LD_LIBRARY_PATH,以便支持性能分析库 ENV LD_LIBRARY_PATH /usr/local/cuda/extras/CUPTI/lib64:${LD_LIBRARY_PATH} # 启动ssh服务器,打开22号端口 USER root RUN mkdir /var/run/sshd EXPOSE 22 CMD ["/usr/sbin/sshd", "-D"] ``` ### 2. 编写`Docker-Compose`文件 ``` version: "3.9" services: nvidia: build: . # 告诉Docker Compose在当前目录中查找Dockerfile并构建镜像 runtime: nvidia # 启用nvidia-container-runtime作为Docker容器的参数,从而实现对GPU的支持 environment: - NVIDIA_VISIBLE_DEVICES=all # 设置所有可用的GPU设备 ports: - "22:22" # port for ssh - "80:80" # port for Web - "8000:8000" # port for API tty: true # 创建一个伪终端以保持容器运行状态 ``` ### 3. 搭建步骤 #### 3.1 准备Docker容器&AI模型文件 - 修改`Docker Compose`文件,添加`volumes`路径 ``` version: "3.9" services: nvidia: build: . # 告诉Docker Compose在当前目录中查找Dockerfile并构建镜像 runtime: nvidia # 启用nvidia-container-runtime作为Docker容器的参数,从而实现对GPU的支持 environment: - NVIDIA_VISIBLE_DEVICES=all # 设置所有可用的GPU设备 ports: - "22:22" # port for ssh - "80:80" # port for Web - "8000:8000" # port for API tty: true # 创建一个伪终端以保持容器运行状态 # 添加一个和宿主机连接的路径 volumes: - ./:/data ``` - 下载对应的AI模块文件 从`Hugging Face Hub`下载所需要的模型,由于我使用的显卡只有`8G`显存,所以直接下载了`INT4`量化后的模型。 > **AI模型下载地址:** > > - [THUDM/chatglm-6b](https://huggingface.co/THUDM/chatglm-6b) > - [THUDM/chatglm-6b-int4](https://huggingface.co/THUDM/chatglm-6b-int4) > - [THUDM/chatglm-6b-int8](https://huggingface.co/THUDM/chatglm-6b-int8) 这里推荐使用`Git`工具进行拖拽对应的仓库,在拖拽前记得给`Git`工具安装上[Git LFS](https://docs.github.com/zh/repositories/working-with-files/managing-large-files/installing-git-large-file-storage)。 仓库存储的地方就放在我当前创建`Docker Compose`文件目录下,这样刚好可以利用`volumes`将其映射进容器中。 ``` # Make sure you have git-lfs installed (https://git-lfs.com) git lfs install git clone https://huggingface.co/THUDM/chatglm-6b-int4 # if you want to clone without large files – just their pointers # prepend your git clone with the following env var: GIT_LFS_SKIP_SMUDGE=1 ``` #### 3.2 准备ChatGLM-6B并运行 - 拉取官方`ChatGLM-6B`项目仓库文件 ``` git clone https://github.com/THUDM/ChatGLM-6B.git ``` 仓库存储的地方依旧是当前创建`Docker Compose`文件目录。如果大家不希望存放在该目录下可以自行修改一下`Docker Compose`中的`volumes`映射路径。 - 拉起该深度学习`Docker`容器 ``` docker-compose up --build -d ``` - 进入容器中 ``` # 查看刚刚启动的深度学习容器的ID号 docker ps # 进入容器内部 docker exec -it xxxxxxx /bin/bash # xxxxxxx 是PS后容器的CONTAINER ID号 ``` - 安装项目依赖 ``` # cd到刚刚拖拽下来的项目仓库中 cd /data/ChatGLM-6B # 安装项目依赖文件 pip install -r requirements.txt ``` - 修改本地AI模型路径 在这里我们使用官方提供的命令行Demo程序来做测试。 ``` # 打开cli_demo.py文件对其进行修改 VI cli_demo.py # 修改第6、第7行的代码,将原有的模型名称修改为本地AI模型路径 # 修改结果如下,其中/data/chatglm-6b-int4为你本地AI模型的路径地址 tokenizer = AutoTokenizer.from_pretrained("/data/chatglm-6b-int4", trust_remote_code=True) model = AutoModel.from_pretrained("/data/chatglm-6b-int4", trust_remote_code=True).half().cuda() ``` - 运行仓库中命令行Demo程序: ``` python cli_demo.py ``` 不出意外,在命令执行完之后你将可以体验到清华开源的ChatGLM-6B自然语言模型了。
上一篇:或许我们都被分库分表约束了思维
下一篇:代码精简的治理方案和工具
Generalfu
文章数
1
阅读量
391
作者其他文章
01
搭个ChatGPT算法模型,离Java程序员有多远?
OpenAI 越来越火,结合着 OpenAI 的应用也越来也多,像是文生文、文生图、多模块的图转代码,都是非常不错的提效利器。但作为 Java 程序员始终觉得还差那么一点,编码习惯了,看到这些东西我们想上手试试,能不能自己走一遍训练和使用。当我开始往算法模型训练里踏进一脚,漏个门缝检索点相关学习资料和案例代码,发现这个世界太庞大了。早在4年前,GPT-2 就已经发布了 openai 开源代码 h
Generalfu
文章数
1
阅读量
391
作者其他文章
添加企业微信
获取1V1专业服务
扫码关注
京东云开发者公众号