一、技术介绍
NVIDIA Triton Inference Server是一个针对CPU和GPU进行优化的云端和推理的解决方案。
支持的模型类型包括TensorRT、TensorFlow、PyTorch(meta-llama/Llama-2-7b)、Python(chatglm)、ONNX Runtime和OpenVino。
NVIDIA Triton Server是一个高性能的推断服务器,具有以下特点:
1. 高性能:Triton Server为使用GPU进行推断的工作负载提供了高性能和低延迟。它能够在高吞吐量和低延迟的情况下同时服务多个模型。
2. 内存管理:大模型通常需要大量的显存来进行推断。Triton Server具有灵活的内存管理机制,可以有效地管理和分配显存,确保大模型的推断可以高效地进行。
3. 可扩展性:Triton Server通过并行处理和异步推断支持高度并发的推断请求。它可以根据负载的需要自动扩展和收缩。
4. 多模型支持:Triton Server能够同时部署和管理多个模型。这允许您共享服务器资源并以一致的方式部署和管理不同的模型。
5. 灵活性:Triton Server支持多种模型格式和推断框架,包括TensorFlow、PyTorch、ONNX等。您可以使用您喜欢的模型和工具进行模型开发和训练,并将其轻松部署到Triton Server上。
6. 高级特性:Triton Server提供了许多高级特性,例如模型版本管理、请求并发控制、动态批处理大小优化、请求时间跟踪等。这些特性增强了模型的部署和管理能力。
二、实践
Serve a Model in 3 (N) Easy Steps 官方文档
https://github.com/triton-inference-server/server
Serve a Model in n Easy Steps
Step 1: 拉取triton-server代码
git clone -b r23.08 https://github.com/triton-inference-server/server.git #
Step 2: 使用tritonserver:22.12-py3镜像构建triton-server容器
docker run --gpus all --shm-size=1g --ulimit memlock=-1 -p 8000:8000 -p 8001:8001 -p 8002:8002 --ulimit stack=67108864 -ti nvcr.io/nvidia/tritonserver:22.12-py3
-p端口映射要注意, 后期要改很麻烦.
tritonserver版本和python_backend后端版本一定要对应.
比如都用22.12
Step 3: 下载python推理后端 python_backend
文档: https:/ https://github.com/triton-inference-server/python_backend
下载python后端代码:
git clone https://github.com/triton-inference-server/python_backend -b r22.12
容器内操作:如果中途退出容器,使用命令 docker exec -it 容器名 /bin/bash 进入容器
如下载不下来可以拷贝到容器内:docker cp python_backend busy_galileo:/opt
Step 4: 创建模型目录
cd python_backend
1)创建模型目录: mkdir -p models/chatglm2-6b/1/
2)宿主机拷贝chatglm2到容器内模型目录: docker cp chatglm2-6b 容器名:/容器内路径/models/chatglm2-6b
3)创建模型配置文件 : vi models/chatglm2-6b/config.pbtxt 包含各种参数,input,output参数,模型路径等.
name: "chatglm2-6b"
backend: "python"
max_batch_size: 1

input [
  {
    name: "QUERY"
    data_type: TYPE_STRING
    dims: [ -1 ]
  },
  {
    name: "max_new_tokens"
    data_type: TYPE_UINT32
    dims: [ -1 ]
  },
  {
    name: "top_k"
    data_type: TYPE_UINT32
    dims: [ 1 ]
    optional: true
  },
  {
    name: "top_p"
    data_type: TYPE_FP32
    dims: [ 1 ]
    optional: true
  },
  {
    name: "temperature"
    data_type: TYPE_FP32
    dims: [ 1 ]
    optional: true
  },
  {
    name: "length_penalty"
    data_type: TYPE_FP32
    dims: [ 1 ]
    optional: true
  },
  {
    name: "repetition_penalty"
    data_type: TYPE_FP32
    dims: [ 1 ]
    optional: true
  },
  {
    name: "bos_token_id"
    data_type: TYPE_UINT32
    dims: [ 1 ]
    optional: true
  },
  {
    name: "eos_token_id"
    data_type: TYPE_UINT32
    dims: [ 1 ]
    optional: true
  },
  {
    name: "do_sample"
    data_type: TYPE_BOOL
    dims: [ 1 ]
    optional: true
  },
  {
    name: "num_beams"
    data_type: TYPE_UINT32
    dims: [ 1 ]
    optional: true
  }
]
output [
  {
    name: "OUTPUT"
    data_type: TYPE_STRING
    dims: [ -1, -1 ]
  }
]

instance_group [
  {
    kind: KIND_GPU
  }
]

parameters {
  key: "model_path"
  value: {
    string_value: "/opt/tritonserver/python_backend/models/chatglm2-6b"
  }
}
创建model.py 自定义Python代码实现的模型推理逻辑 vi models/chatglm2-6b/1/model.py
模型的输入,输出和参数可以在这里使用python脚本进行加工处理
    import triton_python_backend_utils as pb_utils


class TritonPythonModel:
    @staticmethod
    def auto_complete_config(auto_complete_model_config):
        """`auto_complete_config` is called only once when loading the model

    def initialize(self, args):
        """`initialize` is called only once when the model is being loaded.
        Implementing `initialize` function is optional. This function allows
        the model to initialize any state associated with this model.

        Parameters
        ----------
        args : dict
          Both keys and values are strings. The dictionary keys and values are:
          * model_config: A JSON string containing the model configuration
          * model_instance_kind: A string containing model instance kind
          * model_instance_device_id: A string containing model instance device
            ID
          * model_repository: Model repository path
          * model_version: Model version
          * model_name: Model name
        """
        print('Initialized...')

    def execute(self, requests):
        """`execute` must be implemented in every Python model. `execute`
        function receives a list of pb_utils.InferenceRequest as the only
        argument. This function is called when an inference is requested
        for this model.

        Parameters
        ----------
        requests : list
          A list of pb_utils.InferenceRequest

        Returns
        -------
        list
          A list of pb_utils.InferenceResponse. The length of this list must
          be the same as `requests`
        """

        responses = []

    def finalize(self):
        """`finalize` is called only once when the model is being unloaded.
        Implementing `finalize` function is optional. This function allows
        the model to perform any necessary clean ups before exit.
        """
        print('Cleaning up...')
Step 5: 安装推理环境和各种软件
cuda版本和显卡驱动必须对应,cuda toolkit与驱动版本
对应关系见官网: https://docs.nvidia.com/cuda/cuda-toolkit-release-notes/index.html#cuda-major-component-versions
1) torch介绍和安装:
torch科学计算框架,旨在为机器学习和其他科学计算任务提供高效的矩阵运算和自动微分功能。
提供了丰富的预训练模型和算法库,使用户能够快速构建和训练各种机器学习任务。
pip install ./torch-1.12.1+cu116-cp38-cp38-linux_x86_64.whl
2) 显卡驱动:
sh ./NVIDIA-Linux-x86_64-460.106.00.run
3) cudnn介绍和安装:
CUDA Deep Neural Network library是由NVIDIA提供的GPU加速的深度神经网络(DNN)库。它旨在优化和加速深度学习任务中的神经网络模型训练和推理。
cuDNN提供了一组用于卷积神经网络(Convolutional Neural Networks, CNN)和循环神经网络(Recurrent Neural Networks, RNN)等常见深度学习任务的核心算法和函数。这些算法和函数针对GPU架构进行了高度优化,以提供最佳的性能和效率。
wget https://developer.download.nvidia.cn/compute/cuda/repos/ubuntu1804/x86_64/libcudnn8_8.1.1.33-1+cuda11.2_amd64.deb
dpkg -i libcudnn8_8.1.1.33-1+cuda11.2_amd64.deb
4) cuda:
Compute Unified Device Architecture库是由NVIDIA开发的用于GPU编程的并行计算平台和API。
通过CUDA库,可以在GPU上同步或异步地进行模型推理,同时支持批处理和多张卡并行计算,以提升模型推理的速度和效率
wget https://developer.download.nvidia.com/compute/cuda/11.2.0/local_installers/cuda_11.2.0_460.27.04_linux.run
sudo sh cuda_11.2.0_460.27.04_linux.run
5) 各种软件
nohup apt-get update
nohup apt-get install -y autoconf autogen clangd gdb git-lfs libb64-dev libz-dev locales-all mosh openssh-server python3-dev rapidjson-dev sudo tmux unzip zstd zip zsh
Step 6: 启动triton-server
CUDA_VISIBLE_DEVICES=0 setsid tritonserver --model-repository=/opt/tritonserver/python_backend/models --backend-config=python,shm-region-prefix-name=prefix1_ --http-port 8000 --grpc-port 8001 --metrics-port 8002 --log-verbose 1 --log-file /opt/tritonserver/logs/triton_server_gpu0.log
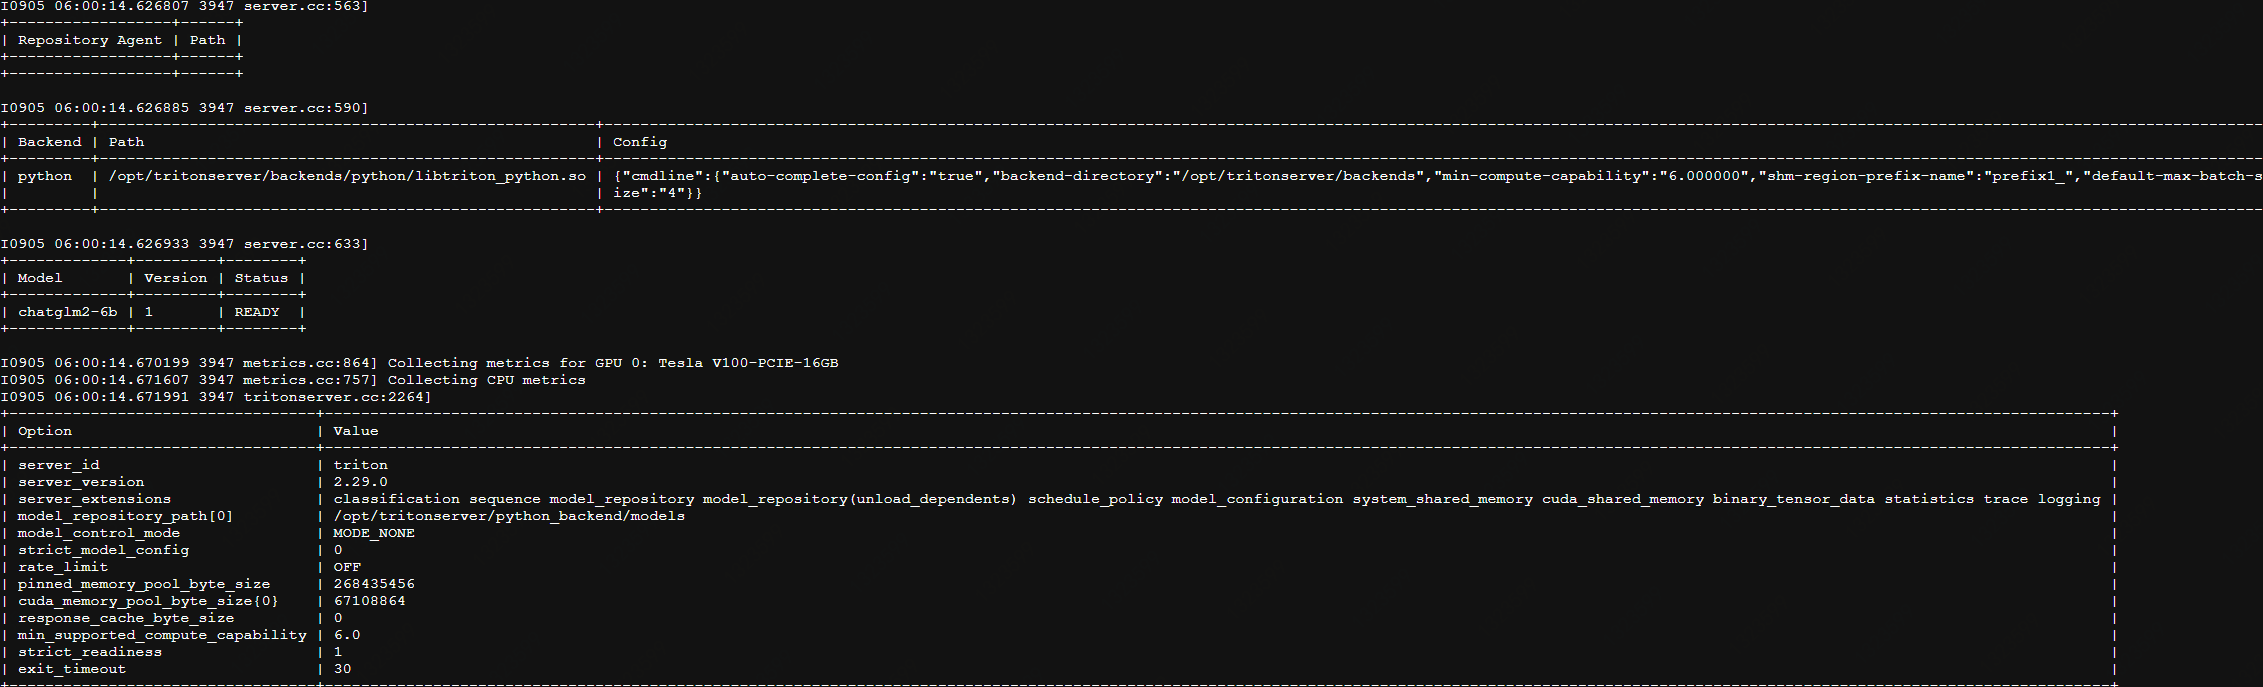
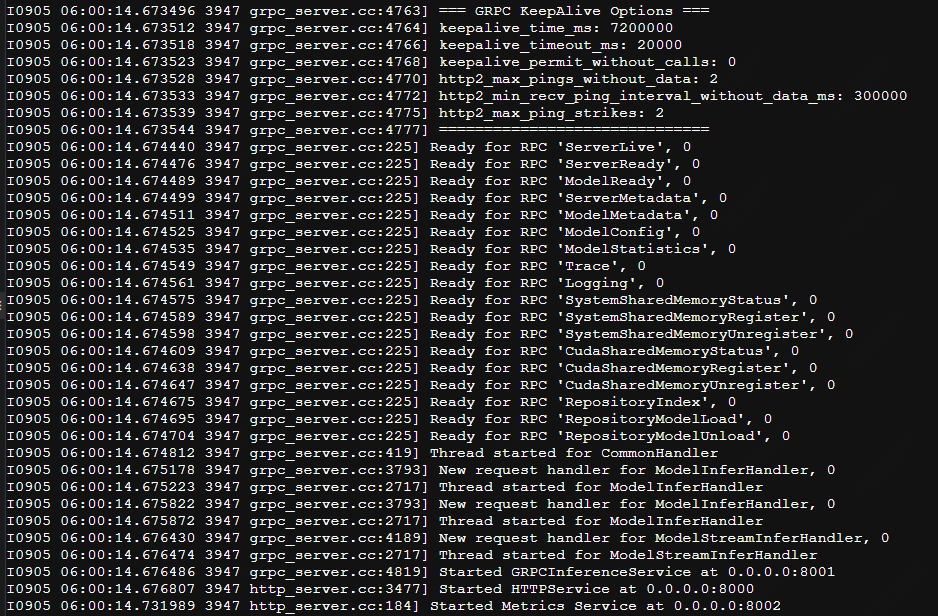
启动成功 http端口 8000 grpc端口8001 测量端口8002
三、测试
简单的调用python代码 调用http接口
import requests
# 定义模型的输入数据
data = {
    "inputs": [
        {

            "name": "QUERY",
            "shape": [1,1],
            "datatype": "BYTES",
            "data": ["川普是不是四川人"]
        },
        {

            "name": "max_new_tokens",
            "shape" : [1,1],
            "datatype": "UINT32",
            "data": [15000]
        },
    ]
}
headers = {
    'Content-Type': 'application/json',
}
# 发送 POST 请求
response = requests.post('http://localhost:8000/v2/models/chatglm2-6b/infer', headers=headers, json=data)
result = response.json()
print(result)
响应:
{
	"model_name": "chatglm2-6b",
	"model_version": "1",
	"outputs": [
		{
			"data": [
				"\n\n 川普不是四川人,他出生于美国宾夕法尼亚州,是一个美国政治家、企业家和电视名人。"
			],
			"datatype": "BYTES",
			"name": "OUTPUT",
			"shape": []
		}
	]
}
四、技术方向
CI(Continuous Integration,持续集成)/CD(Continuous Delivery,持续交付/Continuous Deployment,持续部署)
未来可实现:
1.使用k8s自动操作容器部署--类似行云
2.保存一个大模型运行环境的完整docker镜像, 只需下载模型文件到对应目录即可启动提供服务..
3.单机部署多种开源模型, 提供不同模型的应答接口 , 可对比应答效果
4.创建dockerFile自动构建基础容器
k8s文档
https://kubernetes.io/zh-cn/docs/tasks/tools/
在所有节点上安装Docker和kubeadm,kubenet
部署Kubernetes Master
部署容器网络插件kubectl
部署 Kubernetes Node,将节点加入Kubernetes集群中