您好!
欢迎来到京东云开发者社区
登录
首页
博文
课程
大赛
工具
用户中心
开源
首页
博文
课程
大赛
工具
开源
更多
用户中心
开发者社区
>
博文
>
一份保姆级的Stable Diffusion部署教程,开启你的炼丹之路
分享
打开微信扫码分享
点击前往QQ分享
点击前往微博分享
点击复制链接
一份保姆级的Stable Diffusion部署教程,开启你的炼丹之路
wlchn_m
2023-07-06
IP归属:北京
1253浏览
 <font size='3'>市面上有很多可以被用于AI绘画的应用,例如DALL-E、Midjourney、NovelAI等,他们的大部分都依托云端服务器运行,一部分还需要支付会员费用来购买更多出图的额度。在2022年8月,一款叫做Stable Diffusion的应用,通过算法迭代将AI绘画的精细度提上了一个新的台阶,并能在以秒计数的时间内完成产出,还可以在一台有“民用级”显卡的电脑上运行。</font> <font size='3'>通过Stable Diffusion,可以绘制出各种风格的作品,比如动漫风、插画立绘、国风水墨、3D建模,甚至是照片级的拟真图像,而借助诸如LoRa、ControlNet等衍生功能,还可以做到精准控制美术风格、角色细节、姿势、动作、构图等。更更重要的是,他是全面开源的,这意味着你可以在自己的电脑上部署整个程序,使用它出图、作画是完全免费而且不限量的!市面上大多数商业级的AI绘画应用,都是基于SD去开发的。尽管Stable Diffusion非常亲民,但他还是有一定的配置要求的,它需要一张性能足够强大的独立显卡提供算力进行绘制。实际上,“跑得动”和“玩得爽”是两种不同的体验,算力上的差异会极大的影响AI绘画时的出图效率,也正是因为此,有很多同学因为个人电脑捉急的配置而错失了深入体验Stable Diffusion的机会。等一下,你知道京东云吗?<a href="https://www.jdcloud.com/cn/pages/aistudy?utm_source=c_largemodel">京东云GPU云主机</a>是提供GPU算力的弹性计算服务,具有超强的并行计算能力,正在深度学习、科学计算、图形图像处理、视频编解码等场景广泛使用,为您提供触手可得的算力,有效缓解计算压力,提升您的业务效率,并可弹性扩展,助您快速构建异构的计算应用。</font> <font size='3'>在经历了一系列的探索后,我为你总结出了一套零基础的、非常好上手的借助京东云GPU云主机部署安装Stable Diffusion WebUI以及相关工具和插件的保姆集教程,请查收。</font> # 一、创建GPU主机实例 ## 1.1 创建GPU云主机 <font size='3'><a href="https://www.jdcloud.com/cn/pages/aistudy?utm_source=c_largemodel">京东云GPU云主机</a>的标准型的配置包含Tesla P40 24G显卡、12核48G,跑Stable Diffusion体验非常好,配置推荐如下: | 配置 | 推荐 | 说明 | | --- | --- | --- | | 系统 | Ubuntu 20.04 64位 | | | 规格 | GPU 标准型 p.n - p.n1p40.3xlarge | 12核 48G Nvidia Tesla P40 24G显存 | | 系统盘 | 100G | 系统盘建议100G | | 带宽 | 5M | 建议5M | ## 1.2 创建安全组并绑定 <font size='3'>首先在左侧菜单【安全组】创建一个安全组,在【入站规则】和【出站规则】中分别添加并开放7860、7861、8080、8888端口。其中  然后在实例详情中,点击【安全组】-【绑定安全组】绑定刚刚创建的安全组。 # 二、环境安装 ## 2.1 安装GPU驱动 <font size='3'>在英伟达官网根据显卡型号、操作系统、CUDA等查询驱动版本。官网查询链接https://www.nvidia.com/Download/index.aspx?lang=en-us 注意这里的CUDA版本,如未安装CUDA可以先选择一个版本,稍后再安装CUDA. 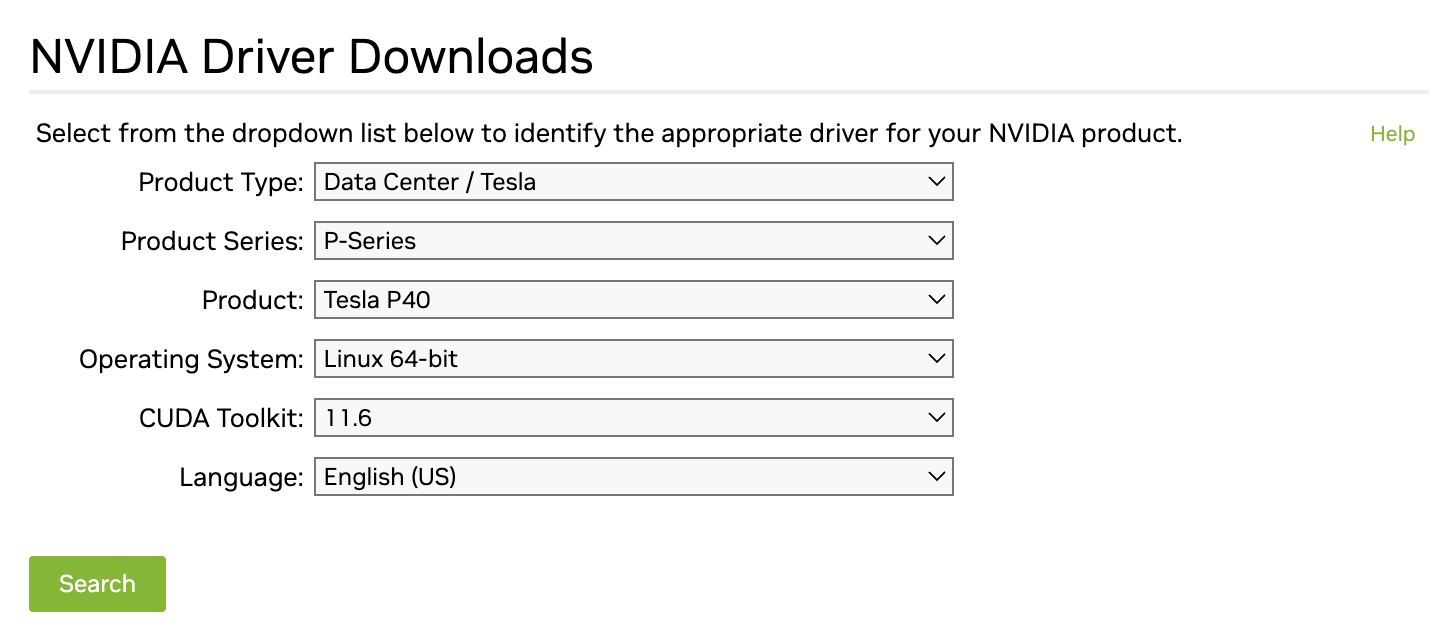 点击Search  如上图,查询到合适的版本为510. 然后可以使用apt安装对应驱动版本,使用apt安装更方便一些。 ``` # 安装510版本驱动 apt install nvidia-driver-510 # 查看驱动信息 nvidia-smi ``` 如安装成功,则可以展示如下提示信息。 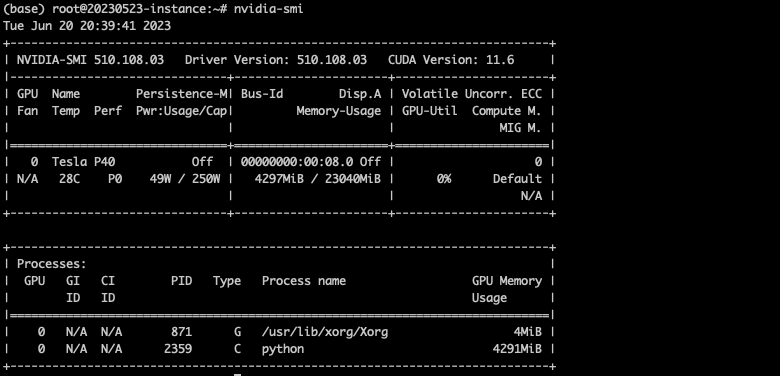 ## 2.2 安装CUDA <font size='3'>访问英伟达开发者网站先选择CUDA版本(版本要对应2.1中GPU驱动支持的CUDA版本), 再根据操作系统选择对应CUDA安装命令,访问链接https://developer.nvidia.com/cuda-toolkit-archive 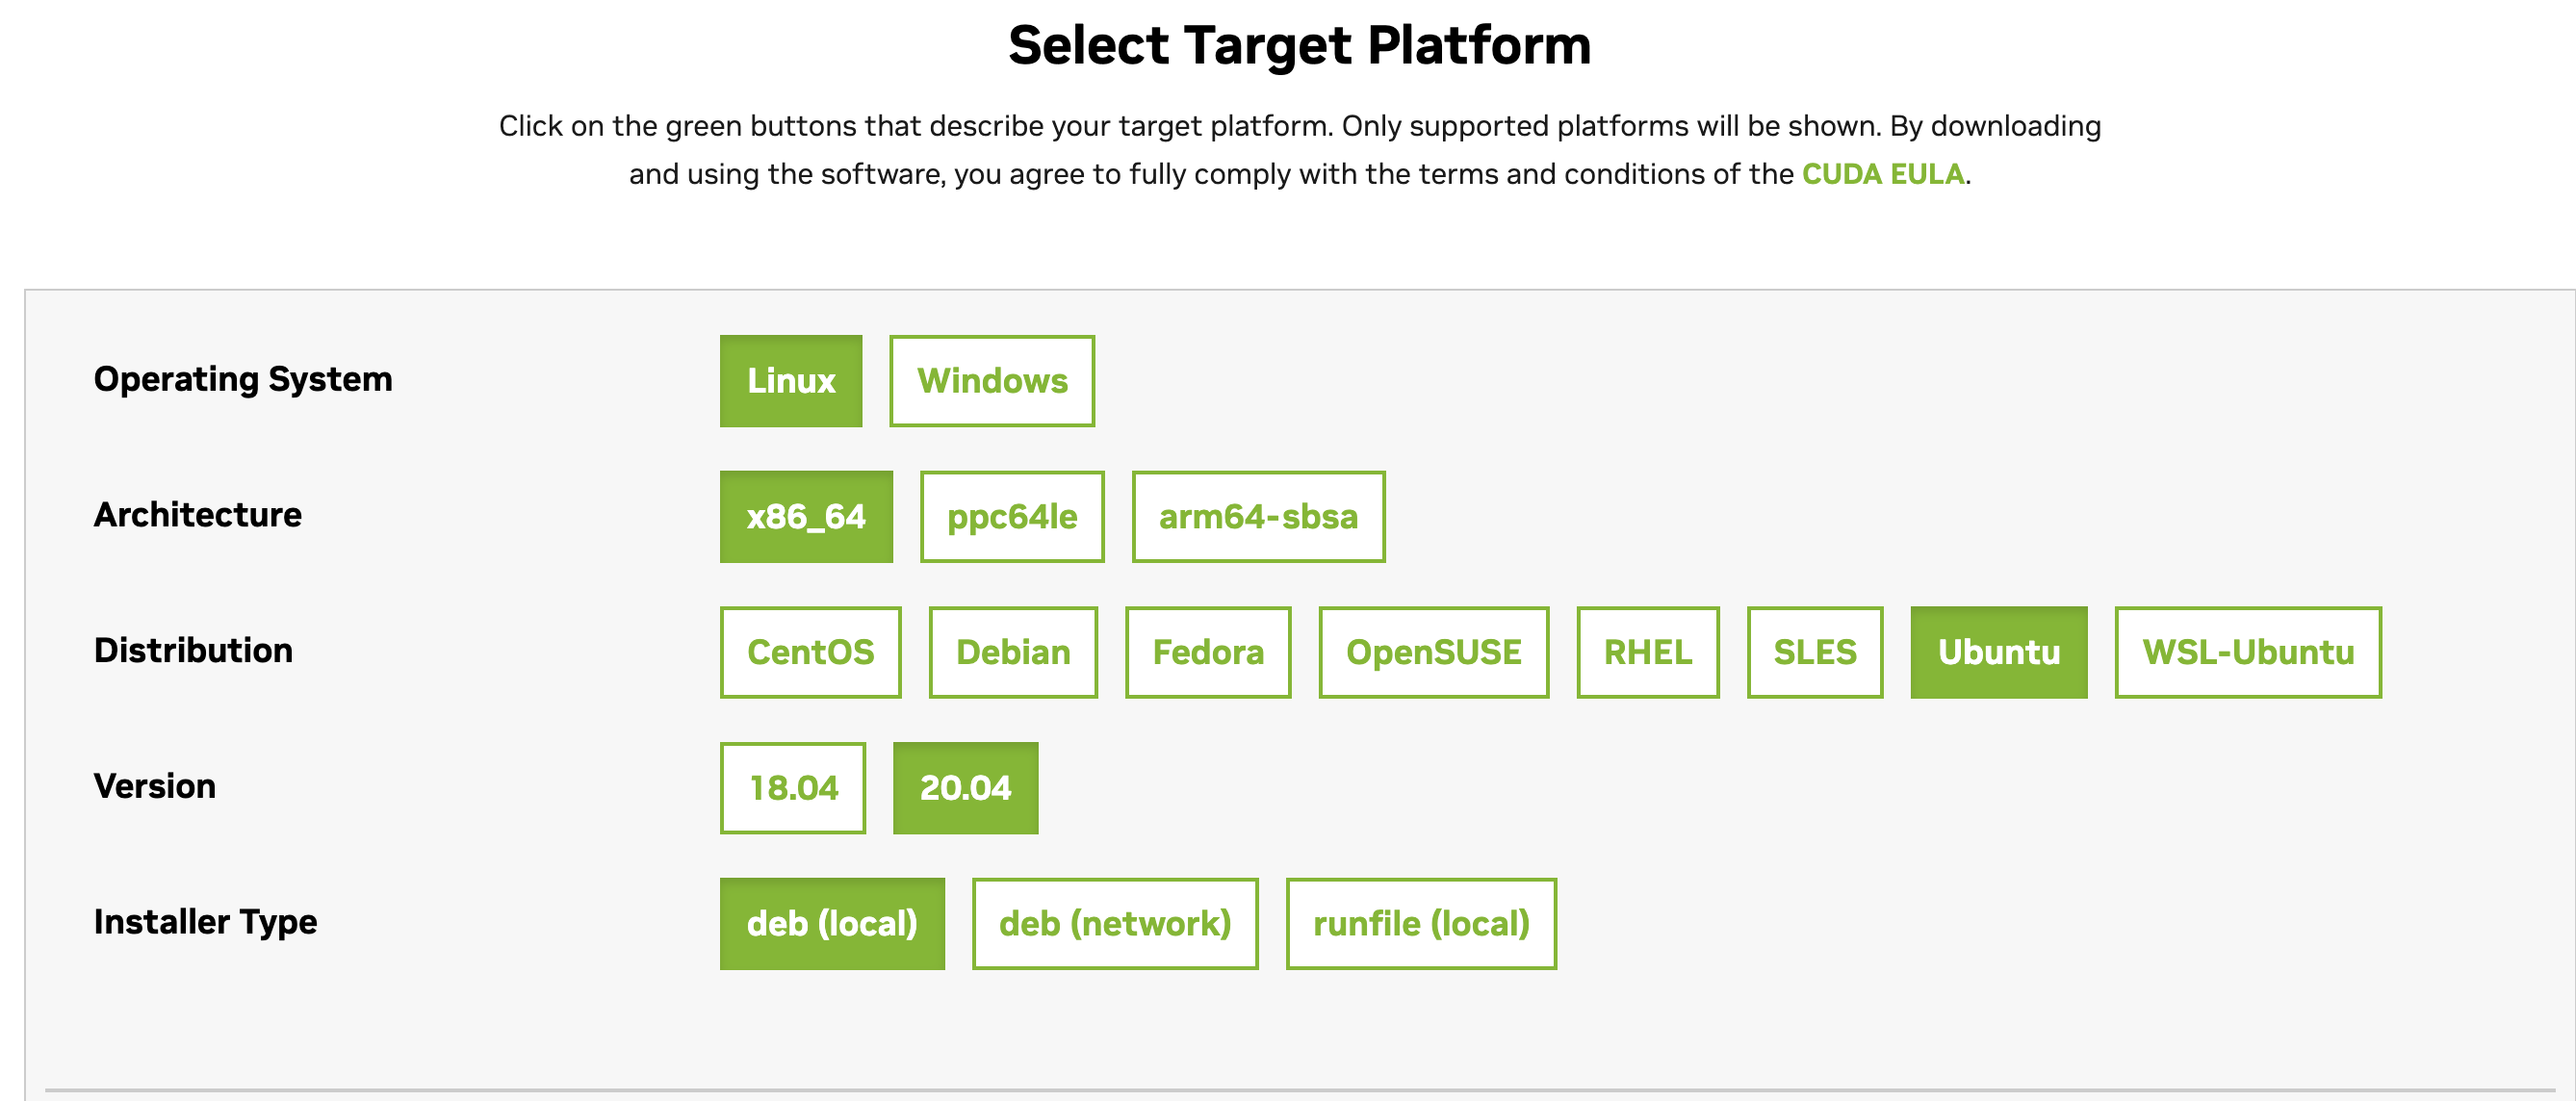 <font size='3'>如上面安装确定所选择驱动对应的CUDA版本为11.6,根据安装命令安装, 以下命令适用Ubuntu 20.04 x86\_64, GPU驱动510版本 ``` wget https://developer.download.nvidia.com/compute/cuda/repos/ubuntu2004/x86_64/cuda-ubuntu2004.pin sudo mv cuda-ubuntu2004.pin /etc/apt/preferences.d/cuda-repository-pin-600 wget https://developer.download.nvidia.com/compute/cuda/11.6.2/local_installers/cuda-repo-ubuntu2004-11-6-local_11.6.2-510.47.03-1_amd64.deb sudo dpkg -i cuda-repo-ubuntu2004-11-6-local_11.6.2-510.47.03-1_amd64.deb sudo apt-key add /var/cuda-repo-ubuntu2004-11-6-local/7fa2af80.pub sudo apt-get update sudo apt-get -y install cuda ``` ## 2.3 安装Python 3.10 <font size='3'>Stable Diffusion WebUI目前最低支持Python 3.10,所以直接安装3.10版本,安装命令: ``` apt install software-properties-common add-apt-repository ppa:deadsnakes/ppa apt update apt install python3.10 python3.10 --verison ``` <font size='3'>PIP设置国内源,由于默认源在国外,所以安装可能经常会出现timeout等问题,使用国内源可以很大程度避免下载包timeout的情况。将如下内容复制到文件`~/.pip/pip.conf`当中,如没有该文件,先创建`touch ~/.pip/pip.conf`。 ``` [global] index-url = https://pypi.tuna.tsinghua.edu.cn/simple [install] trusted-host = https://pypi.tuna.tsinghua.edu.cn ``` ## 2.4 安装Anaconda <font size='3'>非常推荐使用Anaconda。Anaconda可以便捷获取包且对包能够进行管理,同时对Python环境可以统一管理的发行版本。安装命令也很简单: ``` wget https://repo.anaconda.com/archive/Anaconda3-2023.03-1-Linux-x86_64.sh bash ./Anaconda3-2023.03-1-Linux-x86_64.sh ``` <font size='3'>创建Python3.10.9环境,并使用该环境 ``` conda create -n python3.10.9 python==3.10.9 conda activate python3.10.9 ``` ## 2.5 安装PyTorch <font size='3'>首先在PyTorch官网查询对应CUDA版本的Torch,如上述章节2.2中CUDA 11.6需要安装pytorch1.13.1 ``` # 使用conda安装,两种安装方式二选一 conda install pytorch==1.13.1 torchvision==0.14.1 torchaudio==0.13.1 pytorch-cuda=11.6 -c pytorch -c nvidia # 使用pip安装,两种安装方式二选一 pip install torch==1.13.1+cu116 torchvision==0.14.1+cu116 torchaudio==0.13.1 --extra-index-url https://download.pytorch.org/whl/cu116 ``` # 三、部署Stable Diffusion WebUI ## 3.1 下载stable-diffusion-webui <font size='3'>注意首先激活Python3.10环境: ``` conda activate python3.10.9 ``` <font size='3'>然后下载stable-diffusion-webui ``` git clone https://github.com/AUTOMATIC1111/stable-diffusion-webui.git ``` ## 3.2 安装依赖 <font size='3'>cd到stable-diffusion-webui目录安装相应的依赖,如有访问网络超时、失败等,注意按照章节2.3中设置国内源,如果再次失败,重试几次一般都可完成安装。 ``` cd stable-diffusion-webui pip install -r requirements_versions.txt pip install -r requirements.txt ``` ## 3.3 启动stable-diffusion-webui <font size='3'>安装完成后,执行如下启动命令: ``` python launch.py --listen --enable-insecure-extension-access ``` <font size='3'>这一步骤会下载一些常用模型,如果遇到下载失败,根据报错提示在huggingface.co下载模型放到对应目录,如下载stable-diffusion-v1-5模型,搜索找到https://huggingface.co/runwayml/stable-diffusion-v1-5/tree/main 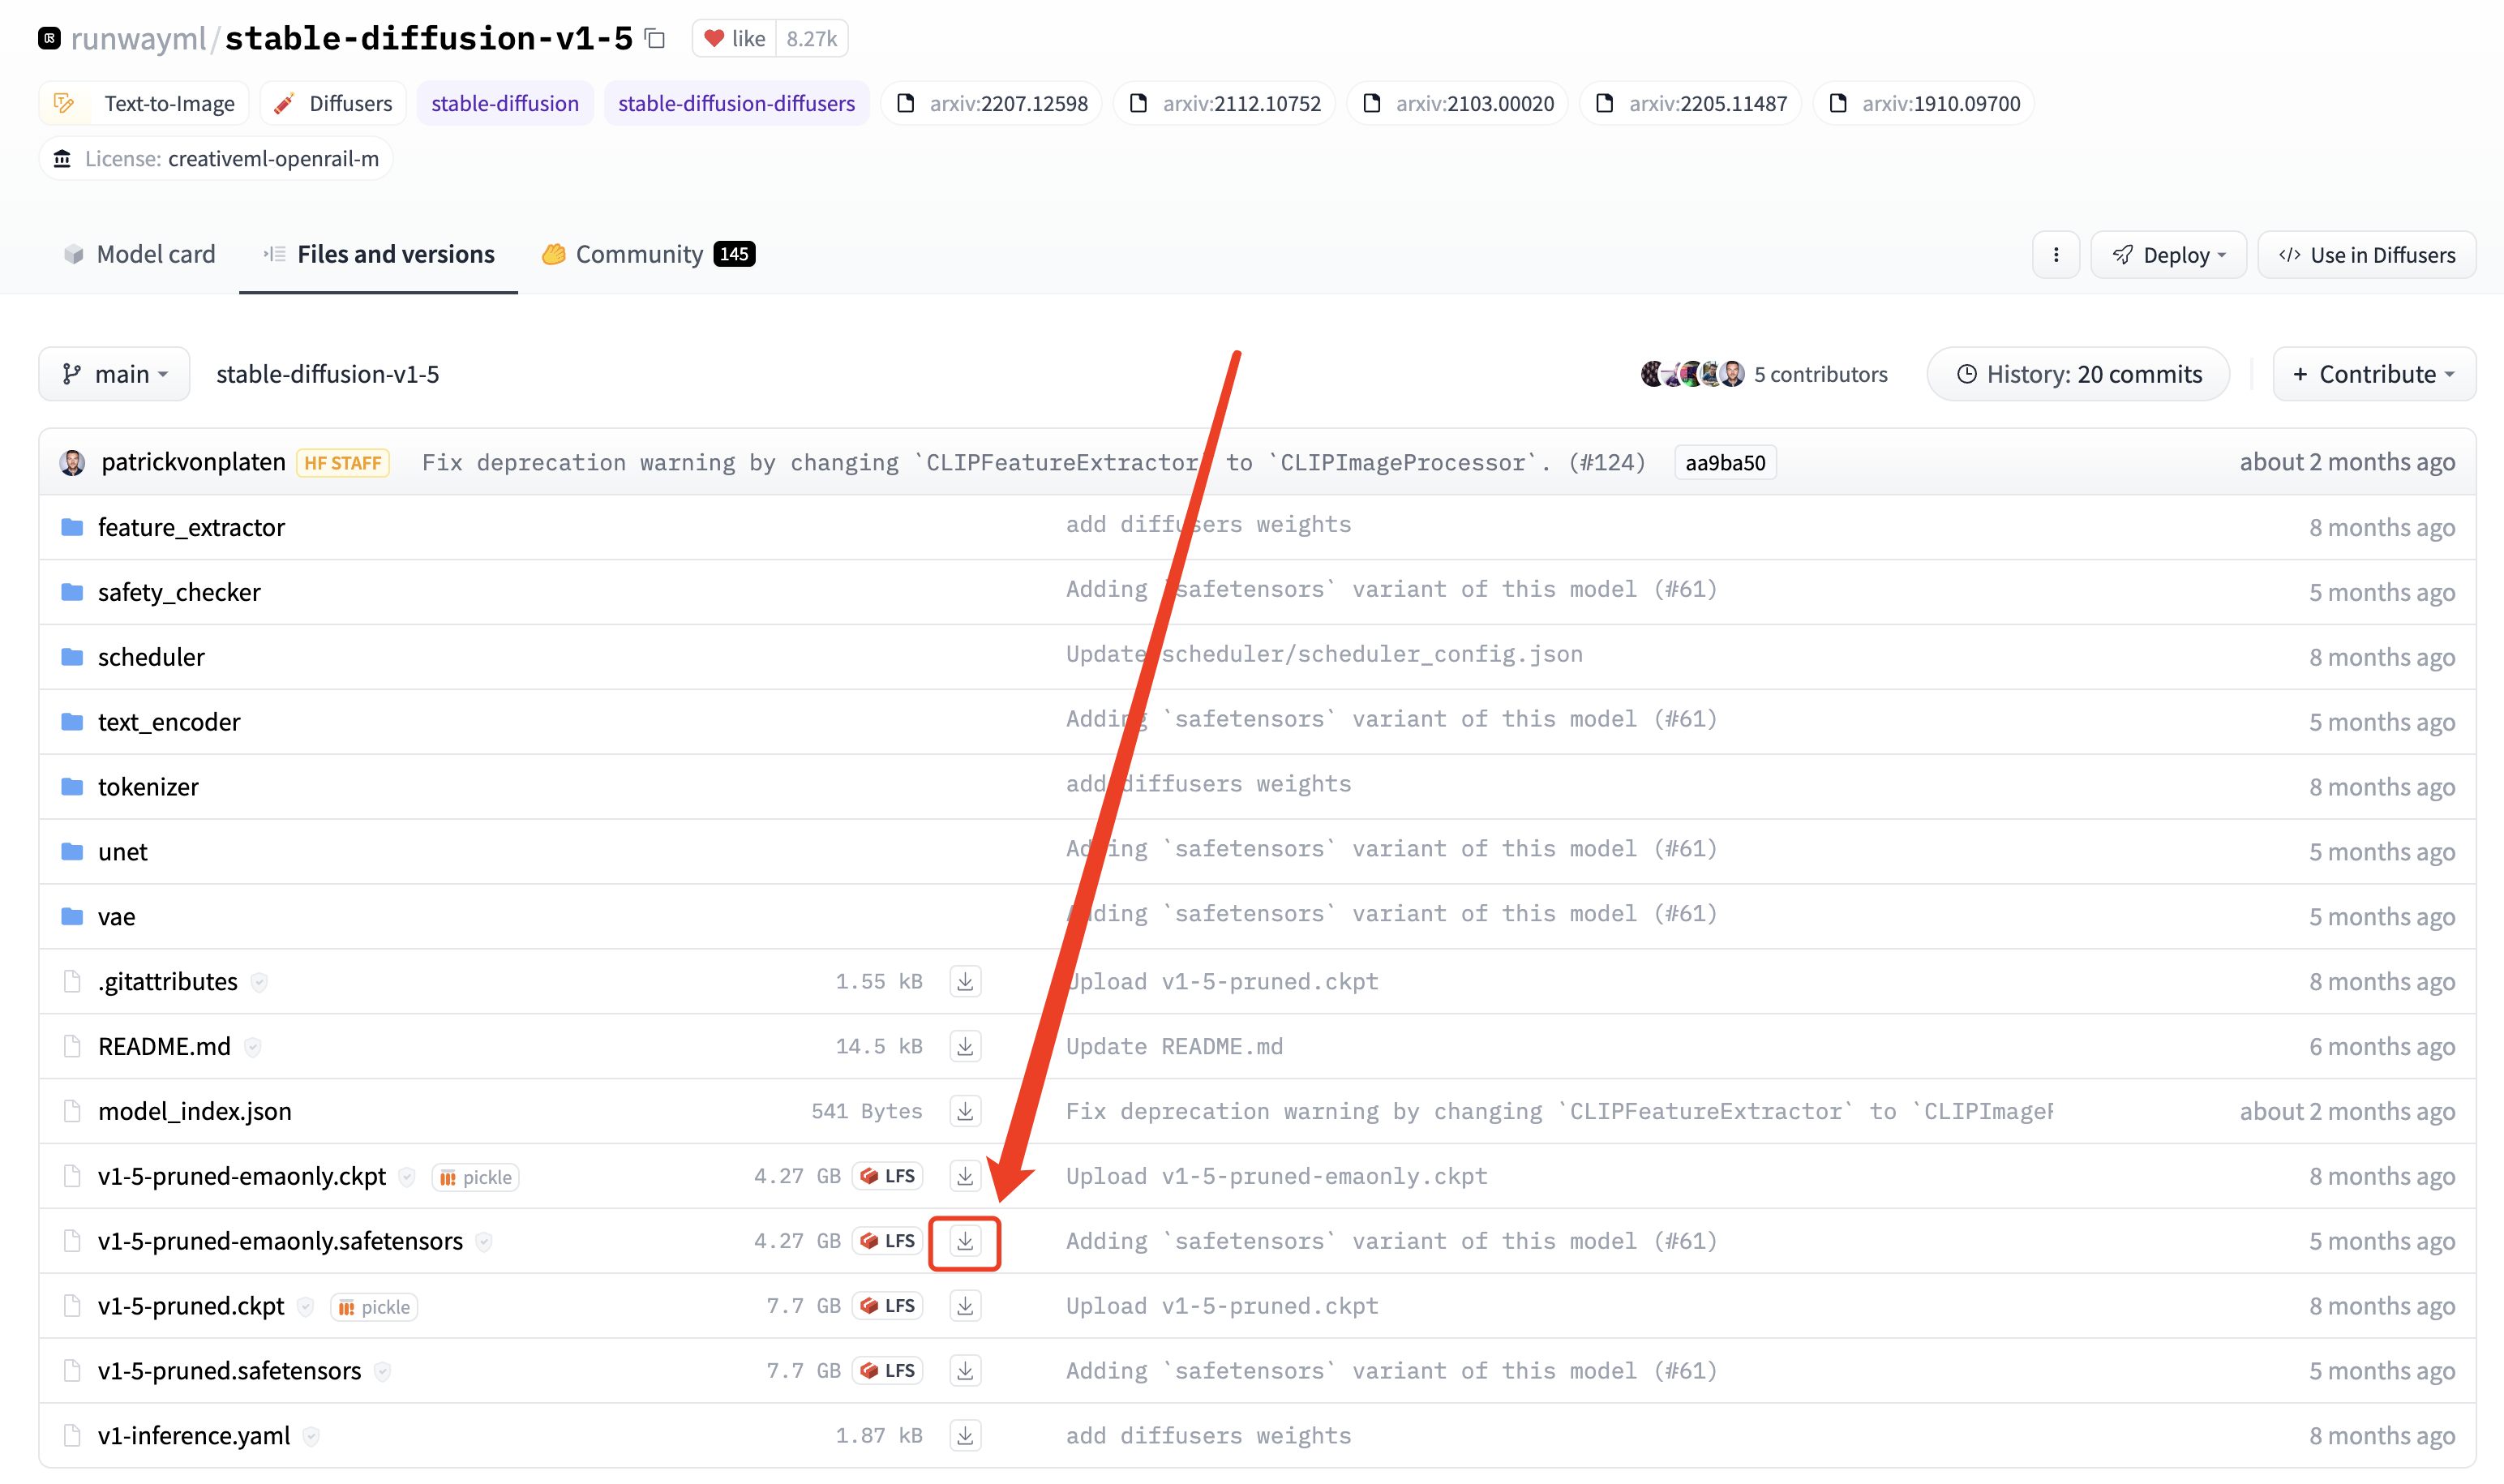 <font size='3'>点击图中下载按钮,下载v1-5-pruned-emaonly.safetensors到stable-diffusion-webui/models/Stable-diffusion目录,其他模型同理。 模型下载完成,再次执行启动命令,提示已启动到7860端口,则可以通过IP+7860端口访问: 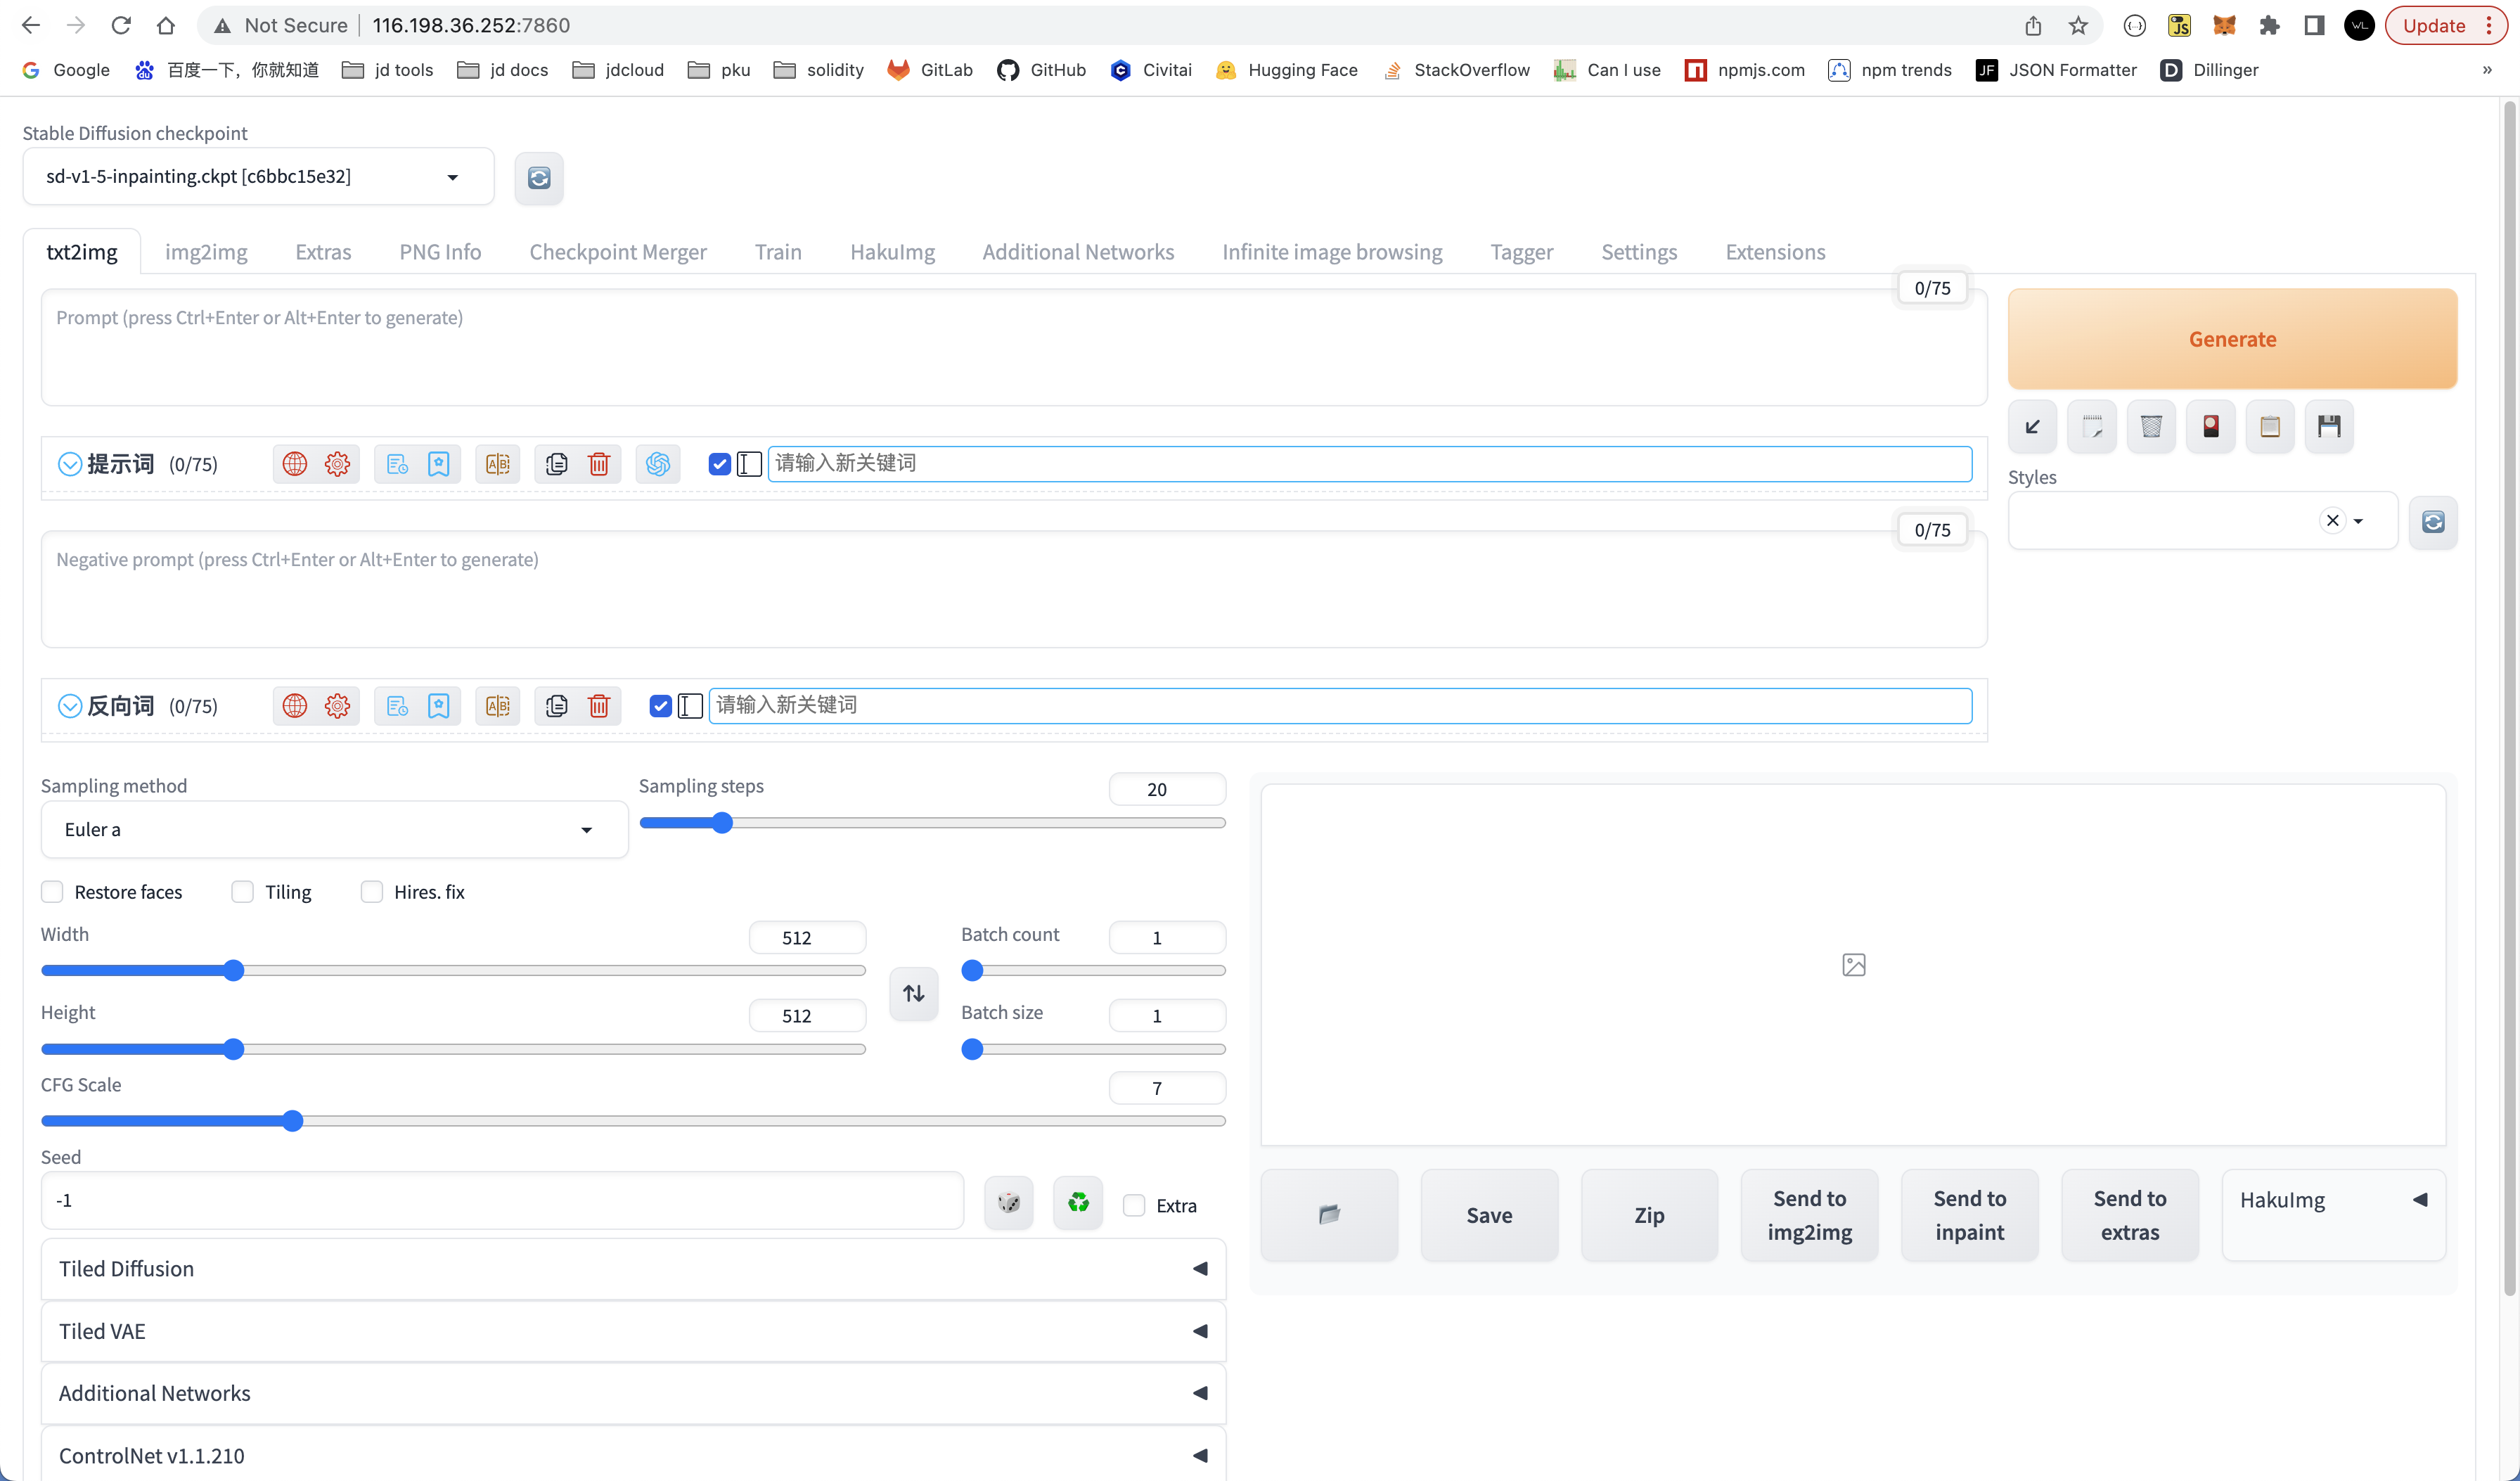 <font size='3'>公网建议设置访问密码,注意替换下面命令当中的username:password为用户名、密码。 ``` python launch.py --listen --enable-insecure-extension-access --gradio-auth username:password ``` 上述命令非后台运行,如需后台运行可以使用nohup、tmux等方法实现。 ## 3.4 使用stable-diffusions生成图片 <font size='3'>下载一个模型到/stable-diffusion-webui/models/Stable-diffusion目录,模型可以在https://civitai.com/查找,如下图所用majicMIX realistic模型。下载完成后点击左上角刷新按钮,然后选择刚下载的模型,输入Promot和参数即可生成图片。 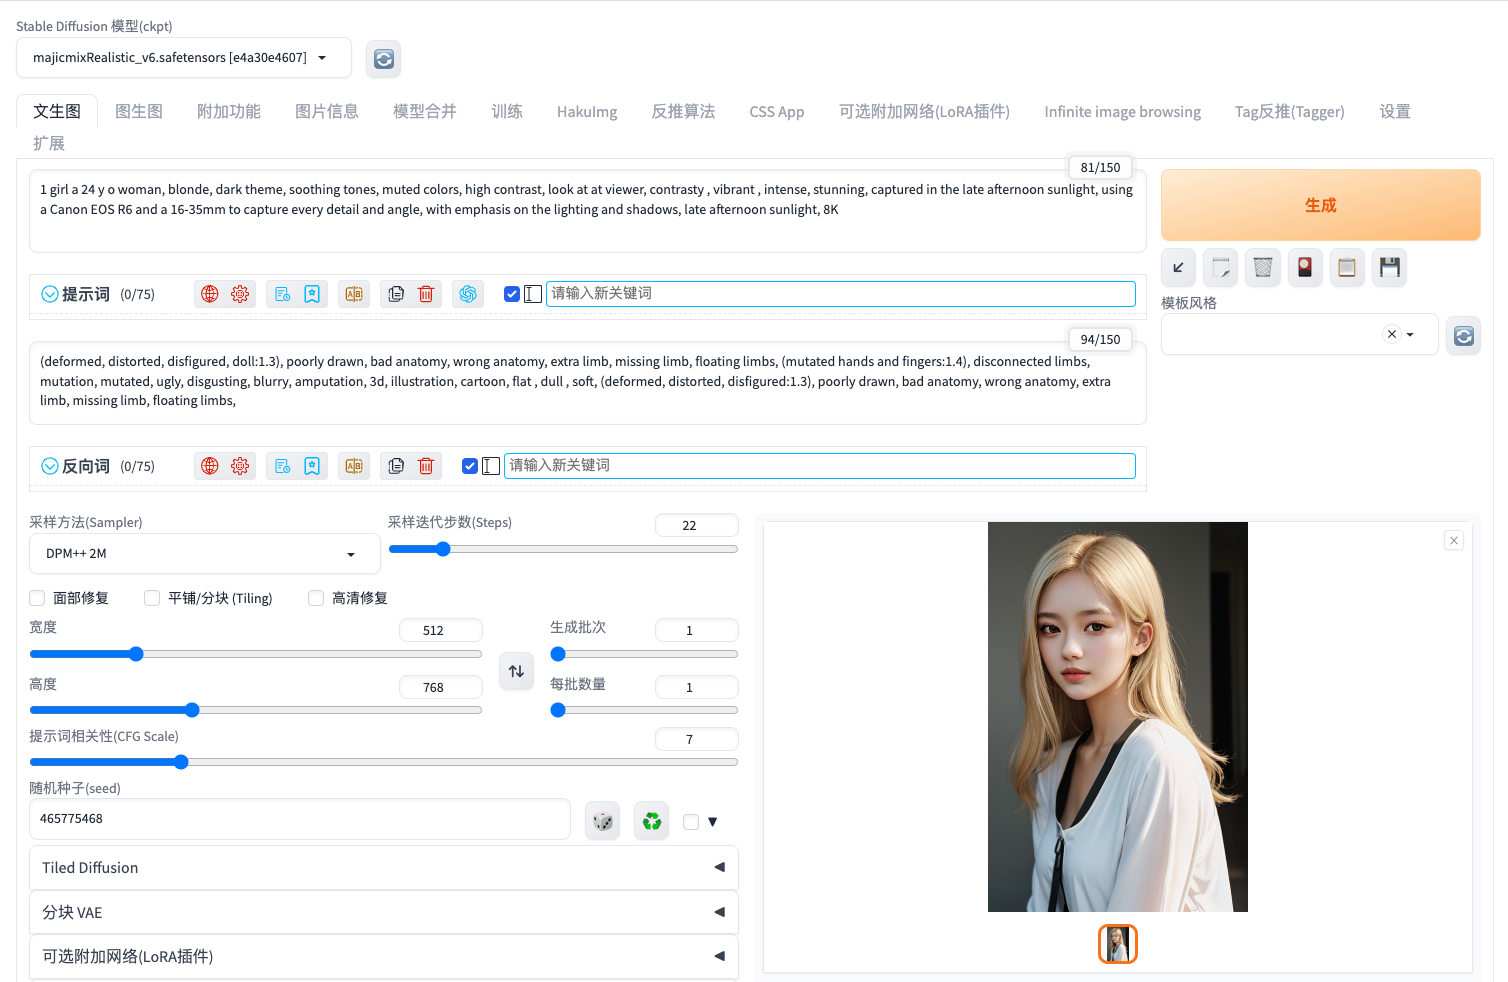 <font size='3'>附上图所用Promot和参数 Prompt ``` 1 girl a 24 y o woman, blonde, dark theme, soothing tones, muted colors, high contrast, look at at viewer, contrasty , vibrant , intense, stunning, captured in the late afternoon sunlight, using a Canon EOS R6 and a 16-35mm to capture every detail and angle, with emphasis on the lighting and shadows, late afternoon sunlight, 8K ``` <font size='3'>Negative prompt ``` (deformed, distorted, disfigured, doll:1.3), poorly drawn, bad anatomy, wrong anatomy, extra limb, missing limb, floating limbs, (mutated hands and fingers:1.4), disconnected limbs, mutation, mutated, ugly, disgusting, blurry, amputation, 3d, illustration, cartoon, flat , dull , soft, (deformed, distorted, disfigured:1.3), poorly drawn, bad anatomy, wrong anatomy, extra limb, missing limb, floating limbs, ``` <font size='3'>其他参数  # 四、常用相关工具与插件 ## 4.1 安装LoRa插件Additional Networks <font size='3'>使用Lora必不可少的插件,Additional Networks可以用来控制checkpoint+LoRa或者多个LoRa模型生成混合风格的图像,并且可以设置Lora模型的Weight。安装方式如下: <font size='3'>打开stable-diffusion-webui,点击【Extensions】- 【Install from URL】输入https://ghproxy.com/https://github.com/kohya-ss/sd-webui-additional-networks.git 然后点击【Install】等待安装,直到在【Installed】中显示,然后直接用命令重启stable-diffusion-webui(不是reload webui),强烈推荐所有插件安装完成都命令重启stable-diffusion-webui,可以免去很多麻烦。 最后点击【Setting】-【Additional Networks】输入LoRa文件夹的绝对路径,如/root/stable-diffusion-webui/models/Lora(示例,请填写你的系统路径),然后【Reload UI】等待重启完成。 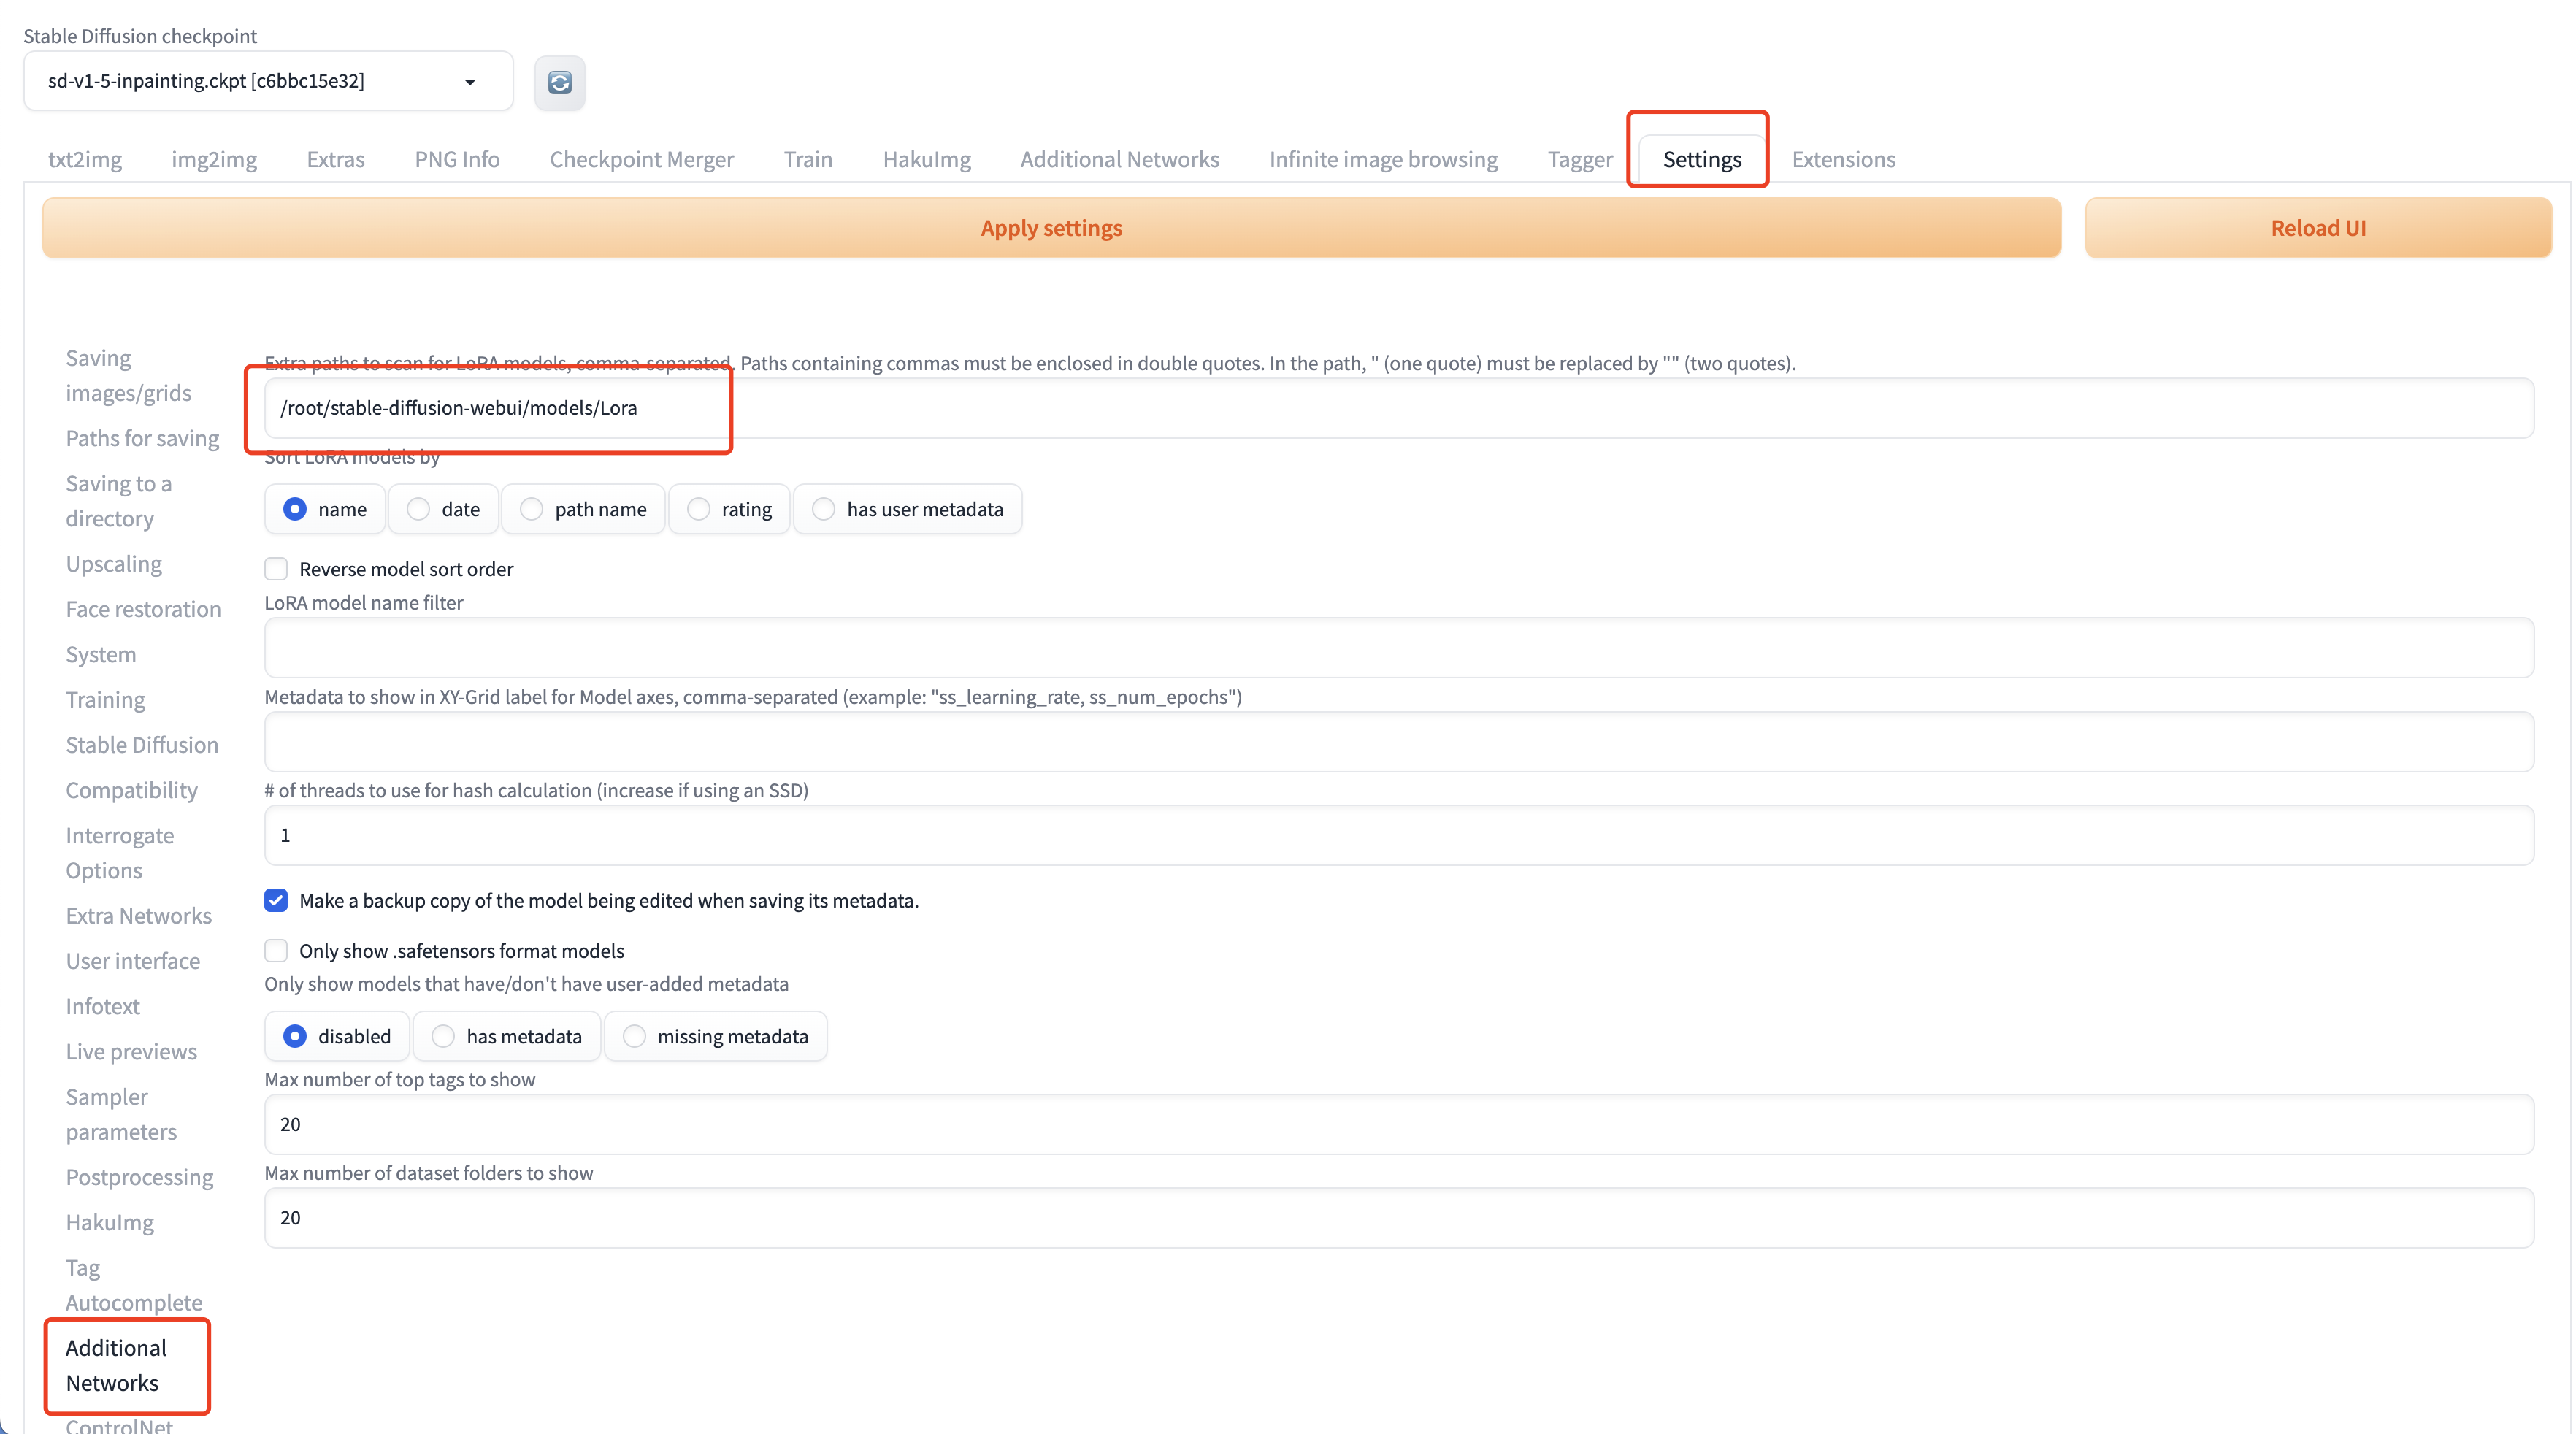 <font size='3'>然后可以在【txt2img】或【img2img】中选择Lora模型并设置权重使用。 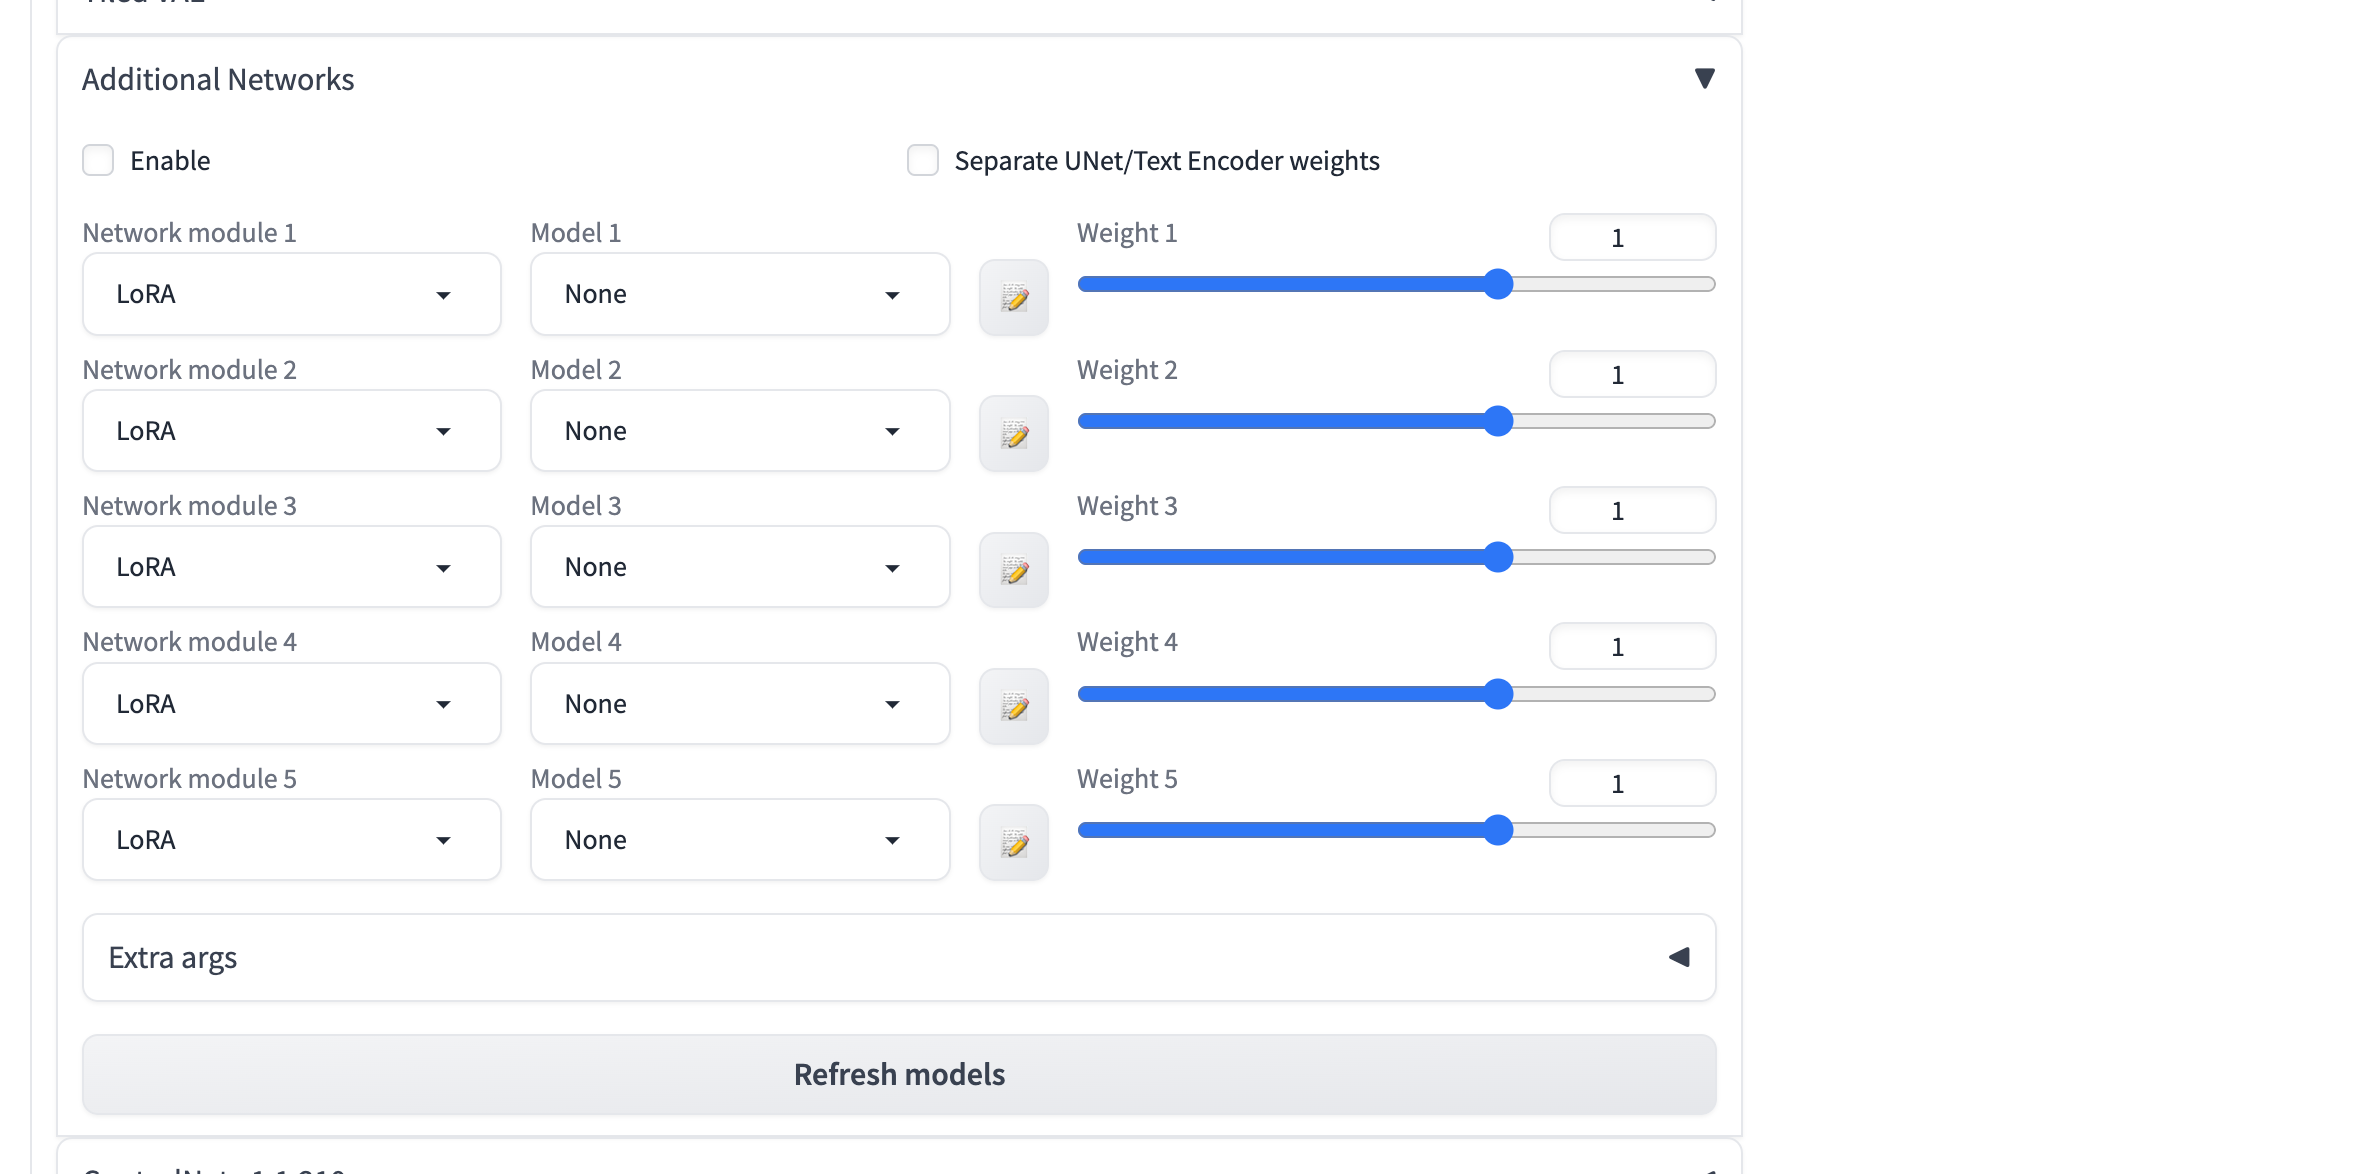 ## 4.2 安装ControlNet <font size='3'>作为Stable Diffusion必装插件,ControlNet 允许用户对生成的图像进行精细的控制,以获得更好的视觉效果,ControlNet让AI绘画的可控性有了质的突变,让AGIC真正的可以投入生产使用。 打开stable-diffusion-webui,点击【Extensions】- 【Install from URL】输入https://ghproxy.com/https://github.com/Mikubill/sd-webui-controlnet.git 然后点击【Install】等待安装,直到在【Installed】中显示,然后直接用命令重启stable-diffusion-webui(不是reload webui)。 由于controlNet会使用很多模型,所以在重启的时候会默认下载,如果下载失败或超时,需要手动下载到controlnet目录。 访问huggingface.co找到controlnet的地址:https://huggingface.co/lllyasviel/ControlNet-v1-1/tree/main 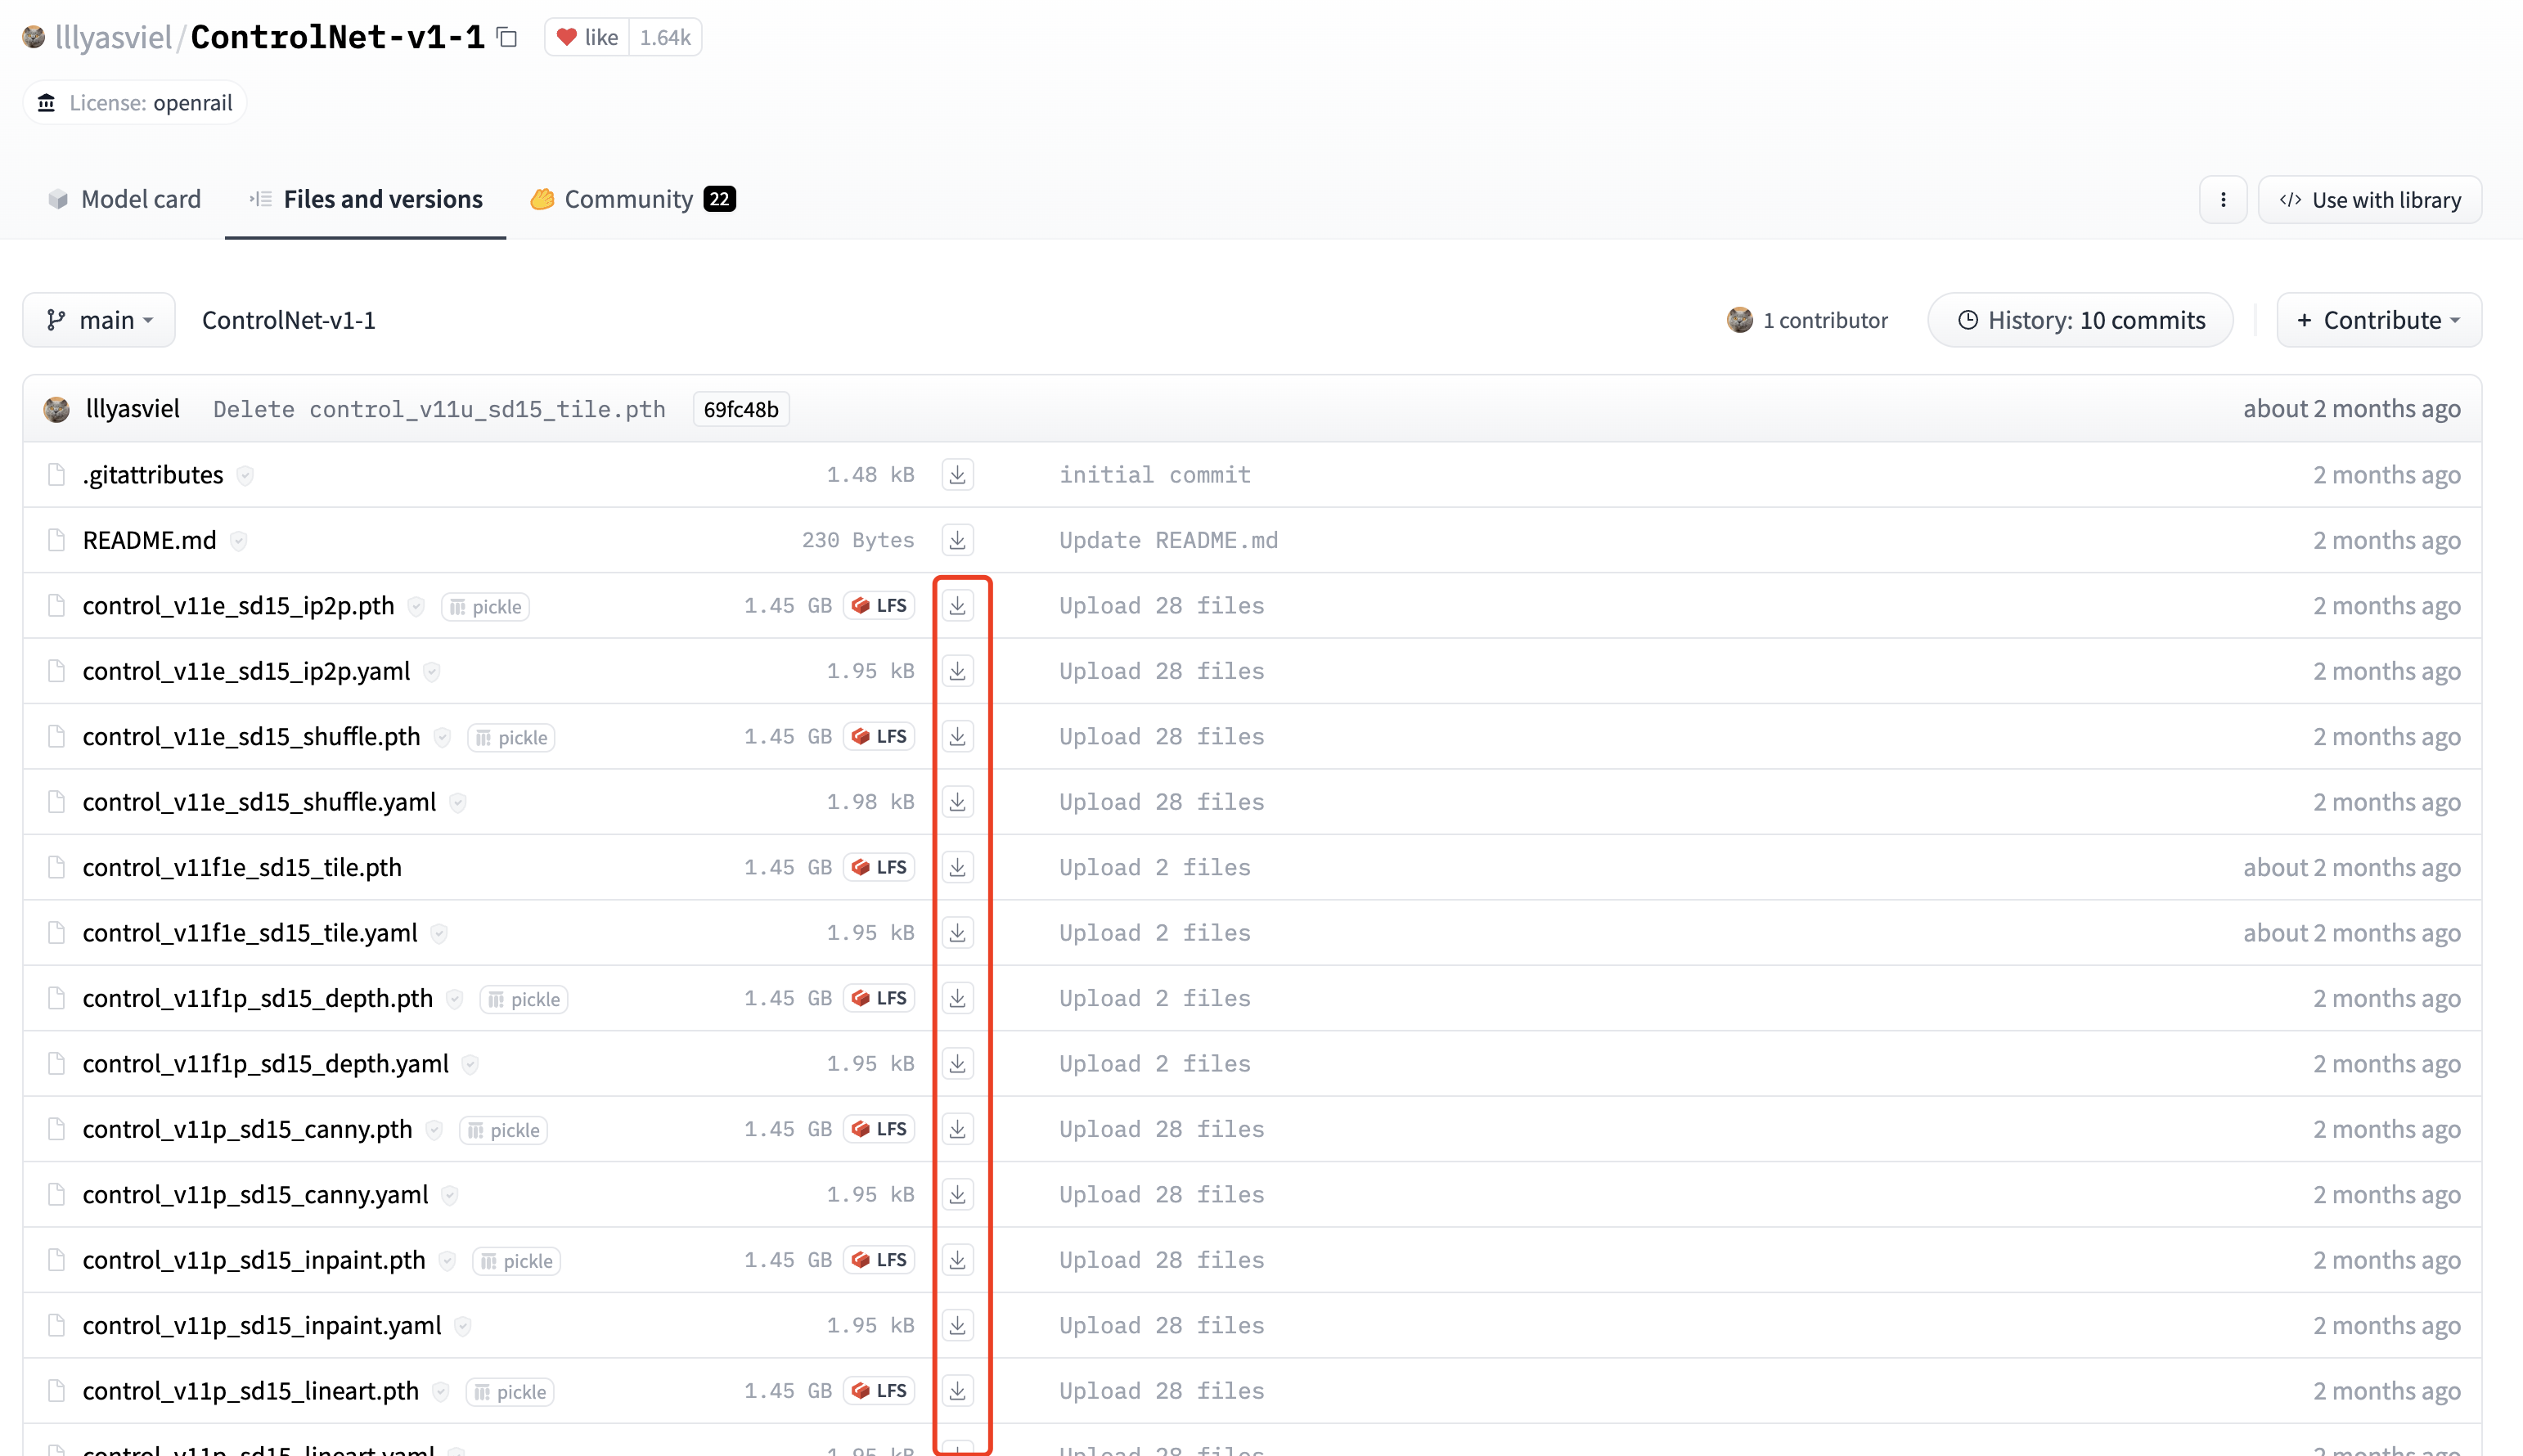 <font size='3'>手动下载上面模型文件到stable-diffusion-webui/extensions/sd-webui-controlnet/models目录,查看已下载controlnet模型:  <font size='3'>下载完成,重启stable-diffusion-webui即可在【txt2img】或【img2img】使用。 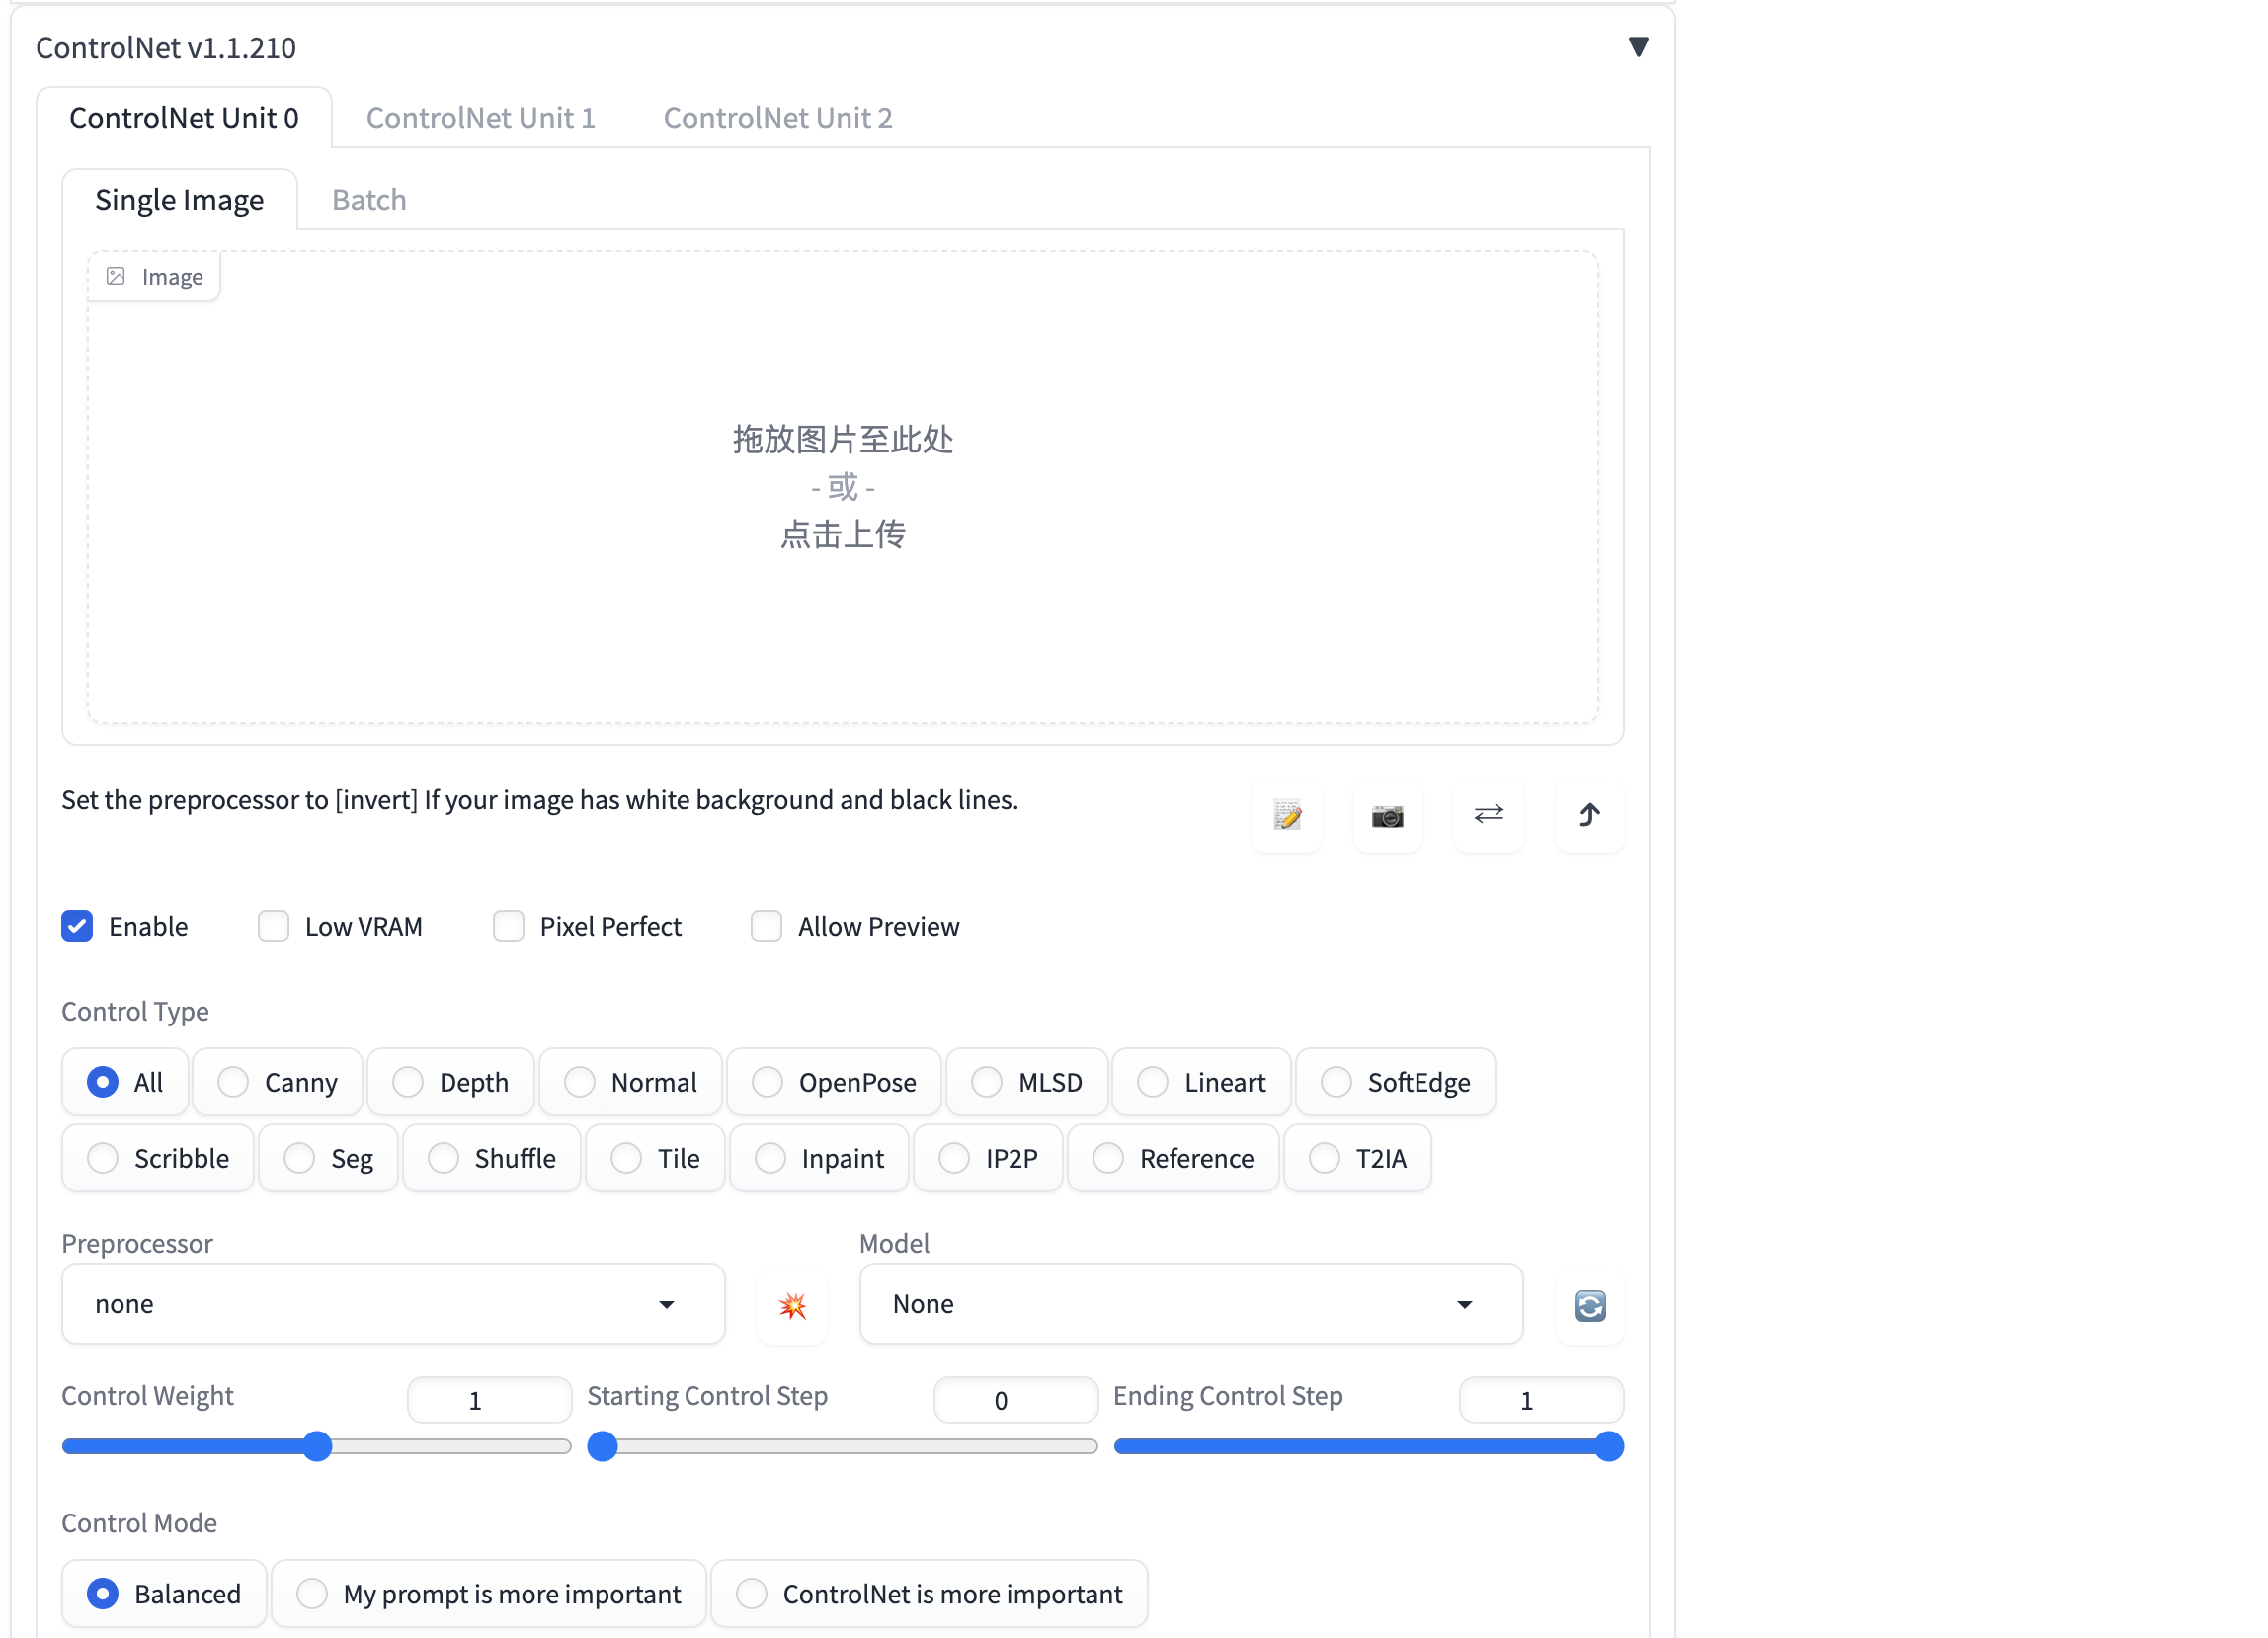 ## 4.3 Jupyter Notebook <font size='3'>Jupyter Notebook是一个基于网页的交互环境,可以用来编辑、运行Python代码,可视化看到运行结果。同时提供了基础的文件树操作功能等。 如已在章节2.4中安装了Anaconda,直接使用以下命令运行notebook ``` jupyter notebook --allow-root --NotebookApp.token='设置你的token' ``` <font size='3'>访问IP+8888端口,可以开始使用notebook 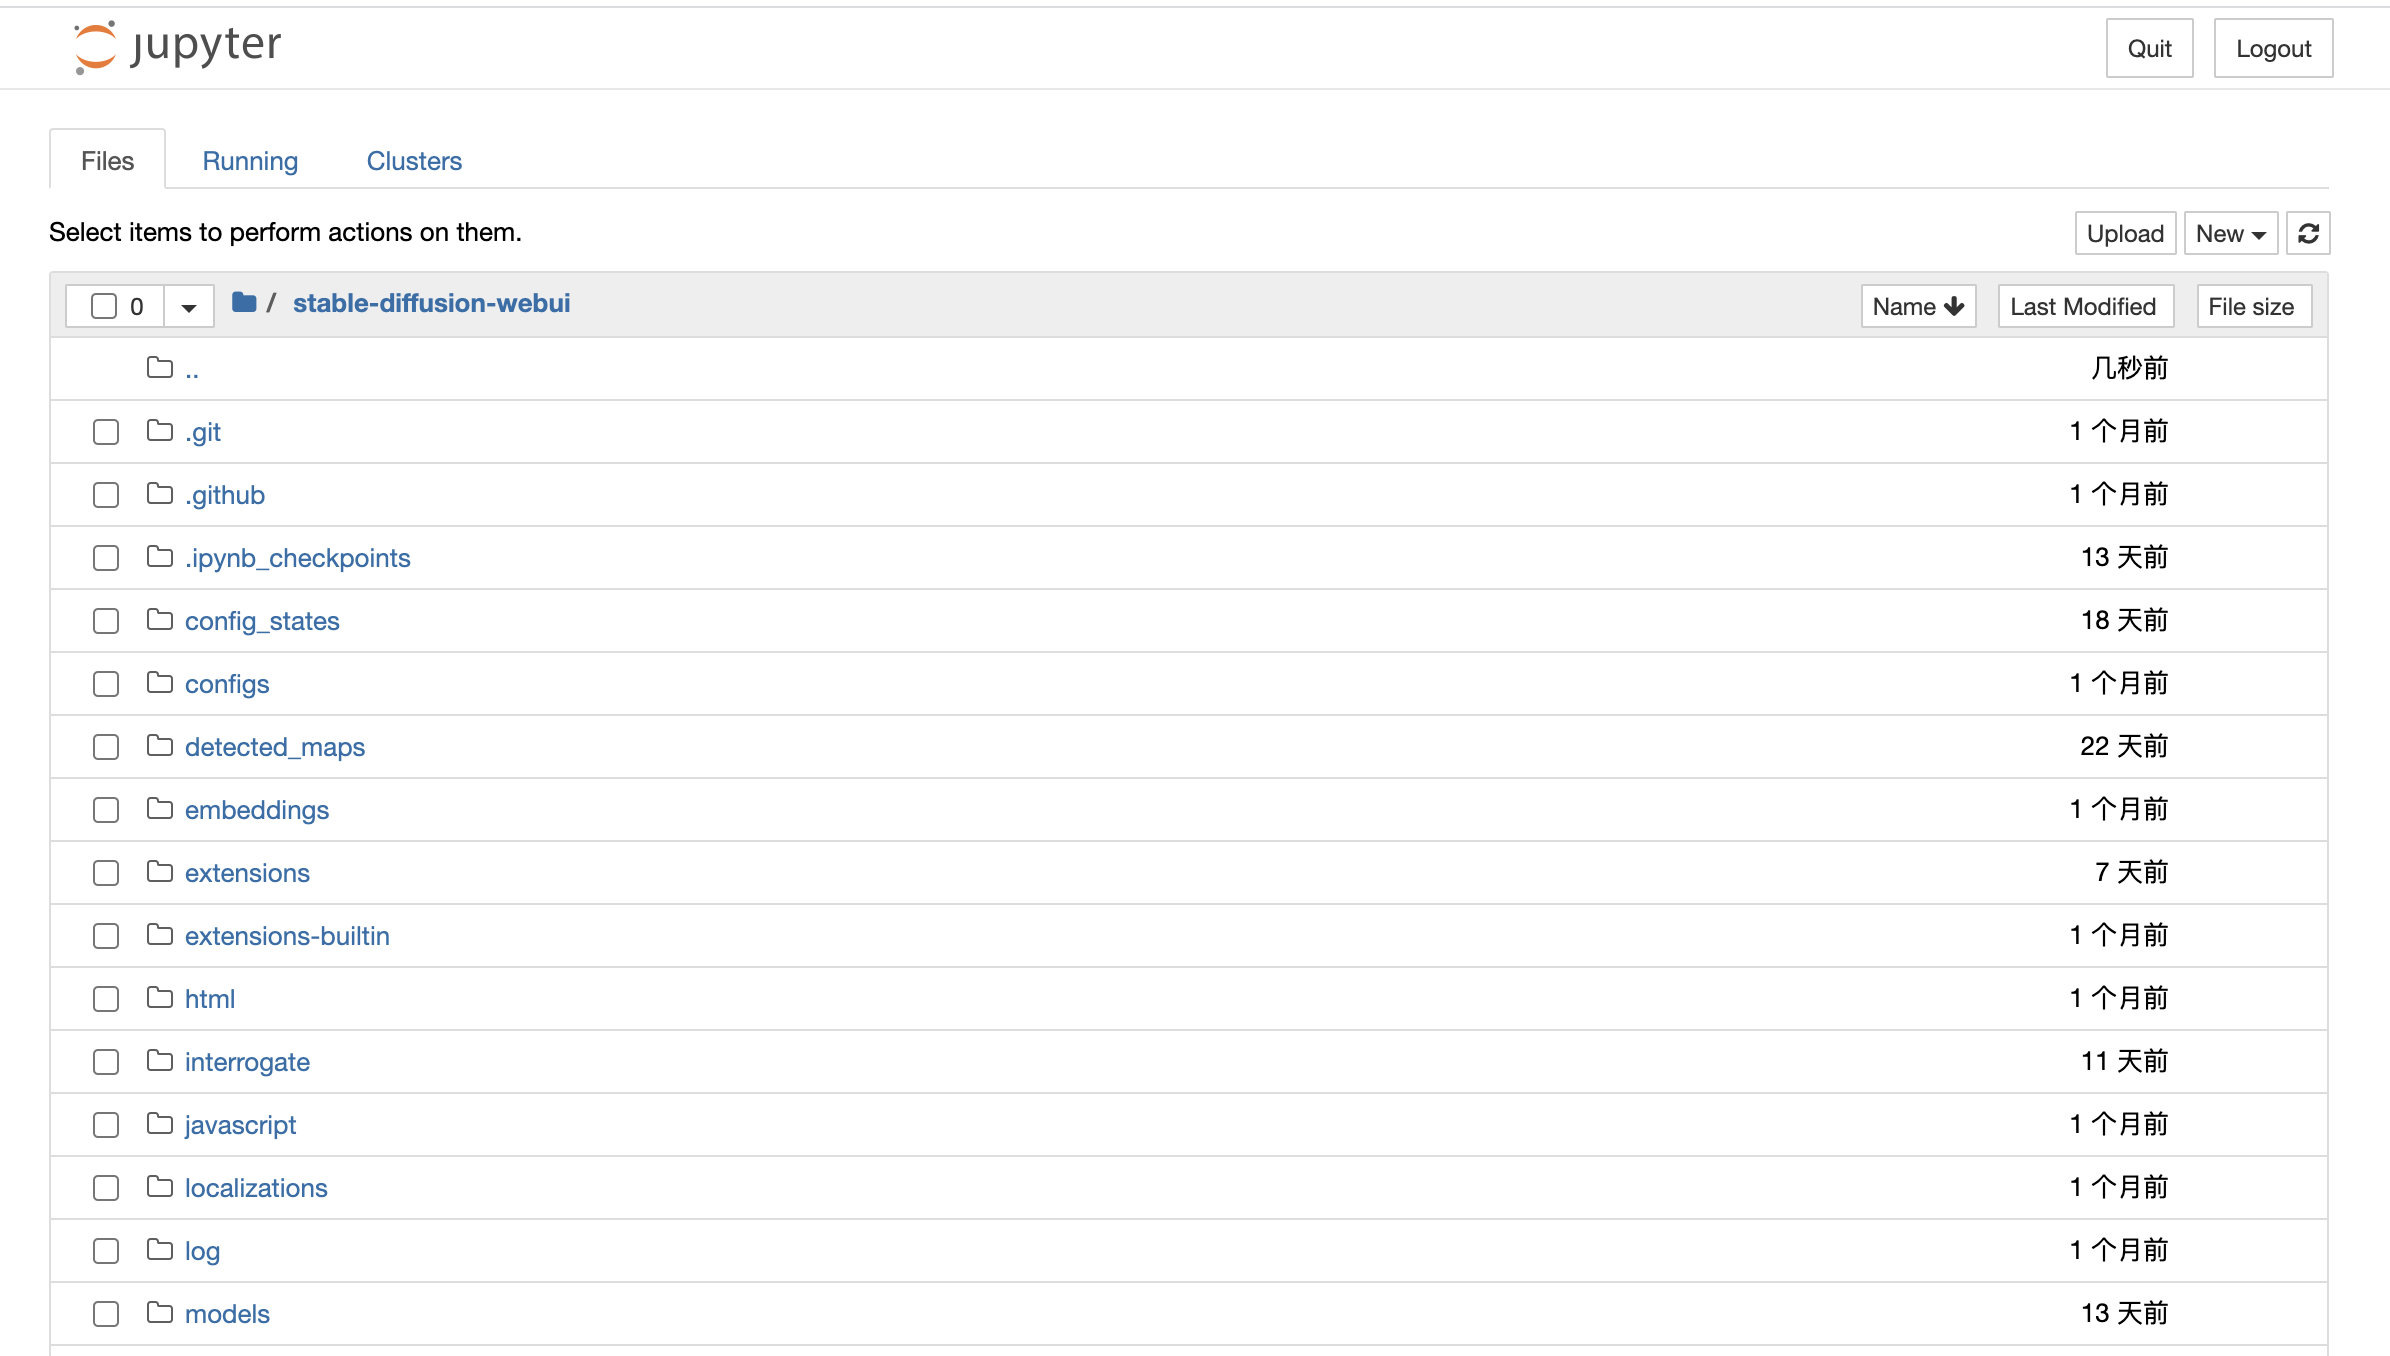 ## 4.4 模型训练工具Kohya\_ss <font size='3'>Kohya\_ss是公认推荐训练Stable Diffusion模型的可视化工具,尤其在windows平台支持比较好,经过尝试在linux直接使用会遇到各种环境原因的问题,为了避免这些问题,十分推荐使用docker安装。 先按照docker官方文档安装好docker,Ubuntu安装docker文档:https://docs.docker.com/engine/install/ubuntu/ 由于在docker容器中需要使用GPU资源,所以还需要先安装`NVIDIA Container Toolkit` ``` sudo apt-get update \ && sudo apt-get install -y nvidia-container-toolkit-base # 查看是否安装成功 nvidia-ctk --version ``` <font size='3'>然后下载kohya\_ss: ``` git clone https://github.com/bmaltais/kohya_ss.git ``` <font size='3'>如下图,修改kohya\_ss/docker-compose.yaml文件端口为`0.0.0.0:7861:7860`(将kohya\_ss的7860端口映射到宿主机的7861端口,因为7860会被Stable Diffusion WebUI占用), 启动参数设置为`"--username xxxx --password xxxx --headless"`,注意替换xxxx为需要设置的账号密码 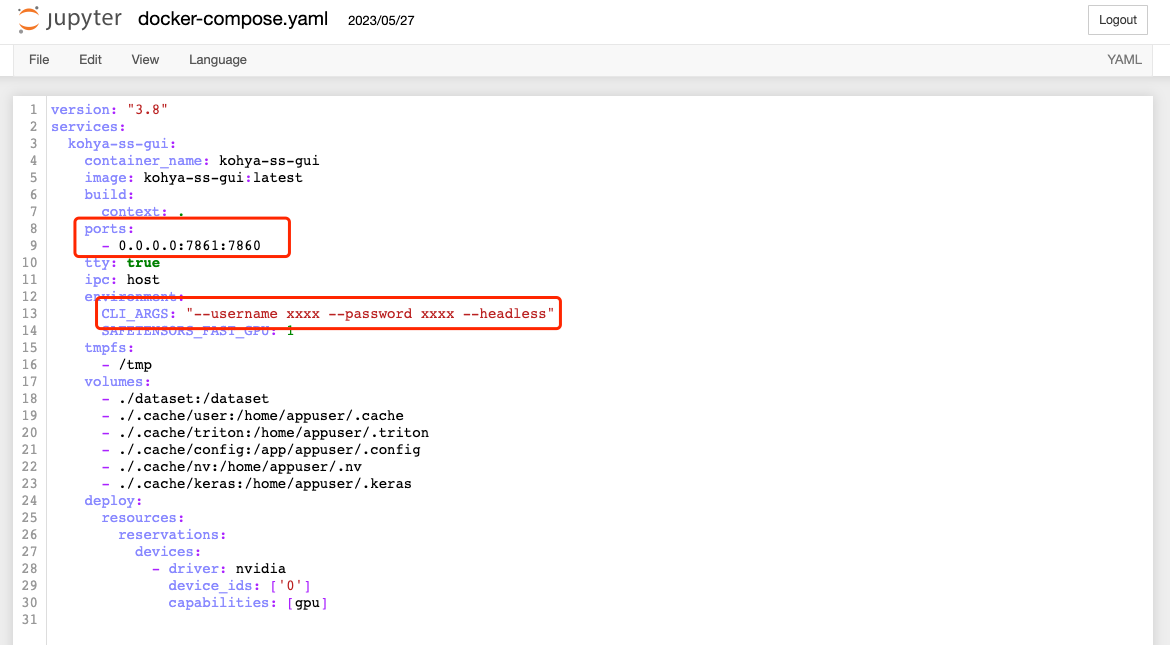 然后执行 ``` docker compose build # 首次执行需要build docker compose run --service-ports kohya-ss-gui ``` <font size='3'>过程中会从huggingface.co下载模型文件,如果下载失败,可以尝试手动下载到目录kohya\_ss/.cache/user/huggingface/hub/models--openai--clip-vit-large-patch14/snapshots/8d052a0f05efbaefbc9e8786ba291cfdf93e5bff,最后的hash值注意改成对应的版本。 下载地址https://huggingface.co/openai/clip-vit-large-patch14/tree/main,注意下载全部文件 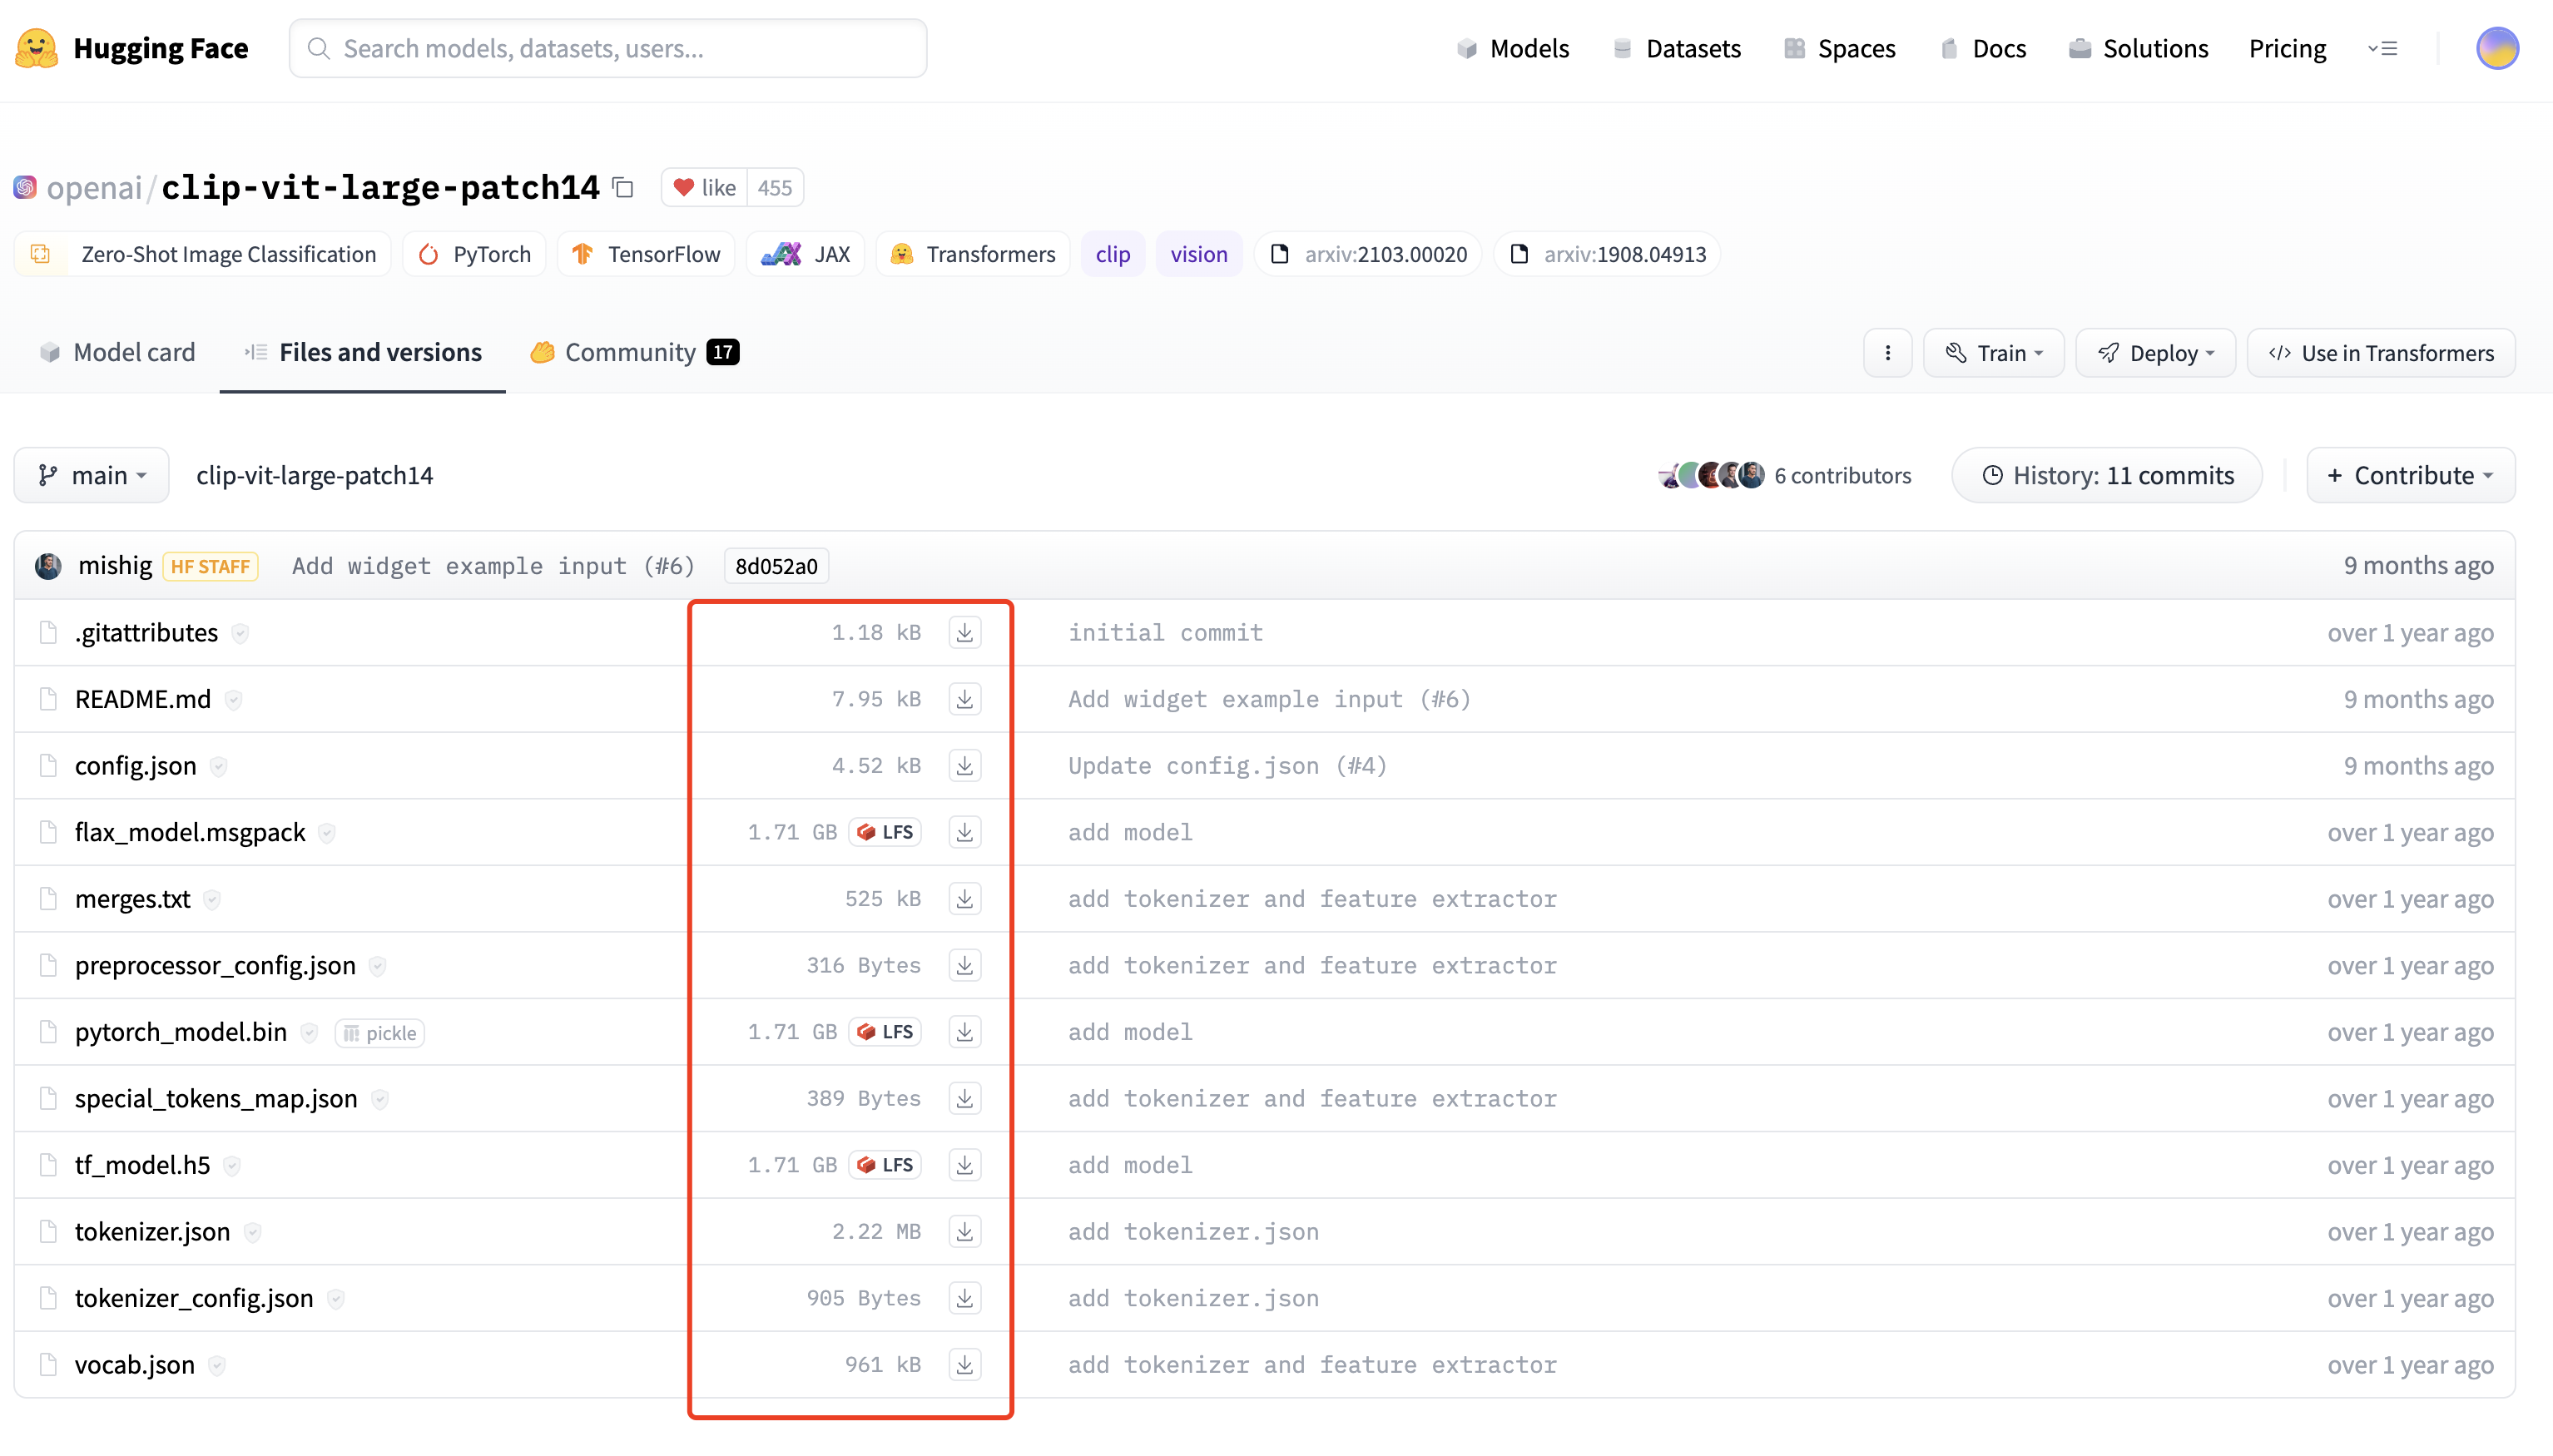 下载完成,然后访问端口+7861端口,可以开始使用Kohya\_ss训练模型了。  # 五、总结 <font size='3'>安装完Stable Diffusion及上面的推荐插件,你的Stable Diffuion已经具备强大的生产力。后续我会继续同大家一起探索和分享更多的使用经验,敬请期待系列文章下一集。 现在购买<a href="https://www.jdcloud.com/cn/pages/aistudy?utm_source=c_largemodel">京东云GPU云主机</a>新人即享99元7天的一折体验价(合0.59元/小时),即刻开启炼丹之旅。 <a href="https://www.jdcloud.com/cn/pages/aistudy?utm_source=c_largemodel"></a> <a href="https://www.jdcloud.com/cn/pages/aistudy?utm_source=c_largemodel">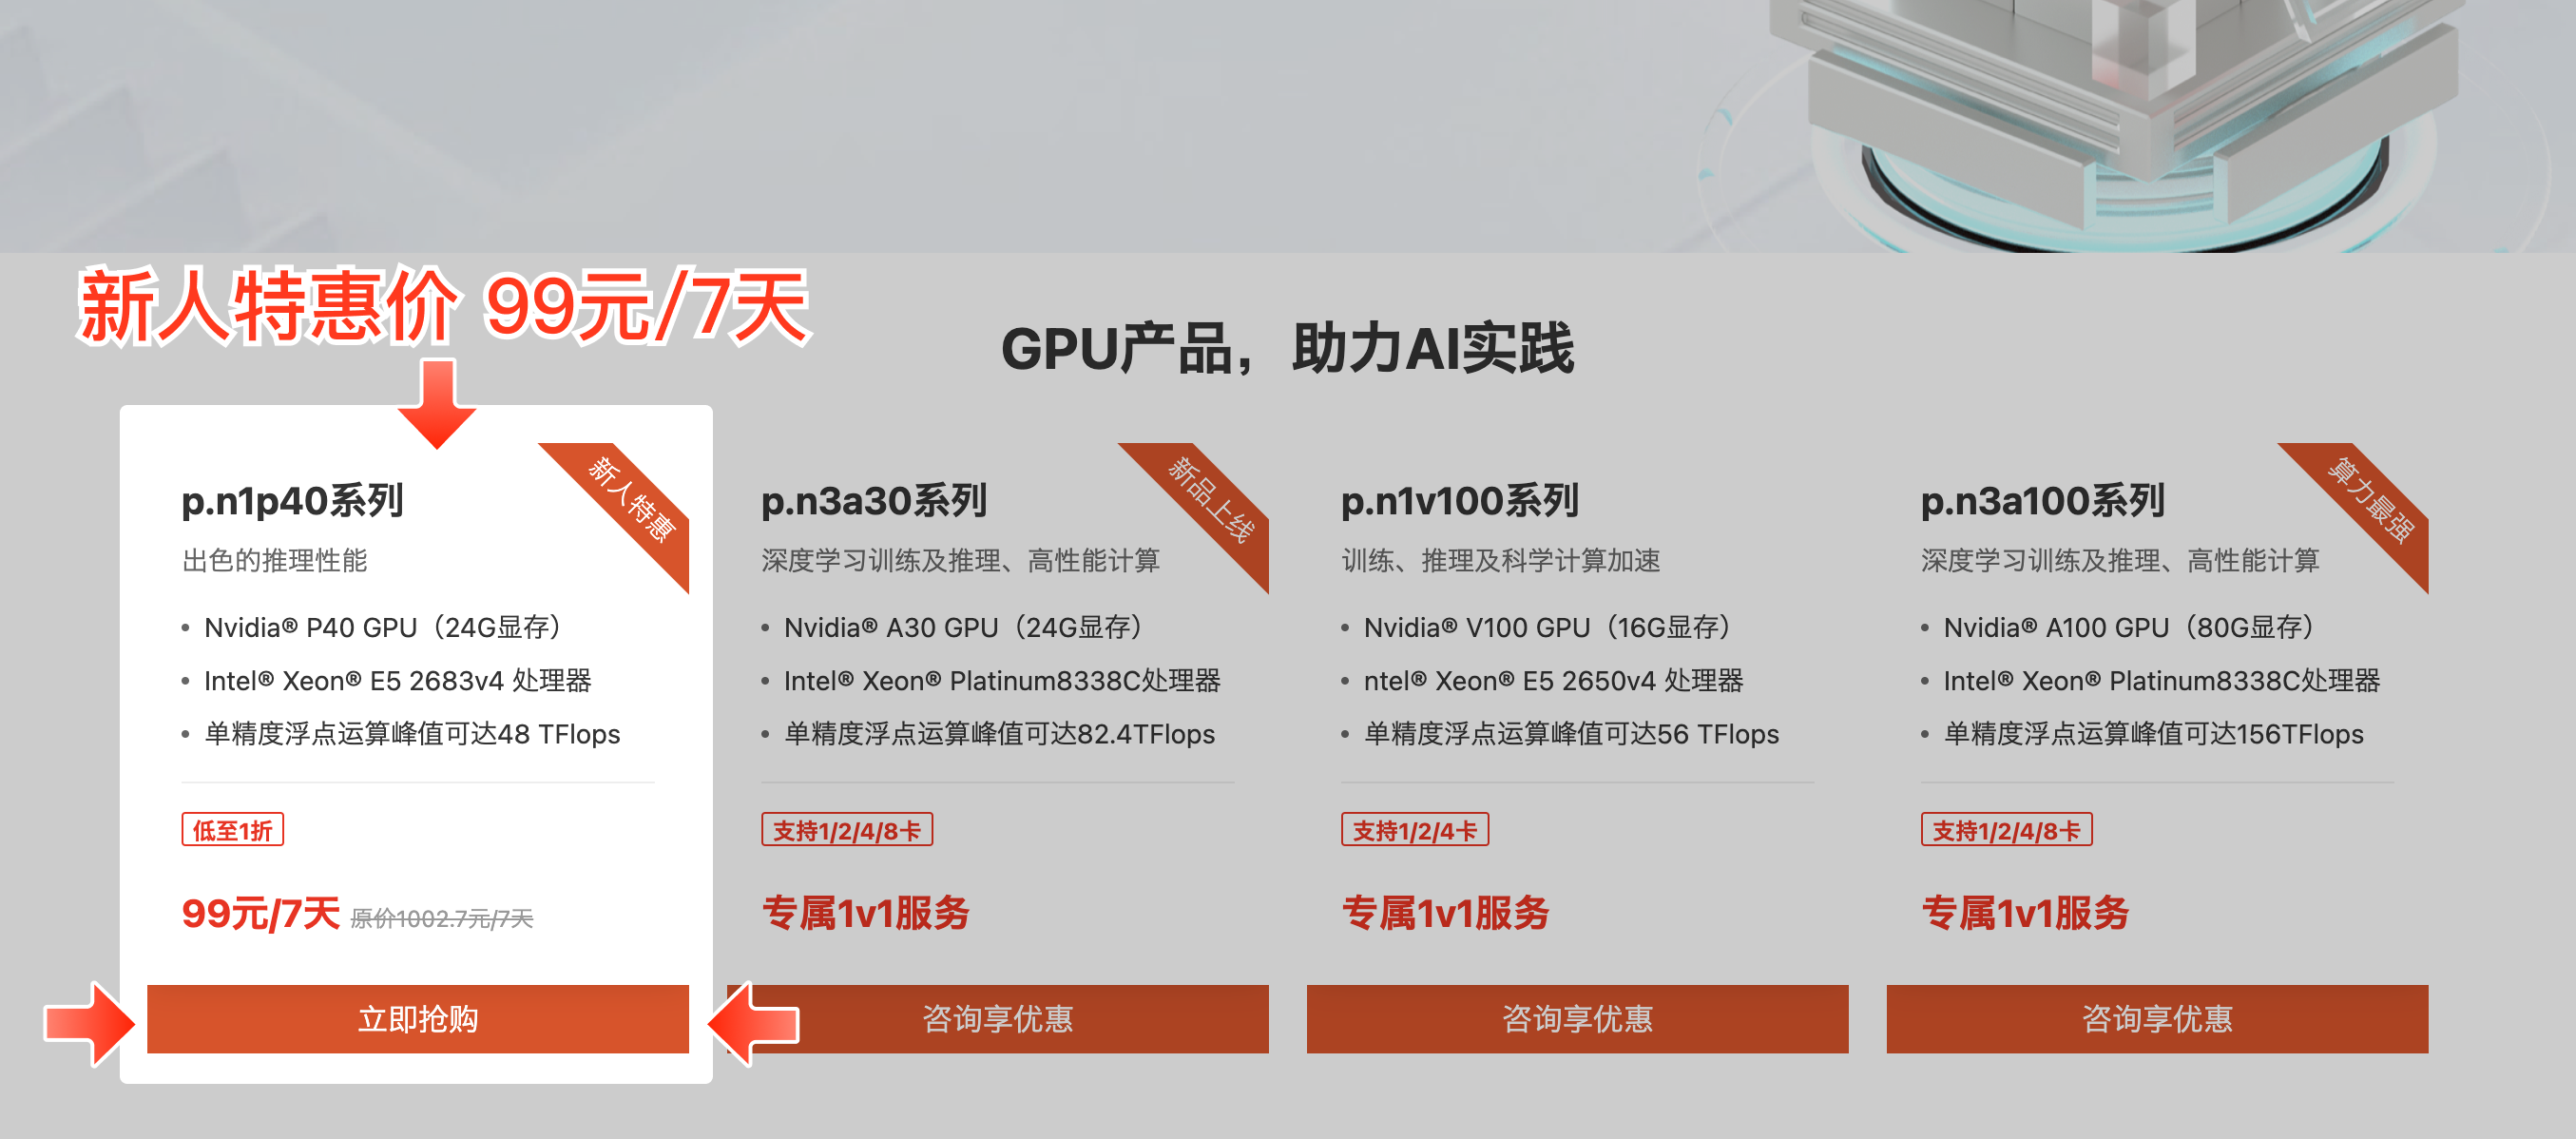</a>
上一篇:大报文问题实战
下一篇:京东统一头尾管理系统探索实践
wlchn_m
文章数
2
阅读量
6874
作者其他文章
01
幻兽帕鲁来啦!京东云召唤你一键开服,快来私服联机
一、前言《幻兽帕鲁》是一款备受瞩目的开放世界生存建造游戏,近期火爆全网。玩家可以在游戏世界中收集神奇的生物“帕鲁”,并利用它们进行战斗、建造、农耕、工业生产等各种活动。《幻兽帕鲁》官方推荐玩家搭建自己的专有服务器以获得更好的游戏体验,话不多说赶快开服!二、创建主机目前专属轻量云主机4C16G低至28元/1月,点击立即购买配置越高越流畅,幻兽帕鲁比较消耗内存,建议至少选择4C16G5M主机, 适合3
01
一份保姆级的Stable Diffusion部署教程,开启你的炼丹之路
市面上有很多可以被用于AI绘画的应用,例如DALL-E、Midjourney、NovelAI等,他们的大部分都依托云端服务器运行,一部分还需要支付会员费用来购买更多出图的额度。在2022年8月,一款叫做Stable Diffusion的应用,通过算法迭代将AI绘画的精细度提上了一个新的台阶,并能在以秒计数的时间内完成产出,还可以在一台有“民用级”显卡的电脑上运行。通过Stable Diffusio
wlchn_m
文章数
2
阅读量
6874
作者其他文章
01
幻兽帕鲁来啦!京东云召唤你一键开服,快来私服联机
添加企业微信
获取1V1专业服务
扫码关注
京东云开发者公众号