您好!
欢迎来到京东云开发者社区
登录
首页
博文
课程
大赛
工具
用户中心
开源
首页
博文
课程
大赛
工具
开源
更多
用户中心
开发者社区
>
博文
>
Elasticsearch必知必会-进阶篇
分享
打开微信扫码分享
点击前往QQ分享
点击前往微博分享
点击复制链接
Elasticsearch必知必会-进阶篇
jd****
2023-06-20
IP归属:北京
527浏览
# 17.跨Cluster检索 - ccr > 官网文档地址:https://www.elastic.co/guide/en/elasticsearch/reference/8.1/modules-cross-cluster-search.html ## 跨Cluster检索的背景和意义 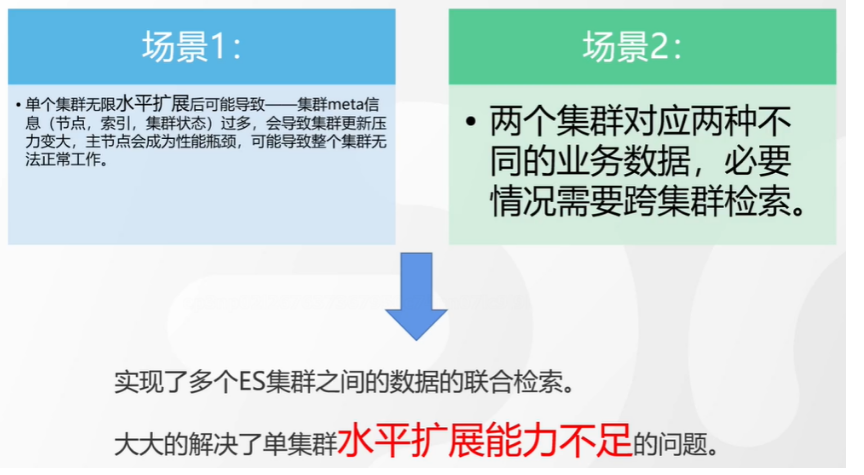 ## 跨Cluster检索定义 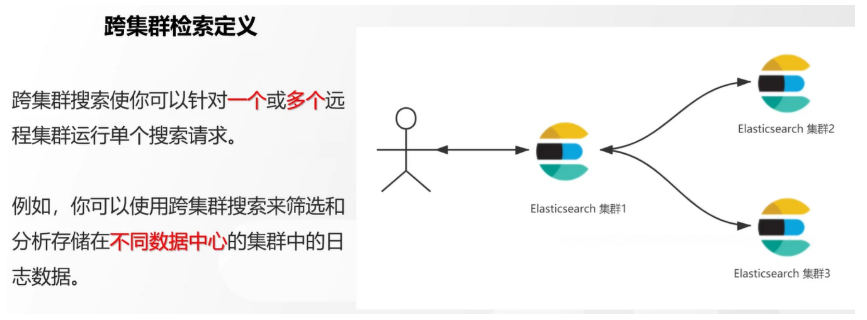 ## 跨Cluster检索环境搭建 > 官网文档地址:https://www.elastic.co/guide/en/elasticsearch/reference/8.1/modules-cross-cluster-search.html > > 步骤1:搭建两个本地单节点Cluster,本地练习可取消安全配置 `xpack.security.enabled: false` > > 步骤2:每个Cluster都执行以下命令 > > PUT \_cluster/settings { "persistent": { "cluster": { "remote": { "cluster\_one": { "seeds": [ "172.21.0.14:9301" ] },"cluster\_two": { "seeds": [ "172.21.0.14:9302" ] } } } } } > > 步骤3:验证Cluster之间是否互通 > > 方案1:Kibana 可视化查看:stack Management -> Remote Clusters -> status 应该是 connected! 且必须打上绿色的对号。 > > 方案2:GET \_remote/info ## 跨Cluster查询演练 ```shell # 步骤1 在Cluster 1 中添加数据如下 PUT test01/_bulk {"index":{"_id":1}} {"title":"this is from cluster01..."} # 步骤2 在Cluster 2 中添加数据如下: PUT test01/_bulk {"index":{"_id":1}} {"title":"this is from cluster02..."} # 步骤 3:执行跨Cluster检索如下: 语法:POST Cluster名称1:索引名称,Cluster名称2:索引名称/_search POST cluster_one:test01,cluster_two:test01/_search { "took" : 7, "timed_out" : false, "num_reduce_phases" : 3, "_shards" : { "total" : 2, "successful" : 2, "skipped" : 0, "failed" : 0 }, "_clusters" : { "total" : 2, "successful" : 2, "skipped" : 0 }, "hits" : { "total" : { "value" : 2, "relation" : "eq" }, "max_score" : 1.0, "hits" : [ { "_index" : "cluster_two:test01", "_id" : "1", "_score" : 1.0, "_source" : { "title" : "this is from cluster02..." } }, { "_index" : "cluster_one:test01", "_id" : "1", "_score" : 1.0, "_source" : { "title" : "this is from cluster01..." } } ] } } ``` # 18.跨Cluster复制 - ccs - 该功能需付费 > 官网文档地址:https://www.elastic.co/guide/en/elasticsearch/reference/current/xpack-ccr.html ## 如何保障Cluster的高可用 > 1. 副本机制 > 2. 快照和恢复 > 3. 跨Cluster复制(类似mysql 主从同步) ## 跨Cluster复制概述 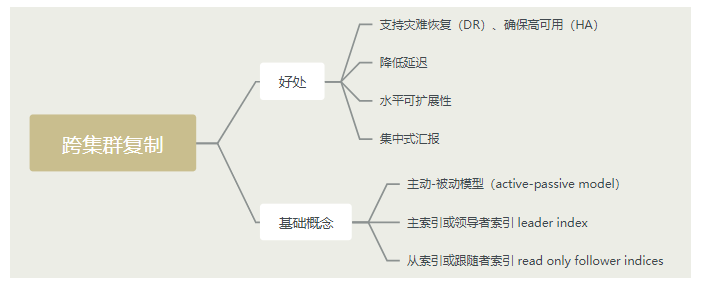 ## 跨Cluster复制配置 > 1. 准备两个Cluster,网络互通 > 1. 开启 license 使用,可试用30天 > 1. 开启位置:Stack Management -> License mangement. > 1. 定义好谁是LeadsCluster,谁是followerCluster > 4.在followerCluster配置LeaderCluster > > ```shell > PUT /_cluster/settings > { > "persistent": { > "cluster": { > "remote": { > "leader": { > "seeds": [ > "43.143.79.199:8901" > ] > } > } > } > } > } > ``` > 1. 在followerCluster配置LeaderCluster的索引同步规则(kibana页面配置) > > stack Management -> Cross Cluster Replication -> create a follower index. > > 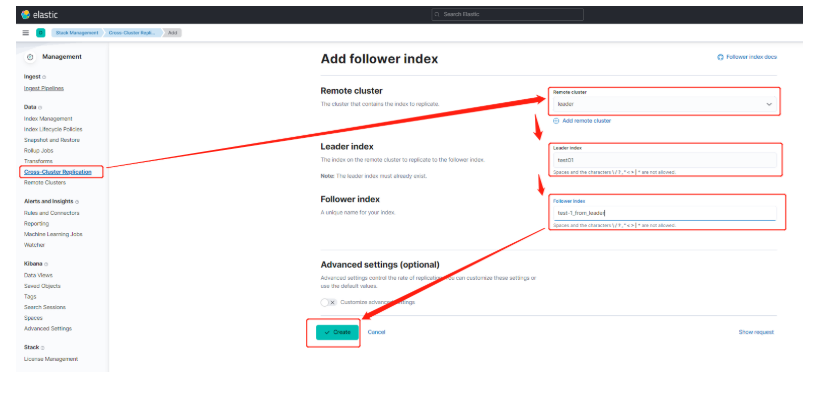 > 6.启用步骤5的配置 > > 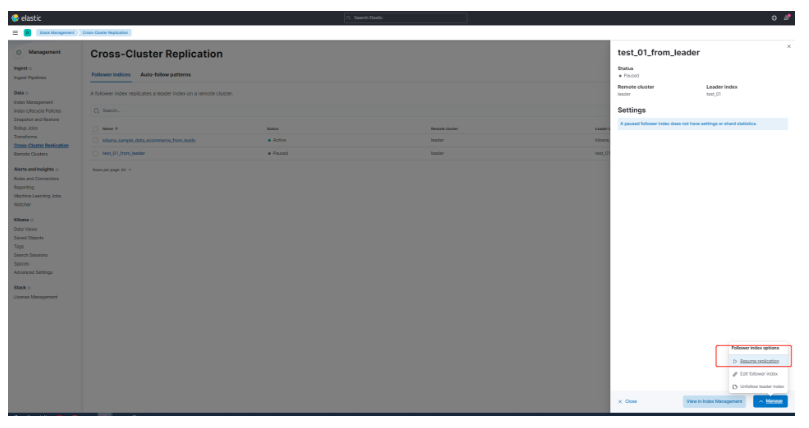 *** # 19.索引模板 > 官网文档地址:https://www.elastic.co/guide/en/elasticsearch/reference/8.1/index-templates.html ## 8.X之组件模板 > 1. 创建组件模板-索引setting相关 > > ```shell > # 组件模板 - 索引setting相关 > PUT _component_template/template_sttting_part > { > "template": { > "settings": { > "number_of_shards": 3, > "number_of_replicas": 0 > } > } > } > ``` > > 1. 创建组件模板-索引mapping相关 > > ```shell > # 组件模板 - 索引mapping相关 > PUT _component_template/template_mapping_part > { > "template": { > "mappings": { > "properties": { > "hosr_name":{ > "type": "keyword" > }, > "cratet_at":{ > "type": "date", > "format": "EEE MMM dd HH:mm:ss Z yyyy" > } > } > } > } > } > ``` > > 1. 创建组件模板-配置模板和索引之间的关联 > > **注意:composed\_of 如果多个组件模板中的配置项有重复,后面的会覆盖前面的,和配置的顺序有关** > > ```shell > # 基于组件模板,配置模板和索引之间的关联 > # 也就是所有 tem_* 该表达式相关的索引创建时,都会使用到以下规则 > PUT _index_template/template_1 > { > "index_patterns": [ > "tem_*" > ], > "composed_of": [ > "template_sttting_part", > "template_mapping_part" > ] > } > ``` > > 1. 测试 > > ```shell > # 创建测试 > PUT tem_001 > ``` ## 索引模板基本操作 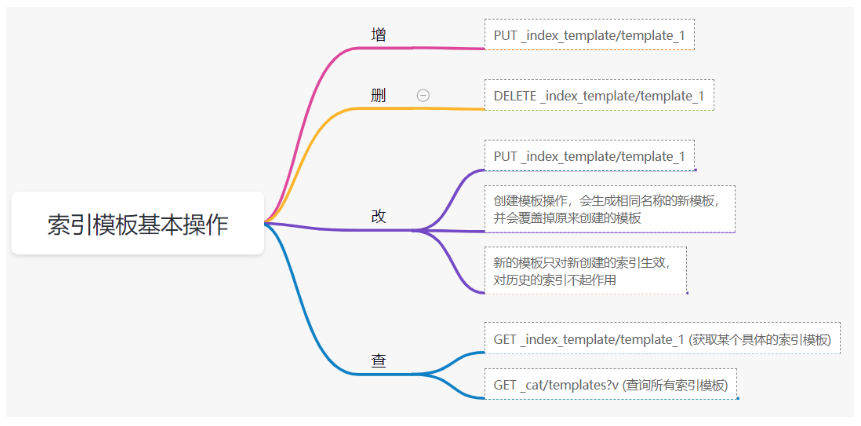 ## 实战演练 > 需求1:默认如果不显式指定Mapping,数值类型会被动态映射为long类型,但实际上业务数值都比较小,会存在存储浪费。需要将默认值指定为Integer > > 索引模板,官网文档地址:https://www.elastic.co/guide/en/elasticsearch/reference/8.1/index-templates.html > > mapping-动态模板,官网文档地址:https://www.elastic.co/guide/en/elasticsearch/reference/8.1/dynamic-templates.html ```shell # 结合mapping 动态模板 和 索引模板 # 1.创建组件模板之 - mapping模板 PUT _component_template/template_mapping_part_01 { "template": { "mappings": { "dynamic_templates": [ { "integers": { "match_mapping_type": "long", "mapping": { "type": "integer" } } } ] } } } # 2. 创建组件模板与索引关联配置 PUT _index_template/template_2 { "index_patterns": ["tem1_*"], "composed_of": ["template_mapping_part_01"] } # 3.创建测试数据 POST tem1_001/_doc/1 { "age":18 } # 4.查看mapping结构验证 get tem1_001/_mapping ``` > 需求2:date\_\*开头的字段,统一匹配为date日期类型。 > > 索引模板,官网文档地址:https://www.elastic.co/guide/en/elasticsearch/reference/8.1/index-templates.html > > mapping-动态模板,官网文档地址:https://www.elastic.co/guide/en/elasticsearch/reference/8.1/dynamic-templates.html ```shell # 结合mapping 动态模板 和 索引模板 # 1.创建组件模板之 - mapping模板 PUT _component_template/template_mapping_part_01 { "template": { "mappings": { "dynamic_templates": [ { "integers": { "match_mapping_type": "long", "mapping": { "type": "integer" } } }, { "date_type_process": { "match": "date_*", "mapping": { "type": "date", "format":"yyyy-MM-dd HH:mm:ss" } } } ] } } } # 2. 创建组件模板与索引关联配置 PUT _index_template/template_2 { "index_patterns": ["tem1_*"], "composed_of": ["template_mapping_part_01"] } # 3.创建测试数据 POST tem1_001/_doc/2 { "age":19, "date_aoe":"2022-01-01 18:18:00" } # 4.查看mapping结构验证 get tem1_001/_mapping ``` ## 真题演练 > 定义一个dynamic\_template, 使得 x\_ 开头的是integer类型, > > 索引模板,官网文档地址:https://www.elastic.co/guide/en/elasticsearch/reference/8.1/index-templates.html > > mapping-动态模板,官网文档地址:https://www.elastic.co/guide/en/elasticsearch/reference/8.1/dynamic-templates.html ```shell # 结合mapping 动态模板 和 索引模板 # 1.创建组件模板之 - mapping模板 PUT _component_template/template_mapping_part_02 { "template": { "mappings": { "dynamic_templates": [ { "keywords": { "match_mapping_type": "string", "mapping": { "type": "keyword" } } }, { "integers": { "match": "x_*", "mapping": { "type": "integer" } } } ] } } } # 2. 创建组件模板与索引关联配置 PUT _index_template/template_3 { "index_patterns": ["tem2_*"], "composed_of": ["template_mapping_part_02"] } ``` *** # 20.LIM 索引生命周期管理 > 官网文档地址:https://www.elastic.co/guide/en/elasticsearch/reference/8.1/index-lifecycle-management.html ## 什么是索引生命周期 > 索引的 生-> 老 -> 病 -> 死 > > 是否有过考虑,如果一个索引,创建之后,就不再去管理了?会发生什么? ## 什么是索引生命周期管理 > **索引太大了会如何?** > > * 大索引的恢复时间,要远比小索引恢复慢的多的多 > > * 索引大了以后,检索会很慢,写入和更新也会受到不同程度的影响 > > * 索引大到一定程度,当索引出现健康问题,会导致整个Cluster核心业务不可用 > > **最佳实践** > > * Cluster的单个分片最大文档数上限:2的32次幂减1,即20亿左右 > > * 官方建议:分片大小控制在30GB-50GB,若索引数据量无限增大,肯定会超过这个值 > > **用户不关注全量** > > * 某些业务场景,业务更关注近期的数据,如近3天、近7天 > > * 大索引会将全部历史数据汇集在一起,不利于这种场景的查询 ## 索引生命周期管理的历史演变  ## lim前奏 - rollover 滚动索引 > 官网文档地址:https://www.elastic.co/guide/en/elasticsearch/reference/8.1/index-rollover.html ```shell # 0.自测前提,lim生命周期rollover频率。默认10分钟 PUT _cluster/settings { "persistent": { "indices.lifecycle.poll_interval": "1s" } } # 1. 创建索引,并指定别名 PUT test_index-0001 { "aliases": { "my-test-index-alias": { "is_write_index": true } } } # 2.批量导入数据 PUT my-test-index-alias/_bulk {"index":{"_id":1}} {"title":"testing 01"} {"index":{"_id":2}} {"title":"testing 02"} {"index":{"_id":3}} {"title":"testing 03"} {"index":{"_id":4}} {"title":"testing 04"} {"index":{"_id":5}} {"title":"testing 05"} # 3.rollover 滚动规则配置 POST my-test-index-alias/_rollover { "conditions": { "max_age": "7d", "max_docs": 5, "max_primary_shard_size": "50gb" } } # 4.在满足条件的前提下创建滚动索引 PUT my-test-index-alias/_bulk {"index":{"_id":7}} {"title":"testing 07"} # 5.查询验证滚动是否成功 POST my-test-index-alias/_search ``` ## lim前奏 -shrink 索引压缩 > 官网文档地址:https://www.elastic.co/guide/en/elasticsearch/reference/8.1/ilm-shrink.html > > 核心步骤: > > 1. 将数据全部迁移至一个独立的节点 > 2. 索引禁止写入 > 3. 方可进行压缩 ```shell # 1.准备测试数据 DELETE kibana_sample_data_logs_ext PUT kibana_sample_data_logs_ext { "settings": { "number_of_shards": 5, "number_of_replicas": 0 } } POST _reindex { "source": { "index": "kibana_sample_data_logs" }, "dest": { "index": "kibana_sample_data_logs_ext" } } # 2.压缩前必要的条件设置 # number_of_replicas :压缩后副本为0 # index.routing.allocation.include._tier_preference 数据分片全部路由到hot节点 # "index.blocks.write 压缩后索引不再允许数据写入 PUT kibana_sample_data_logs_ext/_settings { "settings": { "index.number_of_replicas": 0, "index.routing.allocation.include._tier_preference": "data_hot", "index.blocks.write": true } } # 3.实施压缩 POST kibana_sample_data_logs_ext/_shrink/kibana_sample_data_logs_ext_shrink { "settings":{ "index.number_of_replicas": 0, "index.number_of_shards": 1, "index.codec":"best_compression" }, "aliases":{ "kibana_sample_data_logs_alias":{} } } ``` ## LIM实战 ### 全局认知建立 - 四大阶段 > 官网文档地址:https://www.elastic.co/guide/en/elasticsearch/reference/8.1/overview-index-lifecycle-management.html > 生命周期管理阶段(Policy):https://www.elastic.co/guide/en/elasticsearch/reference/8.1/ilm-index-lifecycle.html > > **Hot阶段** (生) > > Set priority > > > > Unfollow > > > > Rollover > > > > Read-only > > > > Shrink > > > > Force Merge > > > > Search snapshot > > **Warm阶段** (老) > > Set priority > > > > Unfollow > > > > Read-only > > > > Allocate > > > > migrate > > > > Shirink > > > > Force Merge > > **Cold阶段** (病) > > Search snapshot > > **Delete阶段** (死) > > delete ### 演练 > 官网文档地址: > > https://www.elastic.co/guide/en/elasticsearch/reference/8.1/set-up-lifecycle-policy.html > > https://www.elastic.co/guide/en/elasticsearch/reference/8.1/ilm-actions.html #### 1.创建policy > * **Hot**阶段设置,rollover: max\_age:3d,max\_docs:5, max\_size:50gb, 优先级:100 > * Warm阶段设置:min\_age:15s , forcemerage段合并,热节点迁移到warm节点,副本数设置0,优先级:50 > * Cold阶段设置: min\_age 30s, warm迁移到cold阶段 > * Delete阶段设置:min\_age 45s,执行删除操作 ```shell PUT _ilm/policy/kr_20221114_policy { "policy": { "phases": { "hot": { "min_age": "0ms", "actions": { "set_priority": { "priority": 100 }, "rollover": { "max_size": "50gb", "max_primary_shard_size": "50gb", "max_age": "3d", "max_docs": 5 } } }, "warm": { "min_age": "15s", "actions": { "forcemerge": { "max_num_segments": 1 }, "set_priority": { "priority": 50 }, "allocate": { "number_of_replicas": 0 } } }, "cold": { "min_age": "30s", "actions": { "set_priority": { "priority": 0 } } }, "delete": { "min_age": "45s", "actions": { "delete": { "delete_searchable_snapshot": true } } } } } } ``` 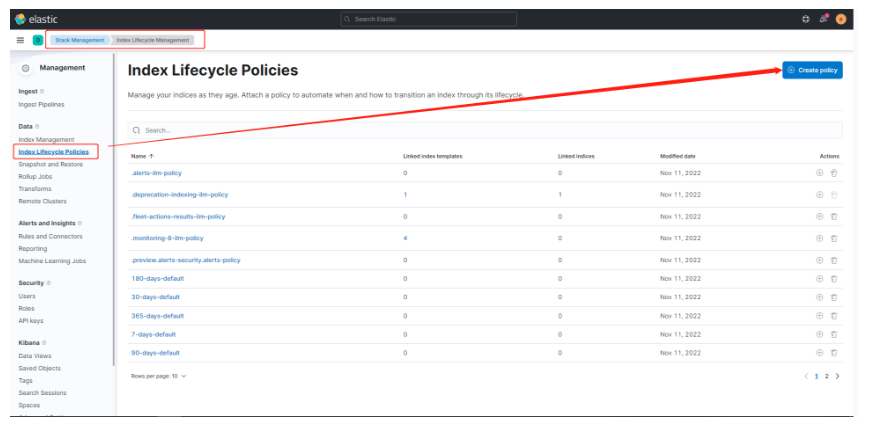 #### 2.创建index template ```shell PUT _index_template/kr_20221114_template { "index_patterns": ["kr_index-**"], "template": { "settings": { "index": { "lifecycle": { "name": "kr_20221114_policy", "rollover_alias": "kr-index-alias" }, "routing": { "allocation": { "include": { "_tier_preference": "data-hot" } } }, "number_of_shards": "3", "number_of_replicas": "1" } }, "aliases": {}, "mappings": {} } } ``` #### 3.测试需要修改lim rollover刷新频率 ```shell PUT _cluster/settings { "persistent": { "indices.lifecycle.poll_interval": "1s" } } ``` #### 4.进行测试 ```shell # 创建索引,并制定可写别名 PUT kr_index-0001 { "aliases": { "kr-index-alias": { "is_write_index": true } } } # 通过别名新增数据 PUT kr-index-alias/_bulk {"index":{"_id":1}} {"title":"testing 01"} {"index":{"_id":2}} {"title":"testing 02"} {"index":{"_id":3}} {"title":"testing 03"} {"index":{"_id":4}} {"title":"testing 04"} {"index":{"_id":5}} {"title":"testing 05"} # 通过别名新增数据,触发rollover PUT kr-index-alias/_bulk {"index":{"_id":6}} {"title":"testing 06"} # 查看索引情况 GET kr_index-0001 get _cat/indices?v ``` #### 过程总结 > 第一步:配置 lim pollicy > > * 横向:Phrase 阶段(Hot、Warm、Cold、Delete) 生老病死 > * 纵向:Action 操作(rollover、forcemerge、readlyonly、delete) > > 第二步:创建模板 绑定policy,指定别名 > > 第三步:创建起始索引 > > 第四步:索引基于第一步指定的policy进行滚动 *** # 21.Data Stream > 官网文档地址:https://www.elastic.co/guide/en/elasticsearch/reference/8.1/ilm-actions.html ## 特性解析 > Data Stream让我们跨多个索引存储时序数据,同时给了唯一的对外接口(data stream名称) > > * 写入和检索请求发给data stream > * data stream将这些请求路由至 backing index(后台索引) > >  ## Backing indices > 每个data stream由多个隐藏的后台索引构成 > > * 自动创建 > * 要求模板索引 > > rollover 滚动索引机制用于自动生成后台索引 > > * 将成为data stream 新的写入索引 ## 应用场景 > 1. 日志、事件、指标等其他持续创建(少更新)的业务数据 > 2. 两大核心特点 > 1. 时序性数据 > 2. 数据极少更新或没有更新 ## 创建Data Stream 核心步骤  > 官网文档地址:https://www.elastic.co/guide/en/elasticsearch/reference/8.1/set-up-a-data-stream.html > > Set up a data stream > > To set up a data stream, follow these steps: > > 1. [Create an index lifecycle policy](https://www.elastic.co/guide/en/elasticsearch/reference/8.1/set-up-a-data-stream.html#create-index-lifecycle-policy) > 2. [Create component templates](https://www.elastic.co/guide/en/elasticsearch/reference/8.1/set-up-a-data-stream.html#create-component-templates) > 3. [Create an index template](https://www.elastic.co/guide/en/elasticsearch/reference/8.1/set-up-a-data-stream.html#create-index-template) > 4. [Create the data stream](https://www.elastic.co/guide/en/elasticsearch/reference/8.1/set-up-a-data-stream.html#create-data-stream) > 5. [Secure the data stream](https://www.elastic.co/guide/en/elasticsearch/reference/8.1/set-up-a-data-stream.html#secure-data-stream) ## 演练 > 1. 创建一个data stream,名称为my-data-stream > 2. index\_template 名称为 my-index-template > 3. 满足index格式【"my-data-stream\*"】的索引都要被应用到 > 4. 数据插入的时候,在data\_hot节点 > 5. 过3分钟之后要rollover到data\_warm节点 > 6. 再过5分钟要到data\_cold节点 ```shell # 步骤1 。创建 lim policy PUT _ilm/policy/my-lifecycle-policy { "policy": { "phases": { "hot": { "actions": { "rollover": { "max_size": "50gb", "max_age": "3m", "max_docs": 5 }, "set_priority": { "priority": 100 } } }, "warm": { "min_age": "5m", "actions": { "allocate": { "number_of_replicas": 0 }, "forcemerge": { "max_num_segments": 1 }, "set_priority": { "priority": 50 } } }, "cold": { "min_age": "6m", "actions": { "freeze":{} } }, "delete": { "min_age": "45s", "actions": { "delete": {} } } } } } # 步骤2 创建组件模板 - mapping PUT _component_template/my-mappings { "template": { "mappings": { "properties": { "@timestamp": { "type": "date", "format": "date_optional_time||epoch_millis" }, "message": { "type": "wildcard" } } } }, "_meta": { "description": "Mappings for @timestamp and message fields", "my-custom-meta-field": "More arbitrary metadata" } } # 步骤3 创建组件模板 - setting PUT _component_template/my-settings { "template": { "settings": { "index.lifecycle.name": "my-lifecycle-policy", "index.routing.allocation.include._tier_preference":"data_hot" } }, "_meta": { "description": "Settings for ILM", "my-custom-meta-field": "More arbitrary metadata" } } # 步骤4 创建索引模板 PUT _index_template/my-index-template { "index_patterns": ["my-data-stream*"], "data_stream": { }, "composed_of": [ "my-mappings", "my-settings" ], "priority": 500, "_meta": { "description": "Template for my time series data", "my-custom-meta-field": "More arbitrary metadata" } } # 步骤5 创建 data stream 并 写入数据测试 PUT my-data-stream/_bulk { "create":{ } } { "@timestamp": "2099-05-06T16:21:15.000Z", "message": "192.0.2.42 - - [06/May/2099:16:21:15 +0000] \"GET /images/bg.jpg HTTP/1.0\" 200 24736" } { "create":{ } } { "@timestamp": "2099-05-06T16:25:42.000Z", "message": "192.0.2.255 - - [06/May/2099:16:25:42 +0000] \"GET /favicon.ico HTTP/1.0\" 200 3638" } POST my-data-stream/_doc { "@timestamp": "2099-05-06T16:21:15.000Z", "message": "192.0.2.42 - - [06/May/2099:16:21:15 +0000] \"GET /images/bg.jpg HTTP/1.0\" 200 24736" } # 步骤6 查看data stream 后台索引信息 GET /_resolve/index/my-data-stream* ``` *** # 22.Ingest 数据预处理 > 官网文档地址:https://www.elastic.co/guide/en/elasticsearch/reference/8.1/ingest.html ## Cluster节点角色 > 官网文档地址:https://www.elastic.co/guide/en/elasticsearch/reference/8.1/modules-node.html 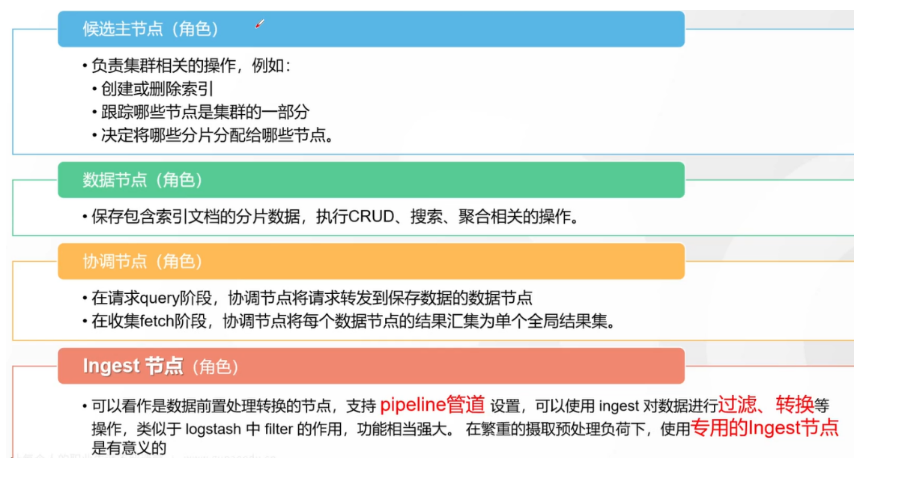 ## Ingest 预处理应用场景 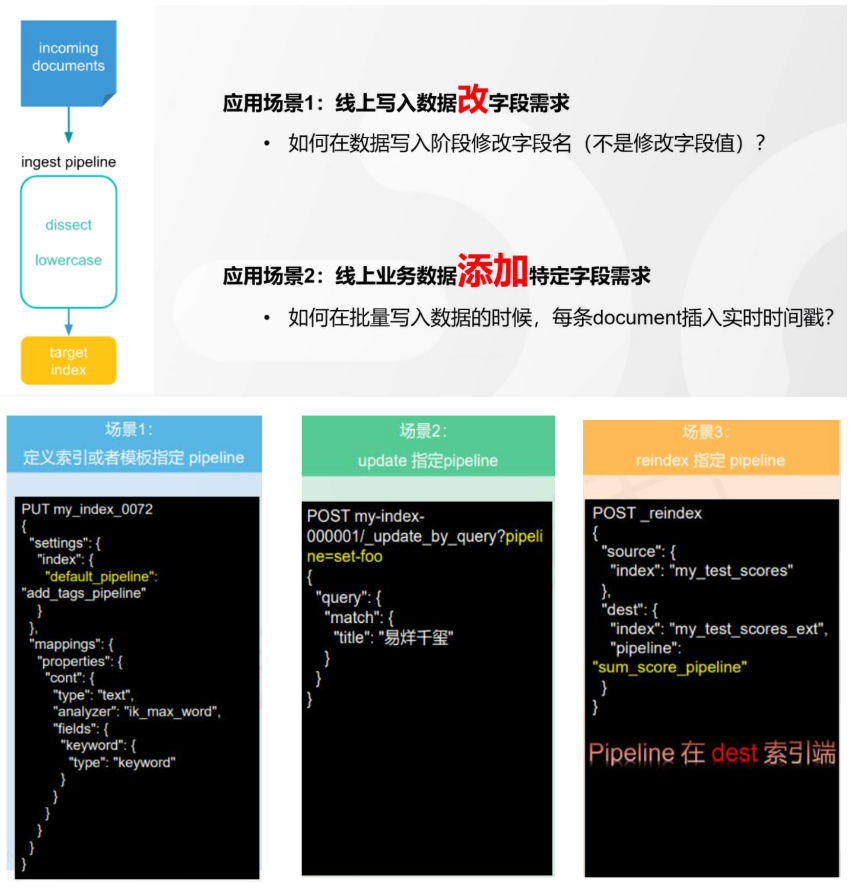 ## Ingest 预处理语法 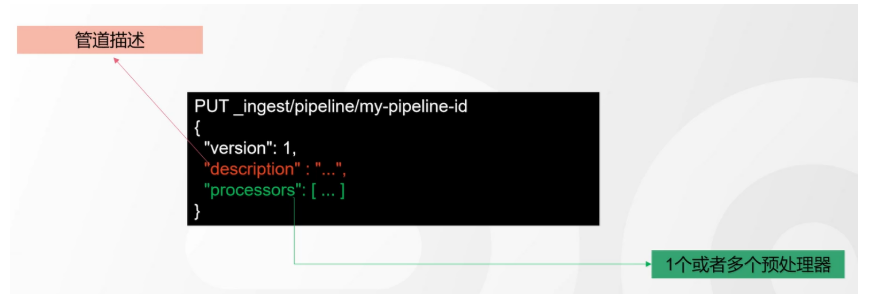 ## 实战演练-Ingest > 有一个index\_a包含一些文档,要求创建index\_b,通过reindex api 将index\_a的文档索引到index\_b > > 1. 要求增加一个整形字段,value是index\_a 的 field\_x的字符长度 > 2. 再增加一个数组类型的字段,value是field\_y的词集合 > 3. field\_y是空格分割的一组词,比如“foo bar",然后索引到index\_b后,要求变成["foo","bar"]” > > 官网文档地址:https://www.elastic.co/guide/en/elasticsearch/reference/8.1/script-processor.html > > 官网文档地址:https://www.elastic.co/guide/en/elasticsearch/reference/8.1/split-processor.html ```shell # 新增测试数据 POST index_a/_bulk {"index":{"_id":1}} {"field_x":"test_01","field_y":"foo bar"} # 创建预处理管道 PUT _ingest/pipeline/my_index_b_pipline { "processors": [ { "script": { "lang": "painless", "source": """ ctx.field_x = ctx.field_x.length(); """ }, "split": { "field": "field_y", "separator": " ", "target_field":"field_y" } } ] } # 执行reindex POST _reindex { "source": { "index": "index_a" }, "dest": { "index": "index_b", "pipeline": "my_index_b_pipline" } } # 测试验证 get index_b/_search ``` ## Ingest-Enrich > 官网文档地址:https://www.elastic.co/guide/en/elasticsearch/reference/8.1/ingest-enriching-data.html  ### Ingest-Enrich使用步骤 > 1. 创建源索引 > 2. 创建policy > 3. 执行policy,生成enrich索引 > 4. 创建ingest pipeline > 5. 通过reindex或者update\_by\_query执行pipeline > 6. 生成目标索引 ### 实战演练Ingest-Enrich > 有a,b两索引,均有字段filed\_a,索引a,b各自包含其它字段,建立新索引如c, > > 要求c包含a索引全部文档,且在a和b索引关联字段 field\_a 相同的文档中把b文档其它字段更新到索引c中 > > 官网文档地址:https://www.elastic.co/guide/en/elasticsearch/reference/8.1/match-enrich-policy-type.html ```shell # 测试数据 - index_test_a DELETE index_test_a PUT index_test_a { "mappings": { "properties": { "field_a": { "type": "keyword" }, "title": { "type": "keyword" }, "publish_time": { "type": "date" } } } } POST index_test_a/_bulk {"index":{"_id":1}} {"field_a":"aaa","title":"elasticsearch in action","publish_time":"2017-07-01T00:00:00"} # 测试数据 - index_test_b PUT index_test_b { "mappings": { "properties": { "field_a": { "type": "keyword" }, "author": { "type": "keyword" }, "publisher": { "type": "keyword" } } } } POST index_test_b/_bulk {"index":{"_id":1}} {"field_a":"aaa","author":"jerry","publisher":"Tsinghua"} # 1. 创建enrich PUT /_enrich/policy/index_test_b_enrich { "match": { "indices": "index_test_b", "match_field": "field_a", "enrich_fields": ["author", "publisher"] } } # 2. 执行enrich POST /_enrich/policy/index_test_b_enrich/_execute # 3.创建policy PUT /_ingest/pipeline/index_test_b_policy { "processors" : [ { "enrich" : { "policy_name": "index_test_b_enrich", "field" : "field_a", "target_field": "auto_add_fields", "max_matches": "1" } }, { "script": { "lang": "painless", "source": """ if(ctx.auto_add_fields!=null && ctx.auto_add_fields.publisher!=null){ ctx.publisher = ctx.auto_add_fields.publisher; } if(ctx.auto_add_fields!=null && ctx.auto_add_fields.author!=null){ ctx.author = ctx.auto_add_fields.author; } """ } }, { "remove": { "field": "auto_add_fields" } } ] } # 4.执行reindex POST _reindex { "source": { "index": "index_test_a" }, "dest": { "index": "index_test_c", "pipeline": "index_test_b_policy" } } # 进行验证 GET index_test_c/_search ``` *** # 23.Painless 无痛脚本 > 官网文档地址:https://www.elastic.co/guide/en/elasticsearch/reference/8.1/modules-scripting.html > > 官网文档地址:https://www.elastic.co/guide/en/elasticsearch/painless/8.1/index.html ## 发展历史 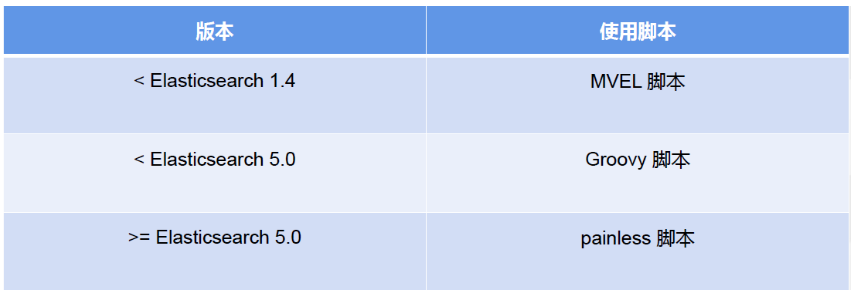 ## 全局认知 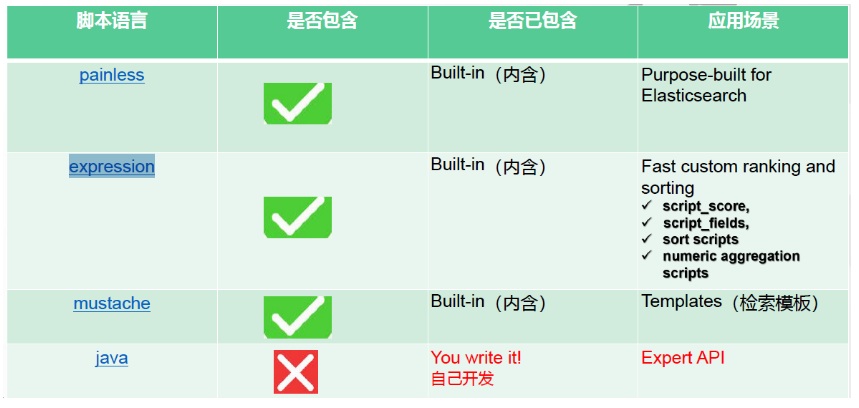 ## 脚本语法模板 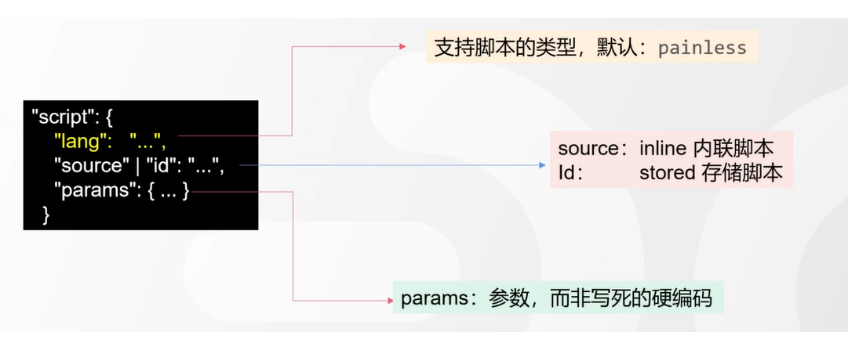 ## 应用场景 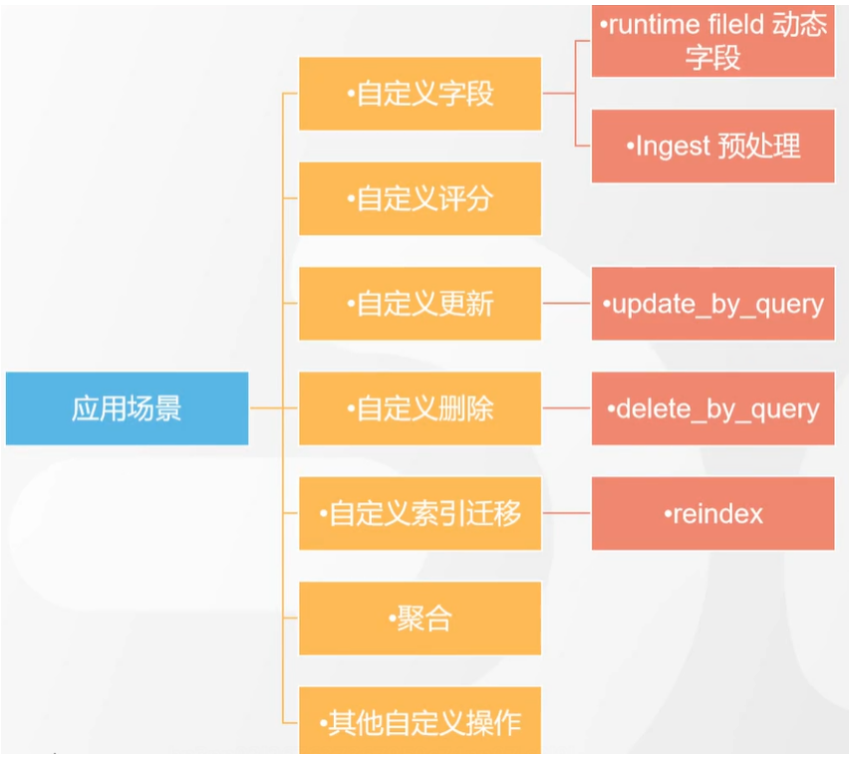 ### 自定义字段 ```shell # script_field GET kibana_sample_data_flights/_search { "_source": { "includes": [ "DistanceKilometers" ] }, "script_fields": { "my_double_field": { "script": { "lang": "expression", "source": "doc['DistanceKilometers'] * multiplier", "params": { "multiplier": 2 } } } } } ``` ```shell # runtime field PUT kibana_sample_data_flights/_mapping { "runtime":{ "day_of_week":{ "type":"keyword", "script":{ "source": "emit(doc['timestamp'].value.getDayOfWeekEnum().toString())" } } } } GET kibana_sample_data_flights/_search { "size": 0, "fields": [ "timestamp", "day_of_week" ], "aggs": { "day_of_week_agg": { "terms": { "field": "day_of_week", "size": 10 } } } } ``` ### 自定义评分 ```shell POST kibana_sample_data_flights/_search { "query": { "function_score": { "query": { "match_all": {} }, "script_score": { "script": { "lang": "expression", "source": "_score * doc['DistanceKilometers']" } } } } } ``` ### 自定义更新/删除 ```shell # 单条更新 POST kibana_sample_data_flights/_update/sJGOwYMBklfFAitU5ZIt { "script": { "lang": "painless", "source": """ ctx._source.last = params.last; ctx._source.nick = params.nick; """, "params": { "last":"aaa", "nick":"bbb" } } } # 批量更新 POST kibana_sample_data_flights/_update_by_query { "query": { "term": { "OriginWeather": { "value": "Sunny" } } }, "script": { "source": """ ctx._source.last = params.last; ctx._source.nick = params.nick; """, "lang": "painless", "params": { "last":"aaa", "nick":"bbb" } } } ``` ## 脚本与场景  ## 实战演练 > reindex操作,需满足 > > 1. 把source index的某个字段(该字段是数组)里的子项都去掉前后的空格 > 2. 增加一个新字段,这个新字段的值是source index的其中两个字段的值的拼接 > > Ingest pipline foreash :https://www.elastic.co/guide/en/elasticsearch/reference/8.1/foreach-processor.html > > Ingest pipline trim: https://www.elastic.co/guide/en/elasticsearch/reference/8.1/trim-processor.html ```shell # 1.创建测试source索引 PUT test_index_source { "mappings": { "properties": { "first_name":{ "type": "keyword" }, "last_name":{ "type": "keyword" }, "tags":{ "type": "keyword" } } } } # 2.填充测试数据 PUT test_index_source/_doc/1 { "first_name": "kang", "last_name": "rui", "tags": [ " aaa ", " bbb ", " ccc" ] } # 3.创建预处理 ingest pipline PUT _ingest/pipeline/test_index_source_pipline { "processors": [ { "foreach": { "field": "tags", "processor": { "trim": { "field": "_ingest._value" } } } }, { "script": { "lang": "painless", "source": """ ctx['full_name'] = ctx['first_name'] + ' '+ ctx['last_name'] """ } }, { "remove": { "field": "first_name" } }, { "remove": { "field": "last_name" } } ] } # 4.执行reindex POST _reindex { "source": { "index": "test_index_source" }, "dest": { "index": "test_index_source_reindex", "pipeline": "test_index_source_pipline" } } GET test_index_source_reindex/_search ``` *** # 24.update\_by\_query > 官网文档地址:https://www.elastic.co/guide/en/elasticsearch/reference/8.1/docs-update-by-query.html ## 更新的分类  ## 更新的场景  ## 基于painless脚本的批量更新 ```shell PUT mytest { "mappings": { "properties": { "counter":{ "type": "long" } } } } POST mytest/_bulk {"index":{"_id":1}} {"counter":100} {"index":{"_id":2}} {"counter":200} POST mytest/_update_by_query { "query": { "term": { "counter": { "value": 100 } } }, "script": { "source": """ ctx._source.counter++; """, "lang": "painless" } } GET mytest/_search ``` ## 基于Ingest pipline的批量更新 ```shell PUT _ingest/pipeline/mytest-pipline { "processors": [ { "set": { "field": "foo", "value": "bar" } } ] } POST mytest/_update_by_query?pipeline=mytest-pipline { "query": { "match_all": {} } } GET mytest/_search ``` ## 实战演练 > 为索引添加一个新字段e, 是已有字段 a b c d的拼接 ```shell POST mytest01/_bulk {"index":{"_id":1}} {"a":"a","b":"b","c":"c","d":"d"} # 解法1 PUT _ingest/pipeline/mytest01_pipline { "processors": [ { "script": { "lang": "painless", "source": """ ctx.e = ctx.a +' '+ ctx.b +' ' + ctx.c + ' '+ ctx.d; """ } } ] } POST mytest01/_update_by_query?pipeline=mytest01_pipline { "query": { "match_all": {} } } # 解法2 POST mytest01/_update_by_query { "query": { "match_all": {} }, "script": { "source": """ ctx._source.e = ctx._source.a +' '+ ctx._source.b +' ' + ctx._source.c + ' '+ ctx._source.d; """, "lang": "painless" } } ``` *** # 25.reindex > 官网文档地址:https://www.elastic.co/guide/en/elasticsearch/reference/8.1/docs-reindex.html ## reindex 使用场景 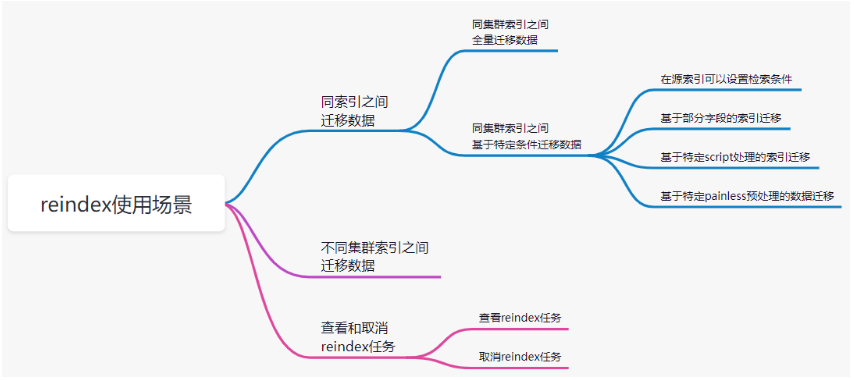 ## reindex在源索引设置检索条件 ```shell POST _reindex { "source": { "index": "YYY", "query": { "term": { "name": { "value": "kr" } } } }, "dest": { "index": "XXX" } } ``` ## reindex 基于部分字段做索引迁移 ```shell POST _reindex { "source": { "index": "YYY", "_source":["name","title"] }, "dest": { "index": "XXX" } } ``` ## 基于特定script处理的索引迁移 ```shell POST text0001/_bulk {"index":{}} {"foo":"bar","count":10} POST _reindex { "source": { "index": "text0001" }, "dest": { "index": "text0002" }, "script": { "lang": "painless", "source": """ if(ctx._source.count !=null && ctx._source.foo == 'bar'){ ctx._source.count++; ctx._source.remove('foo'); } """ } } GET text0002/_search ``` ## 基于pipeline预处理的索引迁移 ```shell POST index_a/_bulk { "index": { "_id": 1 } } { "title": " foo bar " } PUT _ingest/pipeline/my-trim-pipeline { "description": "describe pipeline", "processors": [ { "trim": { "field": "title" } } ] } POST _reindex { "source": { "index": "index_a" }, "dest": { "index": "index_b", "pipeline": "my-trim-pipeline" } } GET index_b/_search ``` *** # 26.Cluster健康诊断 ## Cluster健康状态 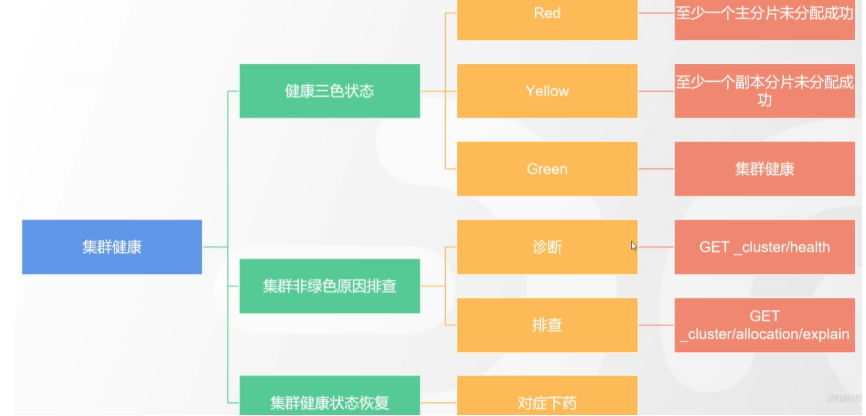 ## Cluster健康如何诊断 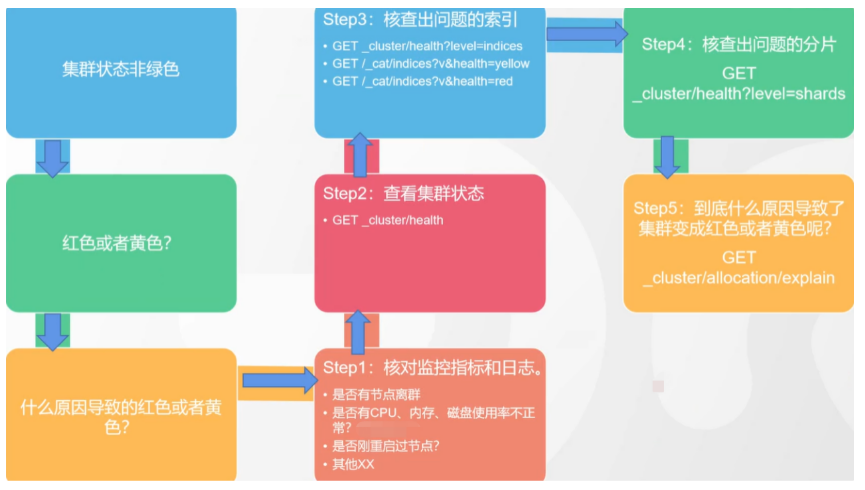 ## 分片未分配解决方案 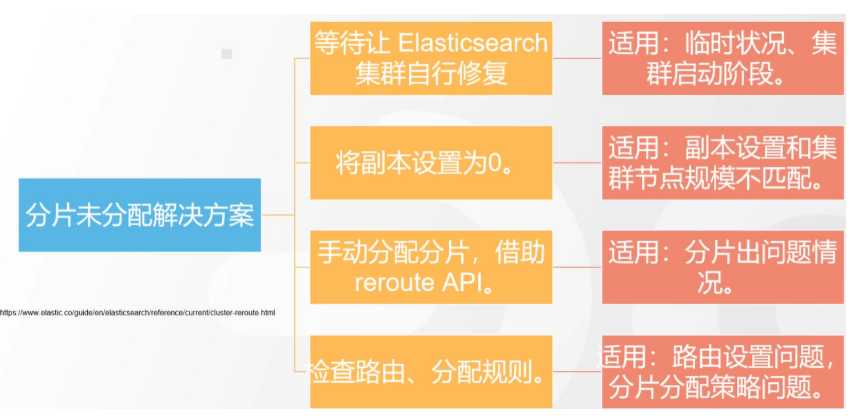 *** # 27.备份和恢复 > 官网文档地址:https://www.elastic.co/guide/en/elasticsearch/reference/8.1/snapshot-restore.html ## 索引备份恢复的方式 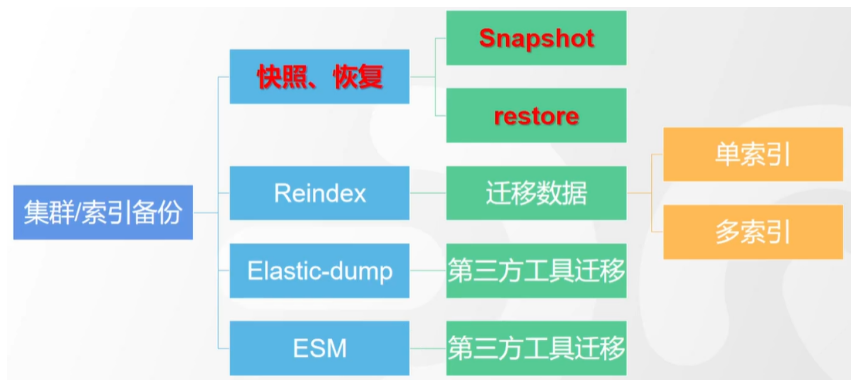 ## 快照常见命令 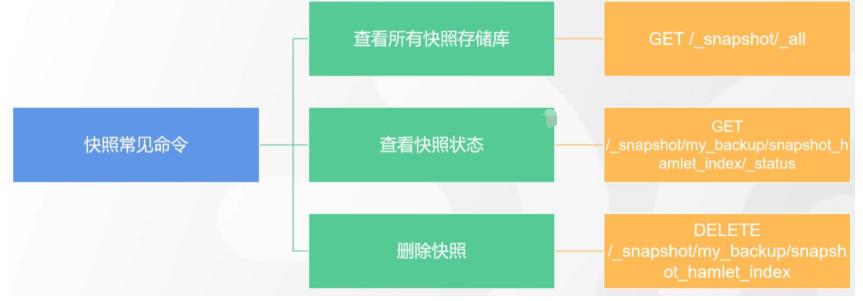 ## 快照库的注册 > 官网文档地址:https://www.elastic.co/guide/en/elasticsearch/reference/8.1/snapshots-filesystem-repository.html > 1. es修改配置文件,新增以下配置, 先创建文件夹 > > ```shell > path.repo: /home/es_study/elasticsearch-node-2/backup > ``` > > 1. 注册快照库 > > ```shell > PUT _snapshot/my_fs_backup > { > "type": "fs", > "settings": { > "location": "/home/es_study/elasticsearch-node-2/backup" > } > } > ``` > > 1. 验证是否注册成功 > > ```shell > POST /_snapshot/my_fs_backup/_verify > ``` ## 备份恢复演练 > 官网文档地址:https://www.elastic.co/guide/en/elasticsearch/reference/8.1/restore-snapshot-api.html ```shell # 执行备份 PUT /_snapshot/my_fs_backup/snapshot_1111?wait_for_completion=true { "indices": "my_index_001", "ignore_unavailable": true, "include_global_state": false, "metadata": { "taken_by": "user123", "taken_because": "backup before upgrading" } } # 删除索引 DELETE my_index_001 # 执行备份恢复 POST /_snapshot/my_fs_backup/snapshot_1111/_restore?wait_for_completion=true { "indices": "*", "ignore_unavailable": true, "include_global_state": false, "include_aliases": false } ``` ## SLM 快照生命周期管理 > 官网文档地址:https://www.elastic.co/guide/en/elasticsearch/reference/8.1/snapshots-take-snapshot.html ```shell PUT _slm/policy/nightly-snapshots { "schedule": "0 30 1 * * ?", // 定时执行时间 "name": "<nightly-snap-{now/d}>", // 生成的快照名称 "repository": "my_repository", // 备份库注册的名称 "config": { "indices": "*", // 需备份的索引 "include_global_state": true }, "retention": { // 删除的配置 "expire_after": "30d", "min_count": 5, "max_count": 50 } } ``` # 28.可搜索快照 > 官网文档地址:https://www.elastic.co/guide/en/elasticsearch/reference/8.1/searchable-snapshots.html ```shell # 1.在elasticsearch.yml配置文件中配置 path.repo: "/home/es_study/esBackUp" # 2.注册快照存储库 PUT _snapshot/my_fs_backup { "type": "fs", "settings": { "location": "/home/es_study/esBackUp" } } # 3.新增测试数据 PUT test-search-01/_bulk {"index":{"_id":1}} {"title":"test01"} # 4.创建快照 PUT _snapshot/my_fs_backup/test-search-01-snapshot?wait_for_completion=true { "indices": "test-search-01", "ignore_unavailable": true, "include_global_state": false, "metadata": { "taken_by": "kr", "taken_because": "backup before upgrading" } } # 5.删除索引 DELETE test-search-01 # 6.执行快照挂载 # https://www.elastic.co/guide/en/elasticsearch/reference/8.1/searchable-snapshots-api-mount-snapshot.html POST _snapshot/my_fs_backup/test-search-01-snapshot/_mount?wait_for_completion=true { "index": "test-search-01", "renamed_index": "docs-index-023", "index_settings": { "index.number_of_replicas": 1 }, "ignore_index_settings": [ "index.refresh_interval" ] } # 7.执行查询挂载后的索引 GET docs-index/_search ```
上一篇:Elasticsearch必知必会-基础篇
下一篇:技术分享-ClickHouse数据表迁移实战之-remote方式
jd****
文章数
2
阅读量
1030
作者其他文章
01
Elasticsearch必知必会-进阶篇
17.跨Cluster检索 - ccr官网文档地址:https://www.elastic.co/guide/en/elasticsearch/reference/8.1/modules-cross-cluster-search.html跨Cluster检索的背景和意义跨Cluster检索定义跨Cluster检索环境搭建官网文档地址:https://www.elastic.co/guide/en/
01
Elasticsearch必知必会-基础篇
1.索引的定义官网文档地址:https://www.elastic.co/guide/en/elasticsearch/reference/8.1/indices.html索引的全局认知ElasticSearchMysqlIndexTableType废弃Table废弃DocumentRowFieldColumnMappingSchemaEverything is indexedIndexQuery
jd****
文章数
2
阅读量
1030
作者其他文章
01
Elasticsearch必知必会-基础篇
添加企业微信
获取1V1专业服务
扫码关注
京东云开发者公众号