一、Sentinel简介
Sentinel 以流量为切入点,从流量控制、熔断降级、系统负载保护等多个维度保护服务的稳定性。
Sentinel 具有以下特征:
- 丰富的应用场景:Sentinel 承接了阿里巴巴近 10 年的双十一大促流量的核心场景,例如秒杀(即突发流量控制在系统容量可以承受的范围)、消息削峰填谷、集群流量控制、实时熔断下游不可用应用等。
- 完备的实时监控:Sentinel 同时提供实时的监控功能。您可以在控制台中看到接入应用的单台机器秒级数据,甚至 500 台以下规模的集群的汇总运行情况。
- 广泛的开源生态:Sentinel 提供开箱即用的与其它开源框架/库的整合模块,例如与 Spring Cloud、Apache Dubbo、gRPC、Quarkus 的整合。您只需要引入相应的依赖并进行简单的配置即可快速地接入 Sentinel。同时 Sentinel 提供 Java/Go/C++ 等多语言的原生实现。
- 完善的 SPI 扩展机制:Sentinel 提供简单易用、完善的 SPI 扩展接口。您可以通过实现扩展接口来快速地定制逻辑。例如定制规则管理、适配动态数据源等。
有关Sentinel的详细介绍以及和Hystrix的区别可以自行网上检索,推荐一篇文章:https://mp.weixin.qq.com/s/Q7Xv8cypQFrrOQhbd9BOXw
本次主要使用了Sentinel的降级、限流、系统负载保护功能
二、Sentinel关键技术源码解析
无论是限流、降级、负载等控制手段,大致流程如下:
- StatisticSlot 则用于记录、统计不同维度的 runtime 指标监控信息
- 责任链依次触发后续 slot 的 entry 方法,如 SystemSlot、FlowSlot、DegradeSlot 等的规则校验;
- 当后续的 slot 通过,没有抛出 BlockException 异常,说明该资源被成功调用,则增加执行线程数和通过的请求数等信息。
关于数据统计,主要会牵扯到 ArrayMetric、BucketLeapArray、MetricBucket、WindowWrap 等类。
项目结构
以下主要分析core包里的内容
2.1注解入口
2.1.1 Entry、Context、Node
SphU门面类的方法出参都是Entry,Entry可以理解为每次进入资源的一个凭证,如果调用SphO.entry()或者SphU.entry()能获取Entry对象,代表获取了凭证,没有被限流,否则抛出一个BlockException。
Entry中持有本次对资源调用的相关信息:
- createTime:创建该Entry的时间戳。
- curNode:Entry当前是在哪个节点。
- orginNode:Entry的调用源节点。
- resourceWrapper:Entry关联的资源信息。
Entry是一个抽象类,CtEntry是Entry的实现,CtEntry持有Context和调用链的信息
Context的源码注释如下,
This class holds metadata of current invocation
Node的源码注释
Holds real-time statistics for resources
Node中保存了对资源的实时数据的统计,Sentinel中的限流或者降级等功能就是通过Node中的数据进行判断的。Node是一个接口,里面定义了各种操作request、exception、rt、qps、thread的方法。
在细看Node实现时,不难发现LongAddr的使用,关于LongAddr和DoubleAddr都是java8 java.util.concurrent.atomic里的内容,感兴趣的小伙伴可以再深入研究一下,这两个是高并发下计数功能非常优秀的数据结构,实际应用场景里需要计数时可以考虑使用。
关于Node的介绍后续还会深入,此处大致先提一下这个概念。
2.2 初始化
2.2.1 Context初始化
在初始化slot责任链部分前,还执行了context的初始化,里面涉及几个重要概念,需要解释一下:
可以发现在Context初始化的过程中,会把EntranceNode加入到Root子节点中(实际Root本身是一个特殊的EntranceNode),并把EntranceNode放到contextNameNodeMap中。
之前简单提到过Node,是用来统计数据用的,不同Node功能如下:
- Node:用于完成数据统计的接口
- StatisticNode:统计节点,是Node接口的实现类,用于完成数据统计
- EntranceNode:入口节点,一个Context会有一个入口节点,用于统计当前Context的总体流量数据
- DefaultNode:默认节点,用于统计一个资源在当前Context中的流量数据
- ClusterNode:集群节点,用于统计一个资源在所有Context中的总体流量数据
protected static Context trueEnter(String name, String origin) {
        Context context = contextHolder.get();
        if (context == null) {
            Map<String, DefaultNode> localCacheNameMap = contextNameNodeMap;
            DefaultNode node = localCacheNameMap.get(name);
            if (node == null) {
                if (localCacheNameMap.size() > Constants.MAX_CONTEXT_NAME_SIZE) {
                    setNullContext();
                    return NULL_CONTEXT;
                } else {
                    LOCK.lock();
                    try {
                        node = contextNameNodeMap.get(name);
                        if (node == null) {
                            if (contextNameNodeMap.size() > Constants.MAX_CONTEXT_NAME_SIZE) {
                                setNullContext();
                                return NULL_CONTEXT;
                            } else {
                                node = new EntranceNode(new StringResourceWrapper(name, EntryType.IN), null);
                                // Add entrance node.
                                Constants.ROOT.addChild(node);

                                Map<String, DefaultNode> newMap = new HashMap<>(contextNameNodeMap.size() + 1);
                                newMap.putAll(contextNameNodeMap);
                                newMap.put(name, node);
                                contextNameNodeMap = newMap;
                            }
                        }
                    } finally {
                        LOCK.unlock();
                    }
                }
            }
            context = new Context(node, name);
            context.setOrigin(origin);
            contextHolder.set(context);
        }

        return context;
    }
2.2.2 通过SpiLoader默认初始化8个slot
每个slot的主要职责如下:
NodeSelectorSlot负责收集资源的路径,并将这些资源的调用路径,以树状结构存储起来,用于根据调用路径来限流降级;ClusterBuilderSlot则用于存储资源的统计信息以及调用者信息,例如该资源的 RT, QPS, thread count 等等,这些信息将用作为多维度限流,降级的依据;StatisticSlot则用于记录、统计不同纬度的 runtime 指标监控信息;FlowSlot则用于根据预设的限流规则以及前面 slot 统计的状态,来进行流量控制;AuthoritySlot则根据配置的黑白名单和调用来源信息,来做黑白名单控制;DegradeSlot则通过统计信息以及预设的规则,来做熔断降级;SystemSlot则通过系统的状态,例如 集群QPS、线程数、RT、负载 等,来控制总的入口流量;
2.3 StatisticSlot
2.3.1 Node
深入看一下Node,因为统计信息都在里面,后面不论是限流、熔断、负载保护等都是结合规则+统计信息判断是否要执行
从Node的源码注释看,它会持有资源维度的实时统计数据,以下是接口里的方法定义,可以看到totalRequest、totalPass、totalSuccess、blockRequest、totalException、passQps等很多request、qps、thread的相关方法:
/**
 * Holds real-time statistics for resources.
 *
 * @author qinan.qn
 * @author leyou
 * @author Eric Zhao
 */
public interface Node extends OccupySupport, DebugSupport {
    long totalRequest();
    long totalPass();
    long totalSuccess();
    long blockRequest();
    long totalException();
    double passQps();
    double blockQps();
    double totalQps();
    double successQps();
    ……
}
2.3.2 StatisticNode
我们先从最基础的StatisticNode开始看,源码给出的定位是:
The statistic node keep three kinds of real-time statistics metrics:
metrics in second level ({@code rollingCounterInSecond})
metrics in minute level ({@code rollingCounterInMinute})
thread count
StatisticNode只有四个属性,除了之前提到过的LongAddr类型的curThreadNum外,还有两个属性是Metric对象,通过入参已经属性命名可以看出,一个用于秒级,一个用于分钟级统计。接下来我们就要看看Metric
// StatisticNode持有两个Metric,一个秒级一个分钟级,由入参可知,秒级统计划分了两个时间窗口,窗口程度是500ms
private transient volatile Metric rollingCounterInSecond = new ArrayMetric(SampleCountProperty.SAMPLE_COUNT,
    IntervalProperty.INTERVAL);

// 分钟级统计划分了60个时间窗口,窗口长度是1000ms
private transient Metric rollingCounterInMinute = new ArrayMetric(60, 60 * 1000, false);

/**
 * The counter for thread count.
 */
private LongAdder curThreadNum = new LongAdder();

/**
 * The last timestamp when metrics were fetched.
 */
private long lastFetchTime = -1;
ArrayMetric只有一个属性LeapArray<MetricBucket>,其余都是用于统计的方法,LeapArray是sentinel中统计最基本的数据结构,这里有必要详细看一下,总体就是根据timeMillis去获取一个bucket,分为:没有创建、有直接返回、被废弃后的reset三种场景。
//以分钟级的统计属性为例,看一下时间窗口初始化过程
private transient Metric rollingCounterInMinute = new ArrayMetric(60, 60 * 1000, false);


public LeapArray(int sampleCount, int intervalInMs) {
        AssertUtil.isTrue(sampleCount > 0, "bucket count is invalid: " + sampleCount);
        AssertUtil.isTrue(intervalInMs > 0, "total time interval of the sliding window should be positive");
        AssertUtil.isTrue(intervalInMs % sampleCount == 0, "time span needs to be evenly divided");
        // windowLengthInMs = 60*1000 / 60 = 1000 滑动窗口时间长度,可见sentinel默认将单位时间分为了60个滑动窗口进行数据统计
        this.windowLengthInMs = intervalInMs / sampleCount;
        // 60*1000
        this.intervalInMs = intervalInMs;
        // 60
        this.intervalInSecond = intervalInMs / 1000.0;
        // 60
        this.sampleCount = sampleCount;
        // 数组长度60
        this.array = new AtomicReferenceArray<>(sampleCount);
    }

/**
     * Get bucket item at provided timestamp.
     *
     * @param timeMillis a valid timestamp in milliseconds
     * @return current bucket item at provided timestamp if the time is valid; null if time is invalid
     */
    public WindowWrap<T> currentWindow(long timeMillis) {
        if (timeMillis < 0) {
            return null;
        }
        // 根据当前时间戳算一个数组索引
        int idx = calculateTimeIdx(timeMillis);
        // Calculate current bucket start time.
        // timeMillis % 1000
        long windowStart = calculateWindowStart(timeMillis);

        /*
         * Get bucket item at given time from the array.
         *
         * (1) Bucket is absent, then just create a new bucket and CAS update to circular array.
         * (2) Bucket is up-to-date, then just return the bucket.
         * (3) Bucket is deprecated, then reset current bucket.
         */
        while (true) {
            WindowWrap<T> old = array.get(idx);
            if (old == null) {
                /*
                 *     B0       B1      B2    NULL      B4
                 * ||_______|_______|_______|_______|_______||___
                 * 200     400     600     800     1000    1200  timestamp
                 *                             ^
                 *                          time=888
                 *            bucket is empty, so create new and update
                 *
                 * If the old bucket is absent, then we create a new bucket at {@code windowStart},
                 * then try to update circular array via a CAS operation. Only one thread can
                 * succeed to update, while other threads yield its time slice.
                 */
                // newEmptyBucket 方法重写,秒级和分钟级统计对象实现不同
                WindowWrap<T> window = new WindowWrap<T>(windowLengthInMs, windowStart, newEmptyBucket(timeMillis));
                if (array.compareAndSet(idx, null, window)) {
                    // Successfully updated, return the created bucket.
                    return window;
                } else {
                    // Contention failed, the thread will yield its time slice to wait for bucket available.
                    Thread.yield();
                }
            } else if (windowStart == old.windowStart()) {
                /*
                 *     B0       B1      B2     B3      B4
                 * ||_______|_______|_______|_______|_______||___
                 * 200     400     600     800     1000    1200  timestamp
                 *                             ^
                 *                          time=888
                 *            startTime of Bucket 3: 800, so it's up-to-date
                 *
                 * If current {@code windowStart} is equal to the start timestamp of old bucket,
                 * that means the time is within the bucket, so directly return the bucket.
                 */
                return old;
            } else if (windowStart > old.windowStart()) {
                /*
                 *   (old)
                 *             B0       B1      B2    NULL      B4
                 * |_______||_______|_______|_______|_______|_______||___
                 * ...    1200     1400    1600    1800    2000    2200  timestamp
                 *                              ^
                 *                           time=1676
                 *          startTime of Bucket 2: 400, deprecated, should be reset
                 *
                 * If the start timestamp of old bucket is behind provided time, that means
                 * the bucket is deprecated. We have to reset the bucket to current {@code windowStart}.
                 * Note that the reset and clean-up operations are hard to be atomic,
                 * so we need a update lock to guarantee the correctness of bucket update.
                 *
                 * The update lock is conditional (tiny scope) and will take effect only when
                 * bucket is deprecated, so in most cases it won't lead to performance loss.
                 */
                if (updateLock.tryLock()) {
                    try {
                        // Successfully get the update lock, now we reset the bucket.
                        return resetWindowTo(old, windowStart);
                    } finally {
                        updateLock.unlock();
                    }
                } else {
                    // Contention failed, the thread will yield its time slice to wait for bucket available.
                    Thread.yield();
                }
            } else if (windowStart < old.windowStart()) {
                // Should not go through here, as the provided time is already behind.
                return new WindowWrap<T>(windowLengthInMs, windowStart, newEmptyBucket(timeMillis));
            }
        }
    }
// 持有一个时间窗口对象的数据,会根据当前时间戳除以时间窗口长度然后散列到数组中
private int calculateTimeIdx(/*@Valid*/ long timeMillis) {
        long timeId = timeMillis / windowLengthInMs;
        // Calculate current index so we can map the timestamp to the leap array.
        return (int)(timeId % array.length());
    }
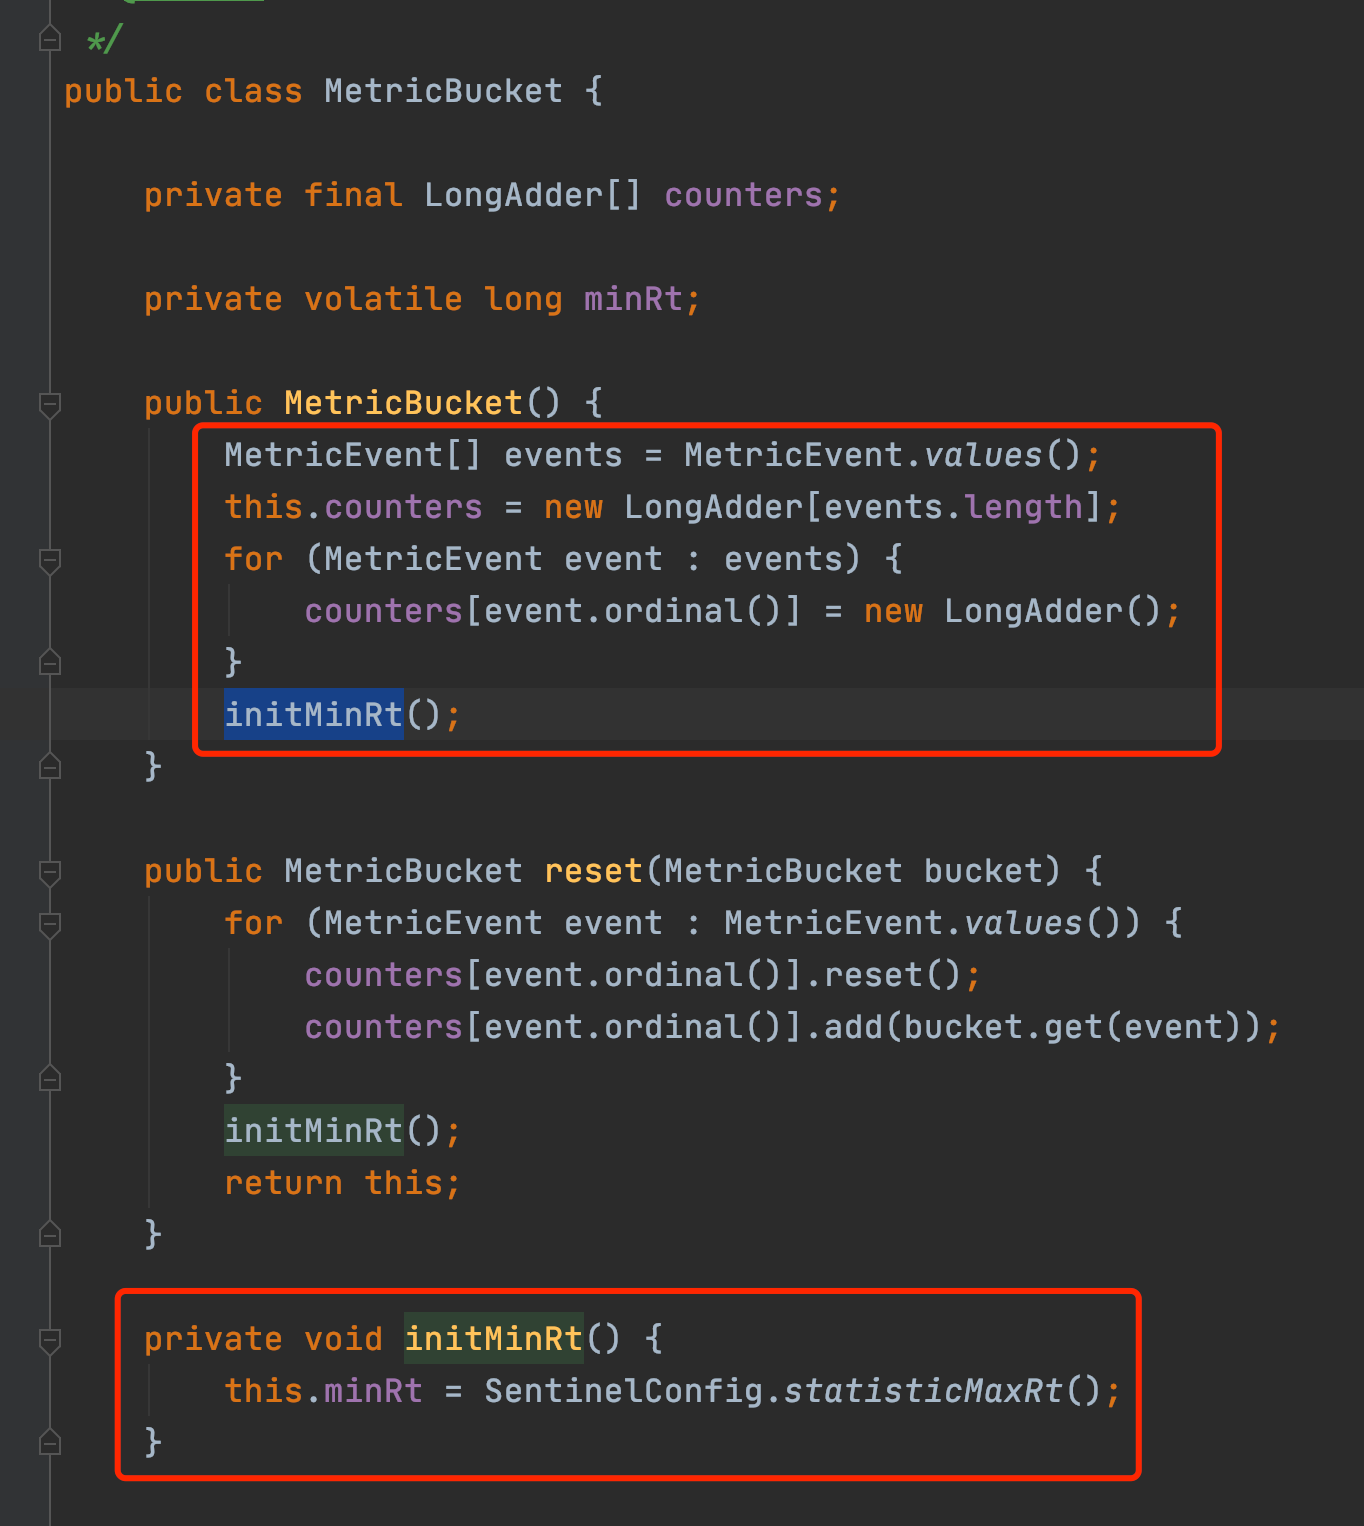
WindowWrap持有了windowLengthInMs, windowStart和LeapArray(分钟统计实现是BucketLeapArray,秒级统计实现是OccupiableBucketLeapArray),对于分钟级别的统计,MetricBucket维护了一个longAddr数组和一个配置的minRT
/**
 * The fundamental data structure for metric statistics in a time span.
 *
 * @author jialiang.linjl
 * @author Eric Zhao
 * @see LeapArray
 */
public class BucketLeapArray extends LeapArray<MetricBucket> {

    public BucketLeapArray(int sampleCount, int intervalInMs) {
        super(sampleCount, intervalInMs);
    }

    @Override
    public MetricBucket newEmptyBucket(long time) {
        return new MetricBucket();
    }

    @Override
    protected WindowWrap<MetricBucket> resetWindowTo(WindowWrap<MetricBucket> w, long startTime) {
        // Update the start time and reset value.
        w.resetTo(startTime);
        w.value().reset();
        return w;
    }
}
对于秒级统计,QPS=20场景下,如何准确统计的问题,此处用到了另外一个LeapArry实现FutureBucketLeapArray,至于秒级统计如何保证没有统计误差,读者可以再研究一下FutureBucketLeapArray的上下文就好。
2.4 FlowSlot
2.4.1 常见限流算法
介绍sentinel限流实现前,先介绍一下常见限流算法,基本分为三种:计数器、漏斗、令牌桶。
计数器算法
顾名思义,计数器算法就是统计某个时间段内的请求,每单位时间加1,然后与配置的限流值(最大QPS)进行比较,如果超出则触发限流。但是这种算法不能做到“平滑限流”,以1s为单位时间,100QPS为限流值为例,如下图,会出现某时段超出限流值的情况
因此在单纯计数器算法上,又出现了滑动窗口计数器算法,我们将统计时间细分,比如将1s统计时长分为5个时间窗口,通过滚动统计所有时间窗口的QPS作为系统实际的QPS的方式,就能解决上述临界统计问题,后续我们看sentinel源码时也能看到类似操作。
漏斗算法
不论流量有多大都会先到漏桶中,然后以均匀的速度流出。如何在代码中实现这个匀速呢?比如我们想让匀速为100q/s,那么我们可以得到每流出一个流量需要消耗10ms,类似一个队列,每隔10ms从队列头部取出流量进行放行,而我们的队列也就是漏桶,当流量大于队列的长度的时候,我们就可以拒绝超出的部分。
漏斗算法同样的也有一定的缺点:无法应对突发流量。比如一瞬间来了100个请求,在漏桶算法中只能一个一个的过去,当最后一个请求流出的时候时间已经过了一秒了,所以漏斗算法比较适合请求到达比较均匀,需要严格控制请求速率的场景。
令牌桶算法
令牌桶算法和漏斗算法比较类似,区别是令牌桶存放的是令牌数量不是请求数量,令牌桶可以根据自身需求多样性得管理令牌的生产和消耗,可以解决突发流量的问题。
2.4.2 单机限流模式
接下来我们看一下Sentinel中的限流实现,相比上述基本限流算法,Sentinel限流的第一个特性就是引入“资源”的概念,可以细粒度多样性的支持特定资源、关联资源、指定链路的限流。
FlowSlot的主要逻辑都在FlowRuleChecker里,介绍之前,我们先看一下Sentinel关于规则的模型描述,下图分别是限流、访问控制规则、系统保护规则(Linux负载)、降级规则
    /**
     * 流量控制两种模式
     *   0: thread count(当调用该api的线程数达到阈值的时候,进行限流)
     *   1: QPS(当调用该api的QPS达到阈值的时候,进行限流)
     */
    private int grade = RuleConstant.FLOW_GRADE_QPS;

    /**
     * 流量控制阈值,值含义与grade有关
     */
    private double count;

    /**
     * 调用关系限流策略(可以支持关联资源或指定链路的多样性限流需求)
     *  直接(api 达到限流条件时,直接限流)
     *  关联(当关联的资源达到限流阈值时,就限流自己)
     *  链路(只记录指定链路上的流量)
     * {@link RuleConstant#STRATEGY_DIRECT} for direct flow control (by origin);
     * {@link RuleConstant#STRATEGY_RELATE} for relevant flow control (with relevant resource);
     * {@link RuleConstant#STRATEGY_CHAIN} for chain flow control (by entrance resource).
     */
    private int strategy = RuleConstant.STRATEGY_DIRECT;

    /**
     * Reference resource in flow control with relevant resource or context.
     */
    private String refResource;

    /**
     * 流控效果:
     * 0. default(reject directly),直接拒绝,抛异常FlowException
     * 1. warm up, 慢启动模式(根据coldFactor(冷加载因子,默认3)的值,从阈值/coldFactor,经过预热时长,才达到设置的QPS阈值)
     * 2. rate limiter  排队等待
     * 3. warm up + rate limiter
     */
    private int controlBehavior = RuleConstant.CONTROL_BEHAVIOR_DEFAULT;

    private int warmUpPeriodSec = 10;

    /**
     * Max queueing time in rate limiter behavior.
     */
    private int maxQueueingTimeMs = 500;

    /**
    *  是否集群限流,默认为否
    */
    private boolean clusterMode;
    /**
     * Flow rule config for cluster mode.
     */
    private ClusterFlowConfig clusterConfig;

    /**
     * The traffic shaping (throttling) controller.
     */
    private TrafficShapingController controller;
接着我们继续分析FlowRuleChecker
canPassCheck第一步会好看limitApp,这个是结合访问授权限制规则使用的,默认是所有。
private static boolean passLocalCheck(FlowRule rule, Context context, DefaultNode node, int acquireCount,
                                          boolean prioritized) {
        // 根据策略选择Node来进行统计(可以是本身Node、关联的Node、指定的链路)
        Node selectedNode = selectNodeByRequesterAndStrategy(rule, context, node);
        if (selectedNode == null) {
            return true;
        }

        return rule.getRater().canPass(selectedNode, acquireCount, prioritized);
    }


static Node selectNodeByRequesterAndStrategy(/*@NonNull*/ FlowRule rule, Context context, DefaultNode node) {
        // limitApp是访问控制使用的,默认是default,不限制来源
        String limitApp = rule.getLimitApp();
        // 拿到限流策略
        int strategy = rule.getStrategy();
        String origin = context.getOrigin();
        // 基于调用来源做鉴权
        if (limitApp.equals(origin) && filterOrigin(origin)) {
            if (strategy == RuleConstant.STRATEGY_DIRECT) {
                // Matches limit origin, return origin statistic node.
                return context.getOriginNode();
            }
            //
            return selectReferenceNode(rule, context, node);
        } else if (RuleConstant.LIMIT_APP_DEFAULT.equals(limitApp)) {
            if (strategy == RuleConstant.STRATEGY_DIRECT) {
                // Return the cluster node.
                return node.getClusterNode();
            }

            return selectReferenceNode(rule, context, node);
        } else if (RuleConstant.LIMIT_APP_OTHER.equals(limitApp)
            && FlowRuleManager.isOtherOrigin(origin, rule.getResource())) {
            if (strategy == RuleConstant.STRATEGY_DIRECT) {
                return context.getOriginNode();
            }

            return selectReferenceNode(rule, context, node);
        }

        return null;
    }

static Node selectReferenceNode(FlowRule rule, Context context, DefaultNode node) {
        String refResource = rule.getRefResource();
        int strategy = rule.getStrategy();

        if (StringUtil.isEmpty(refResource)) {
            return null;
        }

        if (strategy == RuleConstant.STRATEGY_RELATE) {
            return ClusterBuilderSlot.getClusterNode(refResource);
        }

        if (strategy == RuleConstant.STRATEGY_CHAIN) {
            if (!refResource.equals(context.getName())) {
                return null;
            }
            return node;
        }
        // No node.
        return null;
    }

// 此代码是load限流规则时根据规则初始化流量整形控制器的逻辑,rule.getRater()返回TrafficShapingController
private static TrafficShapingController generateRater(/*@Valid*/ FlowRule rule) {
        if (rule.getGrade() == RuleConstant.FLOW_GRADE_QPS) {
            switch (rule.getControlBehavior()) {
                // 预热模式返回WarmUpController
                case RuleConstant.CONTROL_BEHAVIOR_WARM_UP:
                    return new WarmUpController(rule.getCount(), rule.getWarmUpPeriodSec(),
                            ColdFactorProperty.coldFactor);
                // 排队模式返回ThrottlingController
                case RuleConstant.CONTROL_BEHAVIOR_RATE_LIMITER:
                    return new ThrottlingController(rule.getMaxQueueingTimeMs(), rule.getCount());
                // 预热+排队模式返回WarmUpRateLimiterController
                case RuleConstant.CONTROL_BEHAVIOR_WARM_UP_RATE_LIMITER:
                    return new WarmUpRateLimiterController(rule.getCount(), rule.getWarmUpPeriodSec(),
                            rule.getMaxQueueingTimeMs(), ColdFactorProperty.coldFactor);
                case RuleConstant.CONTROL_BEHAVIOR_DEFAULT:
                default:
                    // Default mode or unknown mode: default traffic shaping controller (fast-reject).
            }
        }
        // 默认是DefaultController
        return new DefaultController(rule.getCount(), rule.getGrade());
    }
Sentinel单机限流算法
上面我们看到根据限流规则controlBehavior属性(流控效果),会初始化以下实现:
- DefaultController:是一个非常典型的滑动窗口计数器算法实现,将当前统计的qps和请求进来的qps进行求和,小于限流值则通过,大于则计算一个等待时间,稍后再试
- ThrottlingController:是漏斗算法的实现,实现思路已经在源码片段中加了备注
- WarmUpController:实现参考了Guava的带预热的RateLimiter,区别是Guava侧重于请求间隔,类似前面提到的令牌桶,而Sentinel更关注于请求数,和令牌桶算法有点类似
- WarmUpRateLimiterController:低水位使用预热算法,高水位使用滑动窗口计数器算法排队。
DefaultController
    @Override
    public boolean canPass(Node node, int acquireCount, boolean prioritized) {
        int curCount = avgUsedTokens(node);
        if (curCount + acquireCount > count) {
            if (prioritized && grade == RuleConstant.FLOW_GRADE_QPS) {
                long currentTime;
                long waitInMs;
                currentTime = TimeUtil.currentTimeMillis();
                waitInMs = node.tryOccupyNext(currentTime, acquireCount, count);
                if (waitInMs < OccupyTimeoutProperty.getOccupyTimeout()) {
                    node.addWaitingRequest(currentTime + waitInMs, acquireCount);
                    node.addOccupiedPass(acquireCount);
                    sleep(waitInMs);

                    // PriorityWaitException indicates that the request will pass after waiting for {@link @waitInMs}.
                    throw new PriorityWaitException(waitInMs);
                }
            }
            return false;
        }
        return true;
    }
ThrottlingController
 public ThrottlingController(int queueingTimeoutMs, double maxCountPerStat) {
        this(queueingTimeoutMs, maxCountPerStat, 1000);
    }

    public ThrottlingController(int queueingTimeoutMs, double maxCountPerStat, int statDurationMs) {
        AssertUtil.assertTrue(statDurationMs > 0, "statDurationMs should be positive");
        AssertUtil.assertTrue(maxCountPerStat >= 0, "maxCountPerStat should be >= 0");
        AssertUtil.assertTrue(queueingTimeoutMs >= 0, "queueingTimeoutMs should be >= 0");
        this.maxQueueingTimeMs = queueingTimeoutMs;
        this.count = maxCountPerStat;
        this.statDurationMs = statDurationMs;
        // Use nanoSeconds when durationMs%count != 0 or count/durationMs> 1 (to be accurate)
        // 可见配置限流值count大于1000时useNanoSeconds会是true否则是false
        if (maxCountPerStat > 0) {
            this.useNanoSeconds = statDurationMs % Math.round(maxCountPerStat) != 0 || maxCountPerStat / statDurationMs > 1;
        } else {
            this.useNanoSeconds = false;
        }
    }

    @Override
    public boolean canPass(Node node, int acquireCount) {
        return canPass(node, acquireCount, false);
    }

    private boolean checkPassUsingNanoSeconds(int acquireCount, double maxCountPerStat) {
        final long maxQueueingTimeNs = maxQueueingTimeMs * MS_TO_NS_OFFSET;
        long currentTime = System.nanoTime();
        // Calculate the interval between every two requests.
        final long costTimeNs = Math.round(1.0d * MS_TO_NS_OFFSET * statDurationMs * acquireCount / maxCountPerStat);

        // Expected pass time of this request.
        long expectedTime = costTimeNs + latestPassedTime.get();

        if (expectedTime <= currentTime) {
            // Contention may exist here, but it's okay.
            latestPassedTime.set(currentTime);
            return true;
        } else {
            final long curNanos = System.nanoTime();
            // Calculate the time to wait.
            long waitTime = costTimeNs + latestPassedTime.get() - curNanos;
            if (waitTime > maxQueueingTimeNs) {
                return false;
            }

            long oldTime = latestPassedTime.addAndGet(costTimeNs);
            waitTime = oldTime - curNanos;
            if (waitTime > maxQueueingTimeNs) {
                latestPassedTime.addAndGet(-costTimeNs);
                return false;
            }
            // in race condition waitTime may <= 0
            if (waitTime > 0) {
                sleepNanos(waitTime);
            }
            return true;
        }
    }

    // 漏斗算法具体实现
    private boolean checkPassUsingCachedMs(int acquireCount, double maxCountPerStat) {
        long currentTime = TimeUtil.currentTimeMillis();
        // 计算两次请求的间隔(分为秒级和纳秒级)
        long costTime = Math.round(1.0d * statDurationMs * acquireCount / maxCountPerStat);

        // 请求的期望的时间
        long expectedTime = costTime + latestPassedTime.get();

        if (expectedTime <= currentTime) {
            // latestPassedTime是AtomicLong类型,支持volatile语义
            latestPassedTime.set(currentTime);
            return true;
        } else {
            // 计算等待时间
            long waitTime = costTime + latestPassedTime.get() - TimeUtil.currentTimeMillis();
            // 如果大于最大排队时间,则触发限流
            if (waitTime > maxQueueingTimeMs) {
                return false;
            }

            long oldTime = latestPassedTime.addAndGet(costTime);
            waitTime = oldTime - TimeUtil.currentTimeMillis();
            if (waitTime > maxQueueingTimeMs) {
                latestPassedTime.addAndGet(-costTime);
                return false;
            }
            // in race condition waitTime may <= 0
            if (waitTime > 0) {
                sleepMs(waitTime);
            }
            return true;
        }
    }

    @Override
    public boolean canPass(Node node, int acquireCount, boolean prioritized) {
        // Pass when acquire count is less or equal than 0.
        if (acquireCount <= 0) {
            return true;
        }
        // Reject when count is less or equal than 0.
        // Otherwise, the costTime will be max of long and waitTime will overflow in some cases.
        if (count <= 0) {
            return false;
        }
        if (useNanoSeconds) {
            return checkPassUsingNanoSeconds(acquireCount, this.count);
        } else {
            return checkPassUsingCachedMs(acquireCount, this.count);
        }
    }

    private void sleepMs(long ms) {
        try {
            Thread.sleep(ms);
        } catch (InterruptedException e) {
        }
    }

    private void sleepNanos(long ns) {
        LockSupport.parkNanos(ns);
    }
long costTime = Math.round(1.0d * statDurationMs * acquireCount / maxCountPerStat);由上述计算两次请求间隔的公式我们可以发现,当maxCountPerStat(规则配置的限流值QPS)超过1000后,就无法准确计算出匀速排队模式下的请求间隔时长,因此对应前面介绍的,当规则配置限流值超过1000QPS后,会采用checkPassUsingNanoSeconds,小于1000QPS会采用checkPassUsingCachedMs,对比一下checkPassUsingNanoSeconds和checkPassUsingCachedMs,可以发现主体思路没变,只是统计维度从毫秒换算成了纳秒,因此只看checkPassUsingCachedMs实现就可以
WarmUpController
@Override
    public boolean canPass(Node node, int acquireCount, boolean prioritized) {
        long passQps = (long) node.passQps();

        long previousQps = (long) node.previousPassQps();
        syncToken(previousQps);

        // 开始计算它的斜率
        // 如果进入了警戒线,开始调整他的qps
        long restToken = storedTokens.get();
        if (restToken >= warningToken) {
            long aboveToken = restToken - warningToken;
            // 消耗的速度要比warning快,但是要比慢
            // current interval = restToken*slope+1/count
            double warningQps = Math.nextUp(1.0 / (aboveToken * slope + 1.0 / count));
            if (passQps + acquireCount <= warningQps) {
                return true;
            }
        } else {
            if (passQps + acquireCount <= count) {
                return true;
            }
        }

        return false;
    }

protected void syncToken(long passQps) {
        long currentTime = TimeUtil.currentTimeMillis();
        currentTime = currentTime - currentTime % 1000;
        long oldLastFillTime = lastFilledTime.get();
        if (currentTime <= oldLastFillTime) {
            return;
        }

        long oldValue = storedTokens.get();
        long newValue = coolDownTokens(currentTime, passQps);

        if (storedTokens.compareAndSet(oldValue, newValue)) {
            long currentValue = storedTokens.addAndGet(0 - passQps);
            if (currentValue < 0) {
                storedTokens.set(0L);
            }
            lastFilledTime.set(currentTime);
        }

    }

private long coolDownTokens(long currentTime, long passQps) {
        long oldValue = storedTokens.get();
        long newValue = oldValue;

        // 添加令牌的判断前提条件:
        // 当令牌的消耗程度远远低于警戒线的时候
        if (oldValue < warningToken) {
            newValue = (long)(oldValue + (currentTime - lastFilledTime.get()) * count / 1000);
        } else if (oldValue > warningToken) {
            if (passQps < (int)count / coldFactor) {
                newValue = (long)(oldValue + (currentTime - lastFilledTime.get()) * count / 1000);
            }
        }
        return Math.min(newValue, maxToken);
    }
2.4.3 集群限流
passClusterCheck方法(因为clusterService找不到会降级到非集群限流)
private static boolean passClusterCheck(FlowRule rule, Context context, DefaultNode node, int acquireCount,
                                            boolean prioritized) {
        try {
            // 获取当前节点是Token Client还是Token Server
            TokenService clusterService = pickClusterService();
            if (clusterService == null) {
                return fallbackToLocalOrPass(rule, context, node, acquireCount, prioritized);
            }
            long flowId = rule.getClusterConfig().getFlowId();
            // 根据获取的flowId通过TokenService进行申请token。从上面可知,它可能是TokenClient调用的,也可能是ToeknServer调用的。分别对应的类是DefaultClusterTokenClient和DefaultTokenService
            TokenResult result = clusterService.requestToken(flowId, acquireCount, prioritized);
            return applyTokenResult(result, rule, context, node, acquireCount, prioritized);
            // If client is absent, then fallback to local mode.
        } catch (Throwable ex) {
            RecordLog.warn("[FlowRuleChecker] Request cluster token unexpected failed", ex);
        }
        // Fallback to local flow control when token client or server for this rule is not available.
        // If fallback is not enabled, then directly pass.
        return fallbackToLocalOrPass(rule, context, node, acquireCount, prioritized);
    }

//获取当前节点是Token Client还是Token Server。
//1) 如果当前节点的角色是Client,返回的TokenService为DefaultClusterTokenClient;
//2)如果当前节点的角色是Server,则默认返回的TokenService为DefaultTokenService。
private static TokenService pickClusterService() {
        if (ClusterStateManager.isClient()) {
            return TokenClientProvider.getClient();
        }
        if (ClusterStateManager.isServer()) {
            return EmbeddedClusterTokenServerProvider.getServer();
        }
        return null;
    }
集群限流模式
Sentinel 集群限流服务端有两种启动方式:
- 嵌入模式(Embedded)适合应用级别的限流,部署简单,但对应用性能有影响
- 独立模式(Alone)适合全局限流,需要独立部署
考虑到文章篇幅,集群限流有机会再展开详细介绍。
集群限流模式降级
private static boolean passClusterCheck(FlowRule rule, Context context, DefaultNode node, int acquireCount,
                                            boolean prioritized) {
        try {
            TokenService clusterService = pickClusterService();
            if (clusterService == null) {
                return fallbackToLocalOrPass(rule, context, node, acquireCount, prioritized);
            }
            long flowId = rule.getClusterConfig().getFlowId();
            TokenResult result = clusterService.requestToken(flowId, acquireCount, prioritized);
            return applyTokenResult(result, rule, context, node, acquireCount, prioritized);
            // If client is absent, then fallback to local mode.
        } catch (Throwable ex) {
            RecordLog.warn("[FlowRuleChecker] Request cluster token unexpected failed", ex);
        }
        // Fallback to local flow control when token client or server for this rule is not available.
        // If fallback is not enabled, then directly pass.
        // 可以看到如果集群限流有异常,会降级到单机限流模式,如果配置不允许降级,那么直接会跳过此次校验
        return fallbackToLocalOrPass(rule, context, node, acquireCount, prioritized);
    }
2.5 DegradeSlot
CircuitBreaker
大神对断路器的解释:https://martinfowler.com/bliki/CircuitBreaker.html
首先就看到了根据资源名称获取断路器列表,Sentinel的断路器有两个实现:RT模式使用ResponseTimeCircuitBreaker、异常模式使用ExceptionCircuitBreaker
public interface CircuitBreaker {

    /**
     * Get the associated circuit breaking rule.
     *
     * @return associated circuit breaking rule
     */
    DegradeRule getRule();

    /**
     * Acquires permission of an invocation only if it is available at the time of invoking.
     *
     * @param context context of current invocation
     * @return {@code true} if permission was acquired and {@code false} otherwise
     */
    boolean tryPass(Context context);

    /**
     * Get current state of the circuit breaker.
     *
     * @return current state of the circuit breaker
     */
    State currentState();

    /**
     * <p>Record a completed request with the context and handle state transformation of the circuit breaker.</p>
     * <p>Called when a <strong>passed</strong> invocation finished.</p>
     *
     * @param context context of current invocation
     */
    void onRequestComplete(Context context);

    /**
     * Circuit breaker state.
     */
    enum State {
        /**
         * In {@code OPEN} state, all requests will be rejected until the next recovery time point.
         */
        OPEN,
        /**
         * In {@code HALF_OPEN} state, the circuit breaker will allow a "probe" invocation.
         * If the invocation is abnormal according to the strategy (e.g. it's slow), the circuit breaker
         * will re-transform to the {@code OPEN} state and wait for the next recovery time point;
         * otherwise the resource will be regarded as "recovered" and the circuit breaker
         * will cease cutting off requests and transform to {@code CLOSED} state.
         */
        HALF_OPEN,
        /**
         * In {@code CLOSED} state, all requests are permitted. When current metric value exceeds the threshold,
         * the circuit breaker will transform to {@code OPEN} state.
         */
        CLOSED
    }
}
以ExceptionCircuitBreaker为例看一下具体实现
public class ExceptionCircuitBreaker extends AbstractCircuitBreaker {

    // 异常模式有两种,异常率和异常数
    private final int strategy;
    // 最小请求数
    private final int minRequestAmount;
    // 阈值
    private final double threshold;

    // LeapArray是sentinel统计数据非常重要的一个结构,主要封装了时间窗口相关的操作
    private final LeapArray<SimpleErrorCounter> stat;

    public ExceptionCircuitBreaker(DegradeRule rule) {
        this(rule, new SimpleErrorCounterLeapArray(1, rule.getStatIntervalMs()));
    }

    ExceptionCircuitBreaker(DegradeRule rule, LeapArray<SimpleErrorCounter> stat) {
        super(rule);
        this.strategy = rule.getGrade();
        boolean modeOk = strategy == DEGRADE_GRADE_EXCEPTION_RATIO || strategy == DEGRADE_GRADE_EXCEPTION_COUNT;
        AssertUtil.isTrue(modeOk, "rule strategy should be error-ratio or error-count");
        AssertUtil.notNull(stat, "stat cannot be null");
        this.minRequestAmount = rule.getMinRequestAmount();
        this.threshold = rule.getCount();
        this.stat = stat;
    }

    @Override
    protected void resetStat() {
        // Reset current bucket (bucket count = 1).
        stat.currentWindow().value().reset();
    }


    @Override
    public void onRequestComplete(Context context) {
        Entry entry = context.getCurEntry();
        if (entry == null) {
            return;
        }
        Throwable error = entry.getError();
        SimpleErrorCounter counter = stat.currentWindow().value();
        if (error != null) {
            counter.getErrorCount().add(1);
        }
        counter.getTotalCount().add(1);

        handleStateChangeWhenThresholdExceeded(error);
    }

    private void handleStateChangeWhenThresholdExceeded(Throwable error) {
        if (currentState.get() == State.OPEN) {
            return;
        }

        if (currentState.get() == State.HALF_OPEN) {
            // In detecting request
            if (error == null) {
                fromHalfOpenToClose();
            } else {
                fromHalfOpenToOpen(1.0d);
            }
            return;
        }

        List<SimpleErrorCounter> counters = stat.values();
        long errCount = 0;
        long totalCount = 0;
        for (SimpleErrorCounter counter : counters) {

 += counter.errorCount.sum();
            totalCount += counter.totalCount.sum();
        }
        if (totalCount < minRequestAmount) {
            return;
        }
        double curCount = errCount;
        if (strategy == DEGRADE_GRADE_EXCEPTION_RATIO) {
            // Use errorRatio
            curCount = errCount * 1.0d / totalCount;
        }
        if (curCount > threshold) {
            transformToOpen(curCount);
        }
    }

    static class SimpleErrorCounter {
        private LongAdder errorCount;
        private LongAdder totalCount;

        public SimpleErrorCounter() {
            this.errorCount = new LongAdder();
            this.totalCount = new LongAdder();
        }

        public LongAdder getErrorCount() {
            return errorCount;
        }

        public LongAdder getTotalCount() {
            return totalCount;
        }

        public SimpleErrorCounter reset() {
            errorCount.reset();
            totalCount.reset();
            return this;
        }

        @Override
        public String toString() {
            return "SimpleErrorCounter{" +
                "errorCount=" + errorCount +
                ", totalCount=" + totalCount +
                '}';
        }
    }

    static class SimpleErrorCounterLeapArray extends LeapArray<SimpleErrorCounter> {

        public SimpleErrorCounterLeapArray(int sampleCount, int intervalInMs) {
            super(sampleCount, intervalInMs);
        }

        @Override
        public SimpleErrorCounter newEmptyBucket(long timeMillis) {
            return new SimpleErrorCounter();
        }

        @Override
        protected WindowWrap<SimpleErrorCounter> resetWindowTo(WindowWrap<SimpleErrorCounter> w, long startTime) {
            // Update the start time and reset value.
            w.resetTo(startTime);
            w.value().reset();
            return w;
        }
    }
}
2.6 SystemSlot
校验逻辑主要集中在com.alibaba.csp.sentinel.slots.system.SystemRuleManager#checkSystem,以下是片段,可以看到,作为负载保护规则校验,实现了集群的QPS、线程、RT(响应时间)、系统负载的控制,除系统负载以外,其余统计都是依赖StatisticSlot实现,系统负载是通过SystemRuleManager定时调度SystemStatusListener,通过OperatingSystemMXBean去获取
/**
     * Apply {@link SystemRule} to the resource. Only inbound traffic will be checked.
     *
     * @param resourceWrapper the resource.
     * @throws BlockException when any system rule's threshold is exceeded.
     */
    public static void checkSystem(ResourceWrapper resourceWrapper, int count) throws BlockException {
        if (resourceWrapper == null) {
            return;
        }
        // Ensure the checking switch is on.
        if (!checkSystemStatus.get()) {
            return;
        }

        // for inbound traffic only
        if (resourceWrapper.getEntryType() != EntryType.IN) {
            return;
        }

        // total qps 此处是拿到某个资源在集群中的QPS总和,相关概念可以会看初始化关于Node的介绍
        double currentQps = Constants.ENTRY_NODE.passQps();
        if (currentQps + count > qps) {
            throw new SystemBlockException(resourceWrapper.getName(), "qps");
        }

        // total thread
        int currentThread = Constants.ENTRY_NODE.curThreadNum();
        if (currentThread > maxThread) {
            throw new SystemBlockException(resourceWrapper.getName(), "thread");
        }

        double rt = Constants.ENTRY_NODE.avgRt();
        if (rt > maxRt) {
            throw new SystemBlockException(resourceWrapper.getName(), "rt");
        }

        // load. BBR algorithm.
        if (highestSystemLoadIsSet && getCurrentSystemAvgLoad() > highestSystemLoad) {
            if (!checkBbr(currentThread)) {
                throw new SystemBlockException(resourceWrapper.getName(), "load");
            }
        }

        // cpu usage
        if (highestCpuUsageIsSet && getCurrentCpuUsage() > highestCpuUsage) {
            throw new SystemBlockException(resourceWrapper.getName(), "cpu");
        }
    }

    private static boolean checkBbr(int currentThread) {
        if (currentThread > 1 &&
            currentThread > Constants.ENTRY_NODE.maxSuccessQps() * Constants.ENTRY_NODE.minRt() / 1000) {
            return false;
        }
        return true;
    }

    public static double getCurrentSystemAvgLoad() {
        return statusListener.getSystemAverageLoad();
    }

    public static double getCurrentCpuUsage() {
        return statusListener.getCpuUsage();
    }
public class SystemStatusListener implements Runnable {

    volatile double currentLoad = -1;
    volatile double currentCpuUsage = -1;

    volatile String reason = StringUtil.EMPTY;

    volatile long processCpuTime = 0;
    volatile long processUpTime = 0;

    public double getSystemAverageLoad() {
        return currentLoad;
    }

    public double getCpuUsage() {
        return currentCpuUsage;
    }

    @Override
    public void run() {
        try {
            OperatingSystemMXBean osBean = ManagementFactory.getPlatformMXBean(OperatingSystemMXBean.class);
            currentLoad = osBean.getSystemLoadAverage();

            /*
             * Java Doc copied from {@link OperatingSystemMXBean#getSystemCpuLoad()}:</br>
             * Returns the "recent cpu usage" for the whole system. This value is a double in the [0.0,1.0] interval.
             * A value of 0.0 means that all CPUs were idle during the recent period of time observed, while a value
             * of 1.0 means that all CPUs were actively running 100% of the time during the recent period being
             * observed. All values between 0.0 and 1.0 are possible depending of the activities going on in the
             * system. If the system recent cpu usage is not available, the method returns a negative value.
             */
            double systemCpuUsage = osBean.getSystemCpuLoad();

            // calculate process cpu usage to support application running in container environment
            RuntimeMXBean runtimeBean = ManagementFactory.getPlatformMXBean(RuntimeMXBean.class);
            long newProcessCpuTime = osBean.getProcessCpuTime();
            long newProcessUpTime = runtimeBean.getUptime();
            int cpuCores = osBean.getAvailableProcessors();
            long processCpuTimeDiffInMs = TimeUnit.NANOSECONDS
                    .toMillis(newProcessCpuTime - processCpuTime);
            long processUpTimeDiffInMs = newProcessUpTime - processUpTime;
            double processCpuUsage = (double) processCpuTimeDiffInMs / processUpTimeDiffInMs / cpuCores;
            processCpuTime = newProcessCpuTime;
            processUpTime = newProcessUpTime;

            currentCpuUsage = Math.max(processCpuUsage, systemCpuUsage);

            if (currentLoad > SystemRuleManager.getSystemLoadThreshold()) {
                writeSystemStatusLog();
            }
        } catch (Throwable e) {
            RecordLog.warn("[SystemStatusListener] Failed to get system metrics from JMX", e);
        }
    }

    private void writeSystemStatusLog() {
        StringBuilder sb = new StringBuilder();
        sb.append("Load exceeds the threshold: ");
        sb.append("load:").append(String.format("%.4f", currentLoad)).append("; ");
        sb.append("cpuUsage:").append(String.format("%.4f", currentCpuUsage)).append("; ");
        sb.append("qps:").append(String.format("%.4f", Constants.ENTRY_NODE.passQps())).append("; ");
        sb.append("rt:").append(String.format("%.4f", Constants.ENTRY_NODE.avgRt())).append("; ");
        sb.append("thread:").append(Constants.ENTRY_NODE.curThreadNum()).append("; ");
        sb.append("success:").append(String.format("%.4f", Constants.ENTRY_NODE.successQps())).append("; ");
        sb.append("minRt:").append(String.format("%.2f", Constants.ENTRY_NODE.minRt())).append("; ");
        sb.append("maxSuccess:").append(String.format("%.2f", Constants.ENTRY_NODE.maxSuccessQps())).append("; ");
        RecordLog.info(sb.toString());
    }
}
三、京东版最佳实践
3.1 使用方式
Sentinel使用方式本身非常简单,就是一个注解,但是要考虑规则加载和规则持久化的方式,现有的方式有:
- 使用Sentinel-dashboard功能:使用面板接入需要维护一个配置规则的管理端,考虑到偏后端的系统需要额外维护一个面板成本较大,如果是像RPC框架这种本身有管理端的接入可以考虑次方案。
- 中间件(如:zookepper、nacos、eureka、redis等):Sentinel源码extension包里提供了类似的实现,如下图
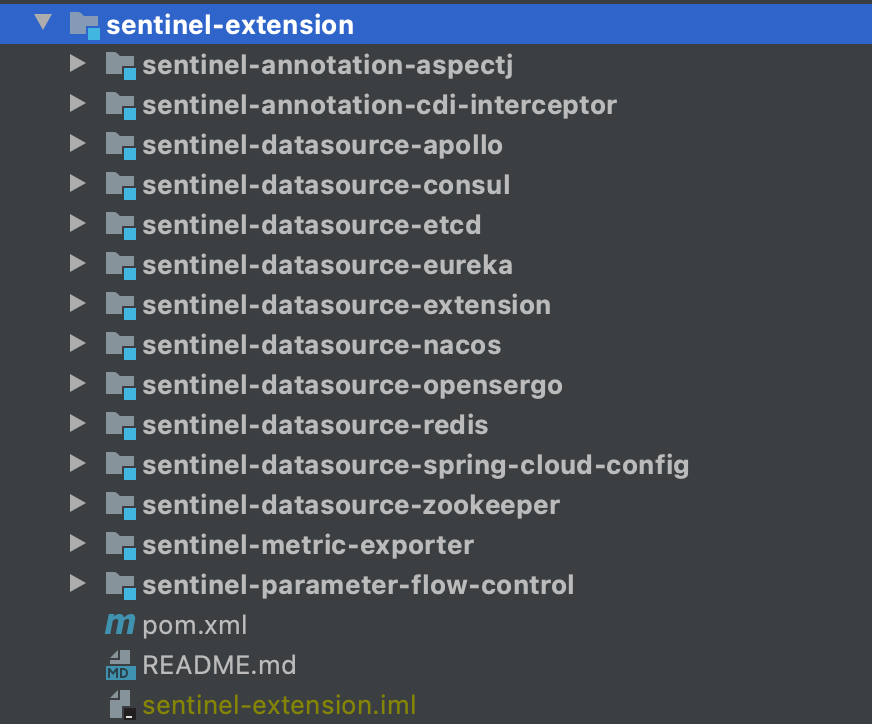
结合京东实际,我实现了一个规则热部署的Sentinel组件,实现方式类似zookeeper的方式,将规则记录到ducc的一个key上,在spring容器启动时做第一次规则加载和监听器注册,组件也做一了一些规则读取,校验、实例化不同规则对象的工作
插件使用方式:注解+配置
第一步 引入组件
<dependency>
    <groupId>com.jd.ldop.tools</groupId>
    <artifactId>sentinel-tools</artifactId>
    <version>1.0.0-SNAPSHOT</version>
</dependency>
第二步 初始化sentinelProcess
支持ducc、本地文件读取、直接写入三种方式规则写入方式
目前支持限流规则、熔断降级规则两种模式,系统负载保护模式待开发和验证
<!-- 基于sentinel的降级、限流、熔断组件 -->
    <bean id="sentinelProcess" class="com.jd.ldop.sentinel.SentinelProcess">
        <property name="ruleResourceWrappers">
            <list>
                <ref bean="degradeRule"/>
            </list>
        </property>
    </bean>

    <!-- 降级或限流规则配置 -->
    <bean id="degradeRule" class="com.jd.ldop.sentinel.dto.RuleResourceWrapper">
        <constructor-arg index="0" value="ducc.degradeRule"/>
        <constructor-arg index="1" value="0"/>
        <constructor-arg index="2" value="0"/>
    </bean>
ducc上配置如下:
第三步 定义资源和关联类型
通过@SentinelResource可以直接在任意位置定义资源名以及对应的熔断降级或者限流方式、回调方法等,同时也可以指定关联类型,支持直接、关联、指定链路三种
    @Override
    @SentinelResource(value = "modifyGetWaybillState", fallback = "executeDegrade")
    public ExecutionResult<List<Integer>> execute(@NotNull Model imodel) {
        // 业务逻辑处理
    }

    public ExecutionResult<List<Integer>> executeDegrade(@NotNull Model imodel) {
        // 降级业务逻辑处理
    }
3.2 应用场景
组件支持任意的业务降级、限流、负载保护
四、Sentinel压测数据
4.1 压测目标
调用量:1.2W/m
应用机器内存稳定在50%以内
机器规格: 8C16G50G磁盘*2
Sentinel降级规则:
count=350-------慢调用临界阈值350ms
timeWindow=180------熔断时间窗口180s
grade=0-----降级模式 慢调用
statIntervalMs=60000------统计时长1min
4.2 压测结果
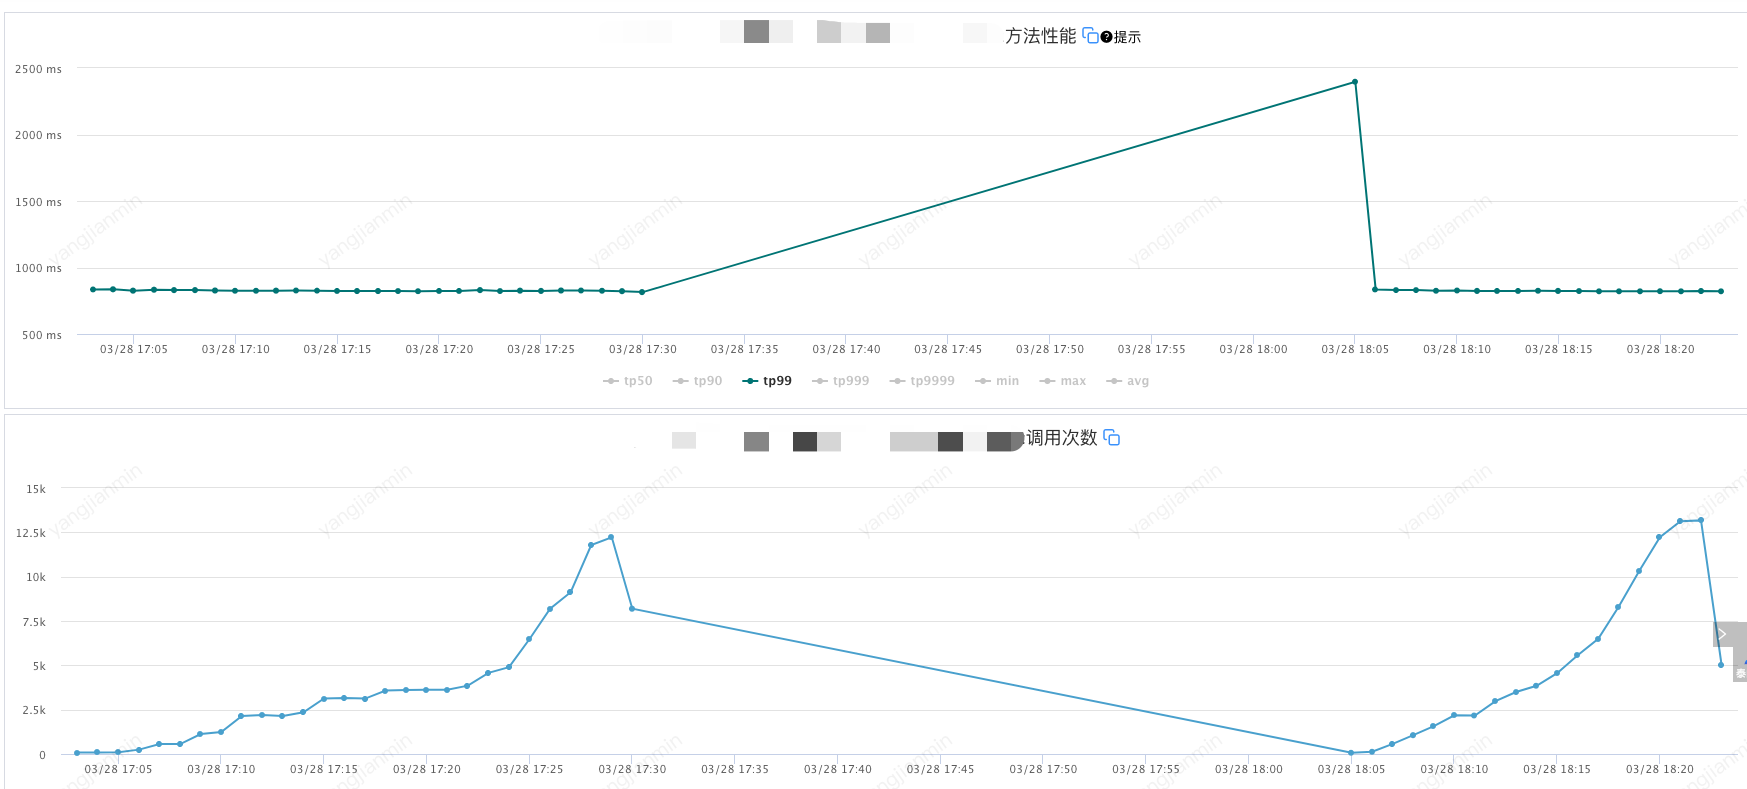
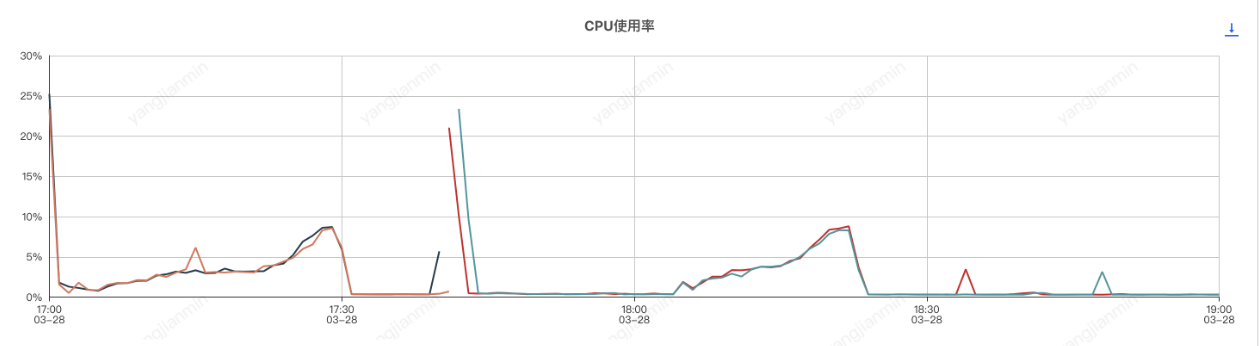
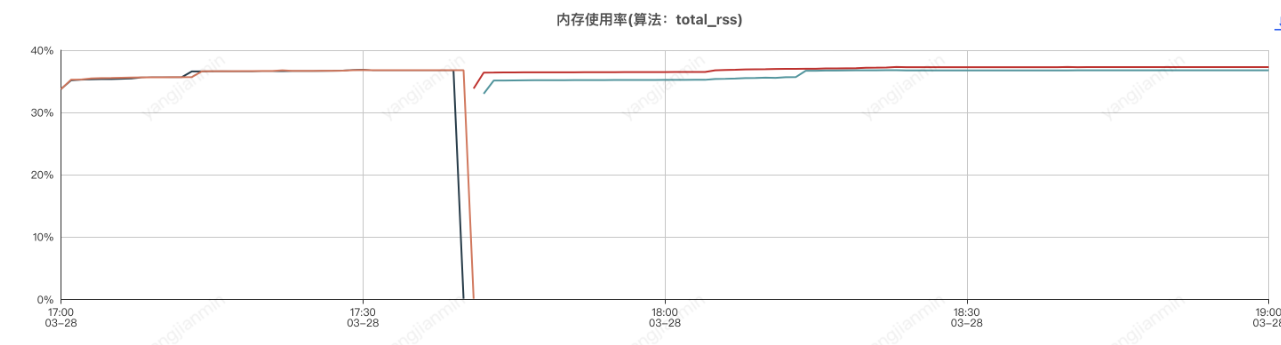
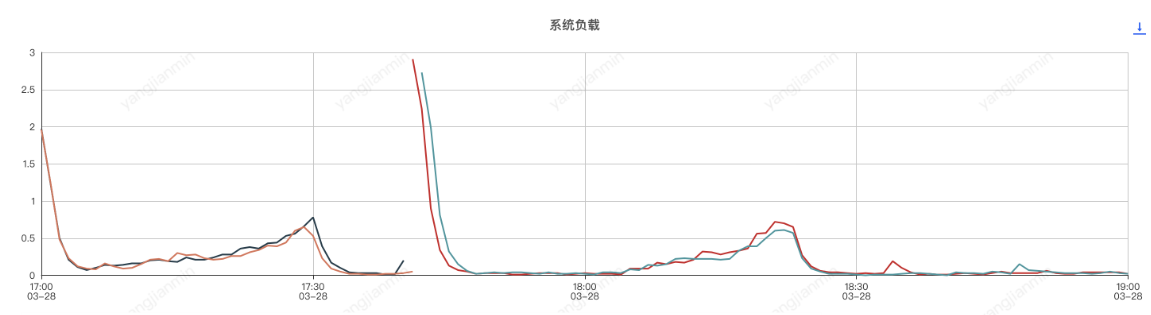
应用机器监控:
压测分为了两个阶段,分别是组件开启和组件关闭两次,前半部分是组件开启的情况,后半部分是组件关闭的情况
应用进程内存分析,和sentinel有关的前三对象是
com.alibaba.csp.sentinel.node.metric.MetricNode


com.alibaba.csp.sentinel.CtEntry


com.alibaba.csp.sentinel.context.Context


4.3 压测结论
使Sentinel组件实现系统服务自动降级或限流,由于sentinel会按照滑动窗口周期性统计数据,因此会占用一定的机器内存,使用时应设置合理的规则,如:合理的统计时长、避免过多的Sentinel资源创建等。
总体来说,使用sentinel组件对应用cpu和内存影响不大。